Engine Mount Replacement
REPLACEMENT
PROCEDURE
Disconnect the negative battery cable.
If the vehicle is equipped with an anti-theft audio system, make sure you have the correct code to reactivate the audio system before disconnecting the battery! Apply the parking brake, raise the front of the vehicle and support it on safety stands. Support the engine (see paragraph 2 above).
Right Engine Mount (passenger side)
PROCEDURE
1. This mount supports the transaxle end of the engine. The mount cushion is attached to the vehicle body and to a bracket secured to the upper part of the transmission housing. After completing the procedures listed above, support the transmission with a jack, fully unloading the right engine mount.
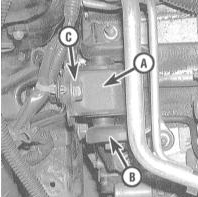
2. Remove the through bolt, then remove the mount bolts from the vehicle body and remove the rubber mount cushion.
3. Install in the reverse order.
Final tightening of the mount fasteners to the specified torque must be performed only after lowering the engine into its normal position. Proceed to paragraph 4 below.
Front Engine Mount
PROCEDURE
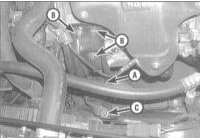
1. The front engine mount is located between the engine block and the radiator.
2. Perform the procedures described in paragraph 1 of the Right Engine Mount section, then proceed in a manner similar to the right mount (see paragraphs 2 and 3 there).
3. Install in the reverse order.
Final tightening of the mount fasteners to the specified torque must be performed only after lowering the engine into its normal position. Proceed to paragraph 4 below.
Rear Engine Mount
PROCEDURE
1. If the intake manifold is not removed, access to the mount is very limited and is only possible from under the vehicle. Loosen the through bolt and unload the mount by raising the engine with a jack.
2. Remove the mount bolts from the vehicle body, remove the through bolt, then raise the engine and free the mount from underneath.

3. Install in the reverse order.
Final tightening of the mount fasteners to the specified torque must be performed only after lowering the engine into its normal position. Proceed to paragraph 4 below.
Left Engine Mount (driver side)
PROCEDURE

1. The left engine mount is attached to the engine near the timing belt.
2. Supporting the engine, remove the fasteners (see illustration) and remove the upper mount bracket, then remove the through bolt and detach the mount cushion from the bracket.
3. Install in the reverse order.
Final tightening of the mount fasteners to the specified torque must be performed only after lowering the engine into its normal position. Proceed to paragraph 4 below.
Final Tightening of All Mount Fasteners.
4. To maximize the service life of the rubber-metal mounts and reduce noise and vibration, final tightening of the mount fasteners to the specified torque must be performed after lowering the engine into its normal position (park the vehicle on a level, flat surface).
Apply non-hardening thread sealant to the threads of the fasteners (bolts and nuts). Make sure the rubber bushings are not twisted or displaced from their seats. If more than one mount was replaced, or when installing the engine, tighten the mount fasteners in the following order:
a) Rear mount - first the bracket-to-block bolts, then the through bolt, and finally the mount-to-body bolts;
b) Fasteners (bolts/nuts).
Test yourself
A quick Honda Accord quiz: every answer comes with an explanation and a link to the manual page.