Removal and Installation of Intake Manifold
Remember that gasoline is an extremely flammable liquid! When servicing fuel system components, observe all applicable fire safety precautions. Do not smoke, and keep away from open flames or unshielded work lights. Do not service the system in a room with gas-fired appliances that have a pilot light, such as water heaters and clothes dryers. Remember that gasoline is a carcinogen that can cause cancer. Avoid skin contact with fuel. Wear protective rubber gloves. If fuel contacts your skin by accident, wash your hands thoroughly with warm water and soap. Collect spilled fuel immediately and do not store fuel-soaked rags near open flames. Remember that fuel injected vehicles have a fuel system that is always under pressure. Before disconnecting any fuel lines, relieve the residual pressure in the system (see Fuel and Exhaust Systems chapter for details). Wear safety glasses when servicing fuel system components. Always keep a Class B fire extinguisher within reach!
REMOVAL
PROCEDURE
1. Relieve the fuel system pressure (see Fuel and Exhaust Systems chapter), then disconnect the negative battery cable.
If the vehicle is equipped with a security-coded audio system, make sure you have the correct code to reactivate the audio system before disconnecting the battery!
2. Drain the cooling system (see Maintenance and Tune-Up chapter).
3. Disconnect the intake duct from the air cleaner assembly (see Fuel and Exhaust Systems chapter).
4. Label and disconnect all wiring harnesses and vacuum lines that interfere with intake manifold removal.
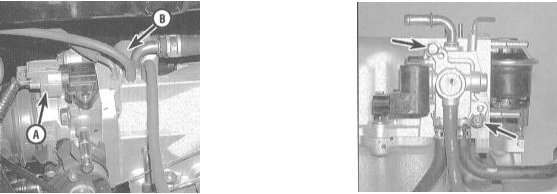
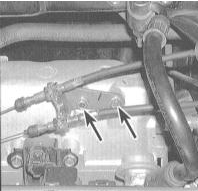
5. Disconnect the throttle cable from the throttle body. Do not remove the cables from the bracket; only remove the bracket mounting bolts.
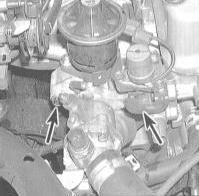
6. Remove the thermostat housing from the intake manifold.
7. Disconnect the fuel supply and return lines from the fuel rail (see Fuel and Exhaust Systems chapter).
Fuel system pressure must be relieved beforehand (see step 1)!

8. Working under the vehicle, remove the bracket supporting the intake manifold, after separating the wiring harness from it.

9. Unscrew the mounting bolts and remove the intake manifold from the engine.
The lower manifold may be removed together with the air intake plenum (upper manifold) installed on it. However, access to the mounting bolts is much easier if the plenum is removed beforehand.
INSTALLATION
PROCEDURE
1. Clean the intake manifold mounting nuts with solvent, then dry them thoroughly (use compressed air if possible).
When using compressed air, always wear safety glasses!
2. Check the flatness of the manifold mating surfaces using a special straightedge (steel ruler set on edge) and a feeler gauge. Compare the measurement results with the Specifications.
3. Before installing the EGR valve, clean it with a small brush and solvent, thoroughly removing all deposits.
4. Inspect the manifold for cracks and signs of distortion. Machine or replace a defective manifold.
5. Check the condition of the manifold fasteners (bolts/studs). Replace any defective parts.
6. Scrape remains of the old gasket material from the mating surfaces of the cylinder head and intake manifold, then wipe the surfaces with a cloth dampened with acetone.
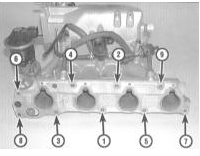
7. Select a new gasket, install the manifold in its original position and secure it by hand-tightening all nuts. Following the specified sequence, tighten the fasteners to the required torque (see Specifications). If the plenum was removed, install it in place (be sure to replace the gasket).
8. Further installation is performed in the reverse order of removal. Finally, be sure to refill the cooling system (see Chapter Maintenance and Tune-up).
Test yourself
A quick Honda Accord quiz: every answer comes with an explanation and a link to the manual page.