Powertrain Mount Control System - General Information and Functional Check
General Information
All models equipped with an automatic transaxle (AT) are fitted with an electronically controlled rear powertrain mount. The controlled parameter is engine vibration at idle. Inside the mount assembly are two chambers filled with hydraulic fluid. When the engine is idling, the Powertrain Control Module (PCM) energizes the solenoid valve mounted on the rear bulkhead of the engine compartment. This valve controls the supply of vacuum from the intake manifold to the rear powertrain mount. Changing the vacuum level applied to the mount redistributes the fluid between the internal chambers, which significantly reduces the vibration transmitted from the engine to the vehicle body. When engine speed exceeds 1000 rpm, the vacuum supply is shut off and the mount operates in passive mode as a conventional rubber mount.
INSPECTION
PROCEDURE
1. If vibration increases at idle, inspect the vacuum hoses connected to the solenoid valve for signs of leaks and mechanical damage.
2. With the engine warm and idling (below 800 rpm), have an assistant shift the transmission into gear (parking brake applied, foot brake depressed). While the assistant does this, repeatedly disconnect and reconnect the solenoid valve electrical connector. If the valve is functioning correctly, a noticeable change in vibration level should occur.
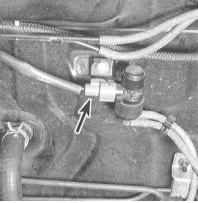
3. Place the transmission in "P" or "N", disconnect the electrical connector, and verify battery voltage at the black/yellow wire terminal. If there is no voltage, check the circuit between the connector and fuse No. 6 in the junction block on the left side under the instrument panel (refer to Chapter Body Electrical System).
4. Increase engine speed to 1000 rpm. Voltage should disappear from the black/yellow wire terminal in the valve connector. If it does not, check the wiring to the PCM for signs of a short circuit.
5. Measure the voltage between the two terminals of the connector. Battery voltage should be present. If it is not, check the circuit between the connector and the PCM.
6. Disconnect the upper vacuum hose from the solenoid valve and apply 228 mm Hg of vacuum using a hand-operated vacuum pump. The vacuum must hold for at least 20 seconds. If it does not, replace the hose or the mount assembly.
7. With the engine running, apply and release vacuum several times. A noticeable change in vibration level should occur.
8. Disconnect the lower vacuum hose from the solenoid valve and verify that intake manifold vacuum is present. If there is no vacuum, check the hose. If vacuum is present but there is no response to applied vacuum (see step 7), replace the solenoid valve.
Test yourself
A quick Honda Accord quiz: every answer comes with an explanation and a link to the manual page.