Cylinder Head Installation
PROCEDURE
1. The mating surfaces of the cylinder head and block must be absolutely clean and dry.
2. Carefully clean the mating surfaces of the cylinder head and block. Scrape off remaining old gasket material and carbon deposits, then wipe the surfaces with a rag moistened with acetone. Old gasket material left on the mating surfaces when installing the head may cause gasket sealing failure and, as a result, leaks. When working on the block, plug the cylinder bores with rags to prevent small debris and foreign objects from entering them (or, as a last resort, vacuum the cylinders thoroughly). Since the cylinder head and block are made of soft aluminum alloy, work with particular care and avoid scratching or gouging the mating surfaces (use only copper or plastic tools for scraping deposits).
3. Inspect the mating surfaces of the head and block for deep scratches, gouges and other damage. Minor defects can be removed with fine-grit sandpaper. In more serious cases, the only alternative is to resurface or replace the components. Chase the head bolt holes with a tap of the correct size. Clamp each bolt by its head in a vise in turn and run a thread chaser along its threads; old sealant, dirt and corrosion in the threads cause the actual tightening force to differ from the torque wrench reading. On F23A5 engines (non-VTEC), remove the oil spray nozzle from the block, clean it and reinstall it.
4. Place a new gasket on the block (with the "TOP" marking facing up). Apply sealant to the edges of the timing belt cover that mate with the block. Carefully install the cylinder head on the block.
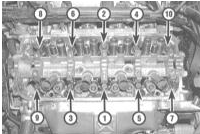
5. Lubricate the threads and underside of the bolt heads with clean engine oil and reinstall the bolts in their original positions. Following the specified sequence, tighten the cylinder head bolts in three stages to the required torque (see Specifications). Due to the critical function of these bolts, the authors of this Manual recommend observing the following precautions when tightening them:
a) It is preferable to use a torque wrench with a ratchet drive and a torque limiting device. Otherwise, work extremely carefully to avoid stripping the threads.
b) If the bolt makes any noise during installation (squealing, creaking, clicking, etc.), fully unscrew it and repeat the attempt.
6. Install the timing gear onto the camshaft journal (see Camshaft Removal, Inspection and Installation).
7. Install the remaining components in the reverse order of removal.
8. Do not forget to refill the cooling system and check the levels of all operating fluids.
9. Slowly rotate the crankshaft counterclockwise by hand for two full turns.
If resistance is felt while rotating the shaft, stop immediately to prevent damage to the valves from contact with the piston crowns, return to the initial position and check that the timing marks are correctly aligned.
10. Start the engine and check the ignition timing (see Adjustments and Routine Maintenance Chapter).
11. Warm up the engine to normal operating temperature and check for signs of leaks. Make sure the engine operates properly.
Test yourself
A quick Honda Accord quiz: every answer comes with an explanation and a link to the manual page.