Oil Pan (lower)
Exploded View
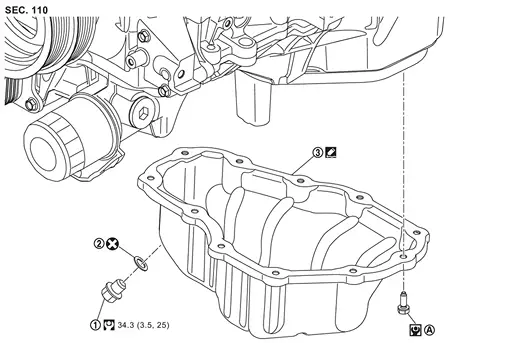
 |
Drain plug |  |
Drain plug washer |  |
Oil pan (lower) |
 |
Comply with the installation procedure when tightening. Refer to Removal and Installation. | ||||
 |
: N·m (kg-m, ft-lb) | ||||
 |
: N·m (kg-m, in-lb) | ||||
 |
: Always replace after every disassembly. | ||||
 |
: Sealing point | ||||
Removal and Installation
REMOVAL
Remove front under cover using a power tool (commercial service tool). Refer to Removal and Installation.
Remove front cross member assembly.
Drain engine oil. Refer to Draining.
Remove engine oil level sensor. Refer to Disassembly and Assembly.
Loosen mounting bolts in the order from 11 to 1 as shown in the figure.
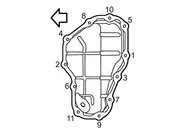
| : Engine front |
Insert seal cutter [SST: KV10111100 (NI-37228)] (A) between oil pan (upper) and oil pan (lower).
Since factory default liquid gasket has better adhesion than conventional one, never pick the area forcibly with a screw driver.
INSTALLATION
Follow the procedure below to install the oil pan (lower). Apply gasket fluid (Genuine Silicone RTV Sealant or equivalent) to the position shown in the figure, making sure that there are no breaks or overlaps.

|
:Oil pan (lower) |
 |
:φ3.4 - 4.4 mm (0.134 - 0.173 in) |
 |
:7.5 - 9.5 mm (0.295 - 0.374 in) |
Install oil pan (lower).
Tighten mounting bolts in two steps in the order from 1 to 11 as shown in the figure.
: Engine front : 6,9 N·m
Install oil pan drain plug.
Install in the reverse order of removal after this step.
Inspection
INSPECTION AFTER REMOVAL
Clean oil strainer if any object is attached.
INSPECTION AFTER INSTALLATION
Check the engine oil level and adjust engine oil. Refer to Inspection.
Start engine, and check there is no leakage of engine oil.
Stop engine and wait for 10 minutes.
Check the engine oil level again. Refer to Inspection.