Oil Pan (upper)
Exploded View
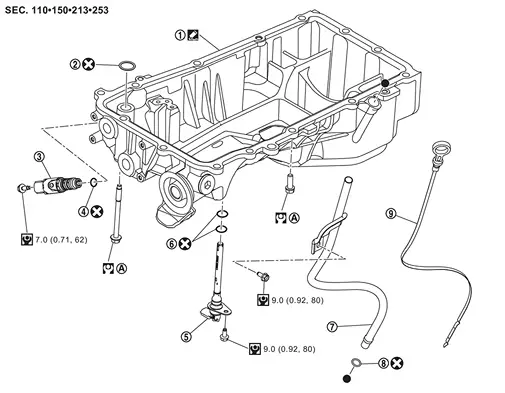
 |
Oil pan (upper) |  |
O-ring 1 |  |
Engine oil pressure control solenoid valve |
 |
O-ring 2 |  |
Engine oil level sensor |  |
O-ring 3 |
 |
Oil level gauge guide |  |
O-ring 4 |  |
Oil level gauge |
 |
Comply with the installation procedure when tightening. Refer to Disassembly and Assembly. | ||||
 |
: N·m (kg-m, ft-lb) | ||||
 |
: N·m (kg-m, in-lb) | ||||
 |
: Always replace after every disassembly. | ||||
 |
: Sealing point | ||||
 |
: Indicates that the parts is connected at points with same symbols in actual vehicle. | ||||
Disassembly and Assembly
REMOVAL
Remove main muffler. Refer to EXHAUST SYSTEM : Removal & Installation.
Remove front propeller shaft. (4WD models) Refer to Removal and Installation.
Remove rear propeller shaft. Refer to following :
2WD models: Refer to Removal and Installation.
4WD models with rear final drive (R240): Refer to Removal and Installation.
4WD models with rear final drive [R240(DL)]: Refer to Removal and Installation.
Remove front final drive assembly. (4WD models) Refer to Removal and Installation.
Remove front stabilizer. Refer to Removal and Installation.
Remove A/T assembly. Refer to following:
2WD models: Refer to Removal and Installation.
4WD models: Refer to Removal and Installation.
Remove oil level gauge and oil level gauge guide.
Drain engine oil. Refer to Draining.
Remove oil filter. Refer to Removal and Installation.
Remove oil cooler.Refer to Removal and Installation.
Remove engine oil level sensor .
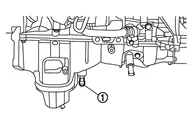
Remove oil pan (lower). Refer to Removal and Installation.
Remove engine oil pressure control solenoid valve .

Loosen mounting bolts in the order from 14 to 1 as shown in the figure using a power tool (commercial service tool) to remove.
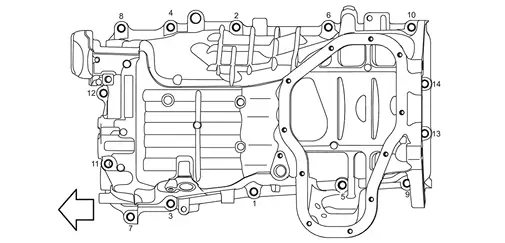
| : Engine front |
Insert the seal cutter [SST: KV10111100 (NI-37228)] between oil pan (upper) and lower cylinder block. Slide seal cutter by tapping on the side of tool with a hammer. Remove oil pan (upper).
Remove O-ring from bottom of lower cylinder block .

| : Engine front |
INSTALLATION
Install oil pan (upper) as follows:Use a scraper (A) to remove old liquid gasket from mating surfaces.

Also remove old liquid gasket from mating surface of lower cylinder block.
Remove old liquid gasket from the bolt holes and threads.
on the bottom of lower cylinder block . | : Engine front |
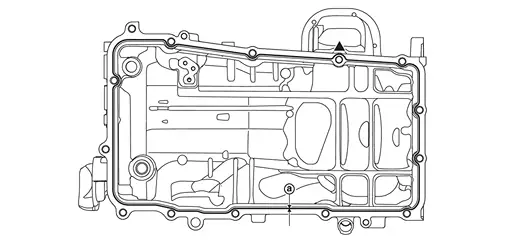
 |
: φ3.4 - 4.4 mm (0.134 - 0.173 in) |
Use Genuine RTV Silicone Sealant or an equivalent. Refer to Recommended Chemical Products and Sealants.
Install oil pan (upper).Tighten mounting bolts to the torque specified below in the order from 1 to 14 as shown in the figure.
: 17,9 N·m : Engine front
Install oil pan (lower). Refer to Removal and Installation.
Install oil pan drain plug.
the figure of components on the prior page for installation direction of drain plug washer. Refer to Removal and Installation.
Install in the reverse order of removal after this step.
Inspection
INSPECTION AFTER REMOVAL
Clean oil strainer if any object is attached.
INSPECTION AFTER INSTALLATION
Check the engine oil level and adjust engine oil. Refer to Inspection.
Start engine, and check there is no leakage of engine oil.
Stop engine and wait for 10 minutes.
Check the engine oil level again. Refer to Inspection.