Cylinder Head
Exploded View
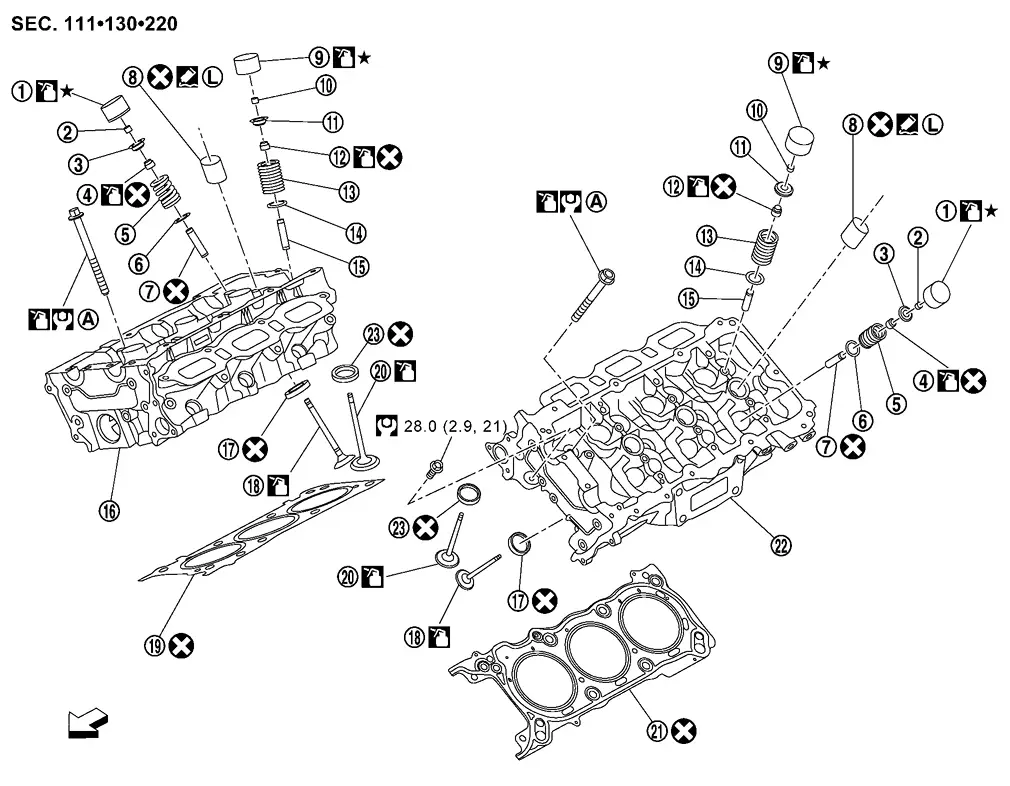
 |
Valve lifter (EXH) |  |
Valve collet (EXH) |  |
Valve spring retainer (EXH) |
 |
Valve oil seal (EXH) |  |
Valve spring (EXH) |  |
Valve spring seat (EXH) |
 |
Valve guide (EXH) |  |
Spark plug tube |  |
Valve lifter (INT) |
 |
Valve collet (INT) |  |
Valve spring retainer (INT) |  |
Valve oil seal (INT) |
 |
Valve spring (INT) |  |
Valve spring seat (INT) |  |
Valve guide (INT) |
 |
Cylinder head (bank 1) |  |
Valve seat (EXH) |  |
Valve (EXH) |
 |
Cylinder head gasket (bank 1) |  |
Valve (INT) |  |
Cylinder head gasket (bank 2) |
 |
Cylinder head (bank 2) |  |
Valve seat (INT) | ||
 |
Comply with the assembly procedure when tightening. Refer to Removal & Installation. | ||||
| : Engine front | |||||
 |
: N·m (kg-m, ft-lb) | ||||
 |
: Always replace after every disassembly. | ||||
 |
: Should be lubricated with oil. | ||||
  : Sealing point with locking sealant. |
|||||
 |
: Select with proper thickness. | ||||
Removal & Installation
DISASSEMBLY
Remove the following parts:
Intake manifold: Refer to Removal and Installation.
Spark plug: Refer to Removal & Installation.
Rocker cover: Refer to Removal and Installation.
Intake manifold: Refer to Removal and Installation.
Fuel tube and fuel injector assembly: Refer to Removal and Installation.
Timing chain: Refer to Removal and Installation.
Camshaft: Refer to Removal & Installation.
Turbocharger: Refer to Removal & Installation.
Remove cylinder head bolts in the order from 8 to 1 (bank 1 ), and for (bank 2  ), from 10 to 1 as shown in the figure with cylinder head bolt wrench (commercial service tool) and power tool to remove cylinder heads (bank 1 and bank 2).
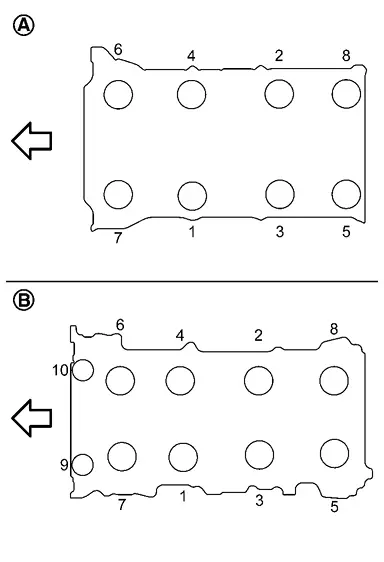
| : Engine front |
Remove cylinder head gaskets.
Remove valve lifter.
Identify installation positions, and store them without mixing them up.
Remove valve collet.
Compress valve spring with the valve spring compressor [SST: KV10116200 (NI-26336-A)] (A), the attachment [SST: KV10115900 (NI-26336-20)] (C) and the adapter [SST: KV10109220 ( — )] (B). Remove valve collet with a magnet hand.

Remove valve spring retainer, valve spring and valve spring seat.
Push valve stem to combustion chamber side, and remove valve.
Identify installation positions, and store them without mixing them up.
Remove valve oil seal using the valve oil seal puller [SST: KV10107902 (NI-38959)] (A).
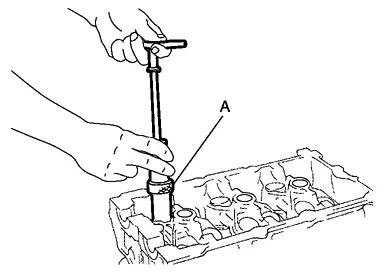
Remove valve seat, if valve seat must be replaced.
Bore out old seat until it collapses. Boring should not continue beyond the bottom face of the seat recess in cylinder head. Set the machine depth stop to ensure this.Refer to CylinderHead.
Remove valve guide, if valve guide must be replaced.To remove valve guide, heat cylinder head to 110 to 130 °C by soaking in heated oil .
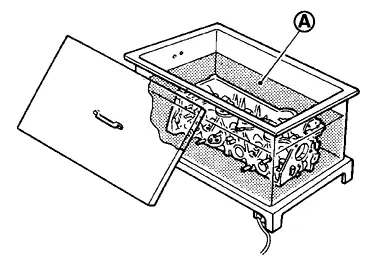
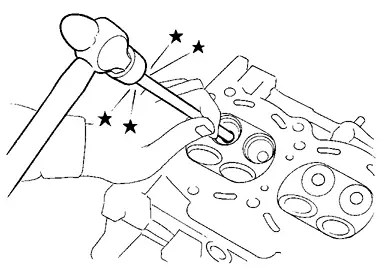
ASSEMBLY
If valve guide is removed in step 10 (DISASSEMBLY), install it.
Replace with oversized [0.2 mm (0.008 in)] valve guide.
Using the valve guide reamer (commercial service tool) (A), ream cylinder head valve guide hole.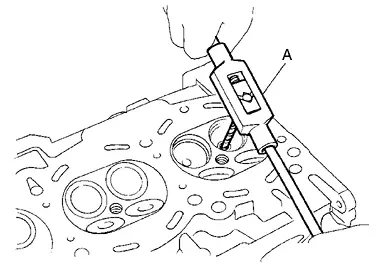
| Oversize (service) [0.2 mm (0.008 in)]: | ||
| : Refer to CylinderHead. | ||
. 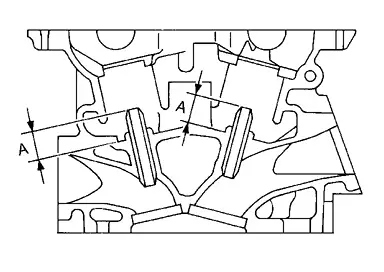
| Projection (A) | ||
| : Refer to CylinderHead. | ||
| Standard | : Refer to CylinderHead. |
If valve seat is removed in step 9 (DISASSEMBLY), install it.
Replace with oversize [0.5 mm (0.020 in)] valve seat.
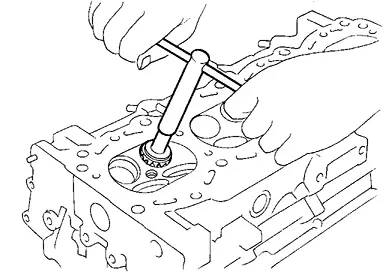
Ream cylinder head recess diameter for service valve seat.

| Oversize (service) [0.5 mm (0.020 in)]: | |
| : Refer to CylinderHead. | |
Be sure to ream in circles concentric to valve guide center. This will enable valve to fit correctly.
. 
Install new valve oil seals as follows.Apply new engine oil on new valve oil seal joint and seal lip. Using the valve oil seal drift [SST: KV10115600 (NI-38958)] (A), press fit valve seal to height  shown in figure.
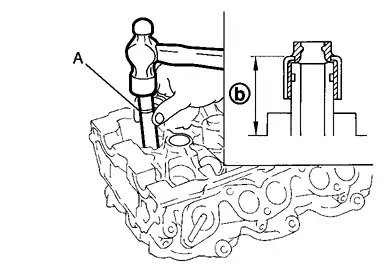
| Height (INT) |
: 14.3 - 14.9 mm (0.563 - 0.587 in) |
| Height (EXH) |
: 15.75 - 16.35 mm (0.6201 - 0.6437 in) |
Install valve spring seat.
Install valve.
Install new cylinder head gaskets.
Turn crankshaft until No. 1 piston is set at TDC.
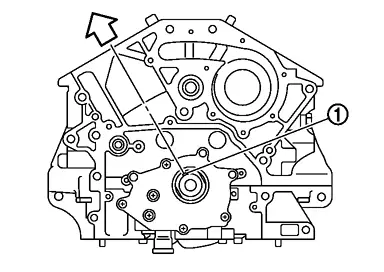
|
: Crankshaft key |
| : Bank 1 side |
Crankshaft key should line up with the cylinder center line (bank 1) as shown in the figure.
Install cylinder head, and tighten cylinder head bolts in numerical order as shown in figure as follows:
|
: Bank 1 |
|
: Bank 2 |
| : Engine front |
Use the cylinder head bolt wrench [special service tool: ST10120000 (NI-24239-01)] and power tool.
: 40 N·m Turn cylinder head bolts in the order from 1 to 8 by 115 degrees clockwise (angle tightening). 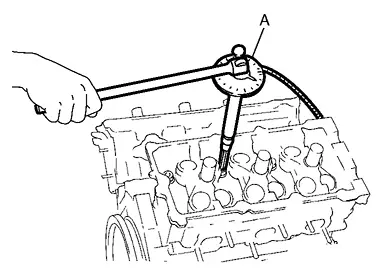
Check tightening angle indicated on the angle wrench indicator plate.
: 28 N·m Install valve spring (with valve spring seat).
Install large diameter side of valve spring (valve spring seat side) to cylinder head side
.
: Valve spring seat Confirm identification color
of valve spring.Intake : Pink Exhaust : Yellow
Install valve spring retainer.
Install valve collet.
Compress valve spring with the valve spring compressor [SST: KV10116200 (NI-26336-A)] (A), the attachment [SST: KV10115900 (NI-26336-20)] (C) and the adapter [SST: KV10109220 ( — )] (B). Install valve collet with a magnet hand.
Tap valve stem edge lightly with plastic hammer after installation to check its installed condition.
Install valve lifter.
Install it in the original position.
Install spark plug tube.
Press-fit spark plug tube as follows:
Use high strength thread locking sealant or equivalent.
Using drift, press-fit spark plug tube so that its height (A) is as specified in the figure.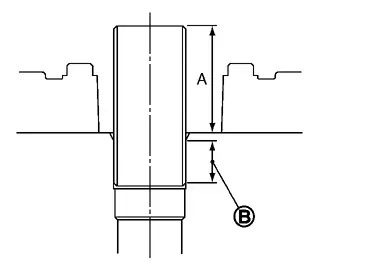
|
: High strength thread locking sealant application area |
| Standard press-fit height: | |
| : 37.7 - 38.7 mm (1.484 - 1.524 in) | |
Install spark plug. Refer to Removal & Installation.
Install in the reverse order of removal after this step.
Inspection
INSPECTION AFTER DISASSEMBLY
Cylinder Head Bolts Outer Diameter
Cylinder head bolts are tightened by plastic zone tightening method. Whenever the size difference between
and exceeds the limit, replace them with new one.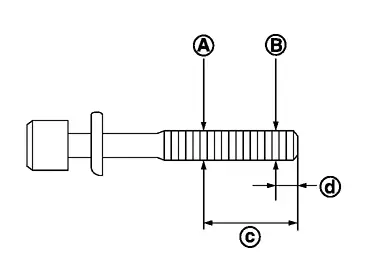

: 50.5 mm (1.988 in) 
: 11 mm (0.43 in) Limit [ - ]: 0.16 mm (0.0063 in) If reduction of outer diameter appears in a position other than
, use it as point.
Cylinder Head Distortion
Using a scraper, wipe off oil, scale, gasket, sealant and carbon deposits from surface of cylinder head.
At each of several locations on bottom surface of cylinder head, measure the distortion in six directions , ,  ,
 ,
 , and
 ).
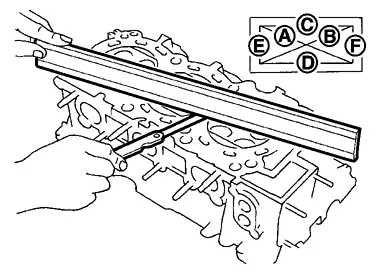
| Limit | : Refer to CylinderHead. |
If it exceeds the limit, replace cylinder head.
Valve Dimensions
Check the dimensions of each valve. For the dimensions, Refer to CylinderHead.
If dimensions are out of the standard, replace valve and check valve seat contact. Refer to “VALVE SEAT CONTACT”
Valve Guide Clearance
Valve Stem Diameter
Measure the diameter of valve stem with micrometer (A).
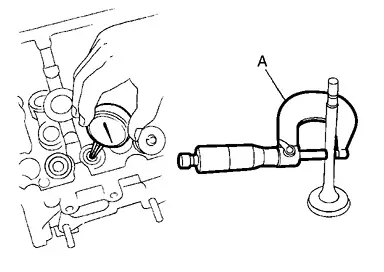
Standard : Refer to CylinderHead.
Valve Guide Inner Diameter
Measure the inner diameter of valve guide with bore gauge.
Standard : Refer to CylinderHead.
Valve Guide Clearance
(Valve guide clearance) = (Valve guide inner diameter) – (Valve stem diameter)
Standard : Refer to CylinderHead.
If the calculated value exceeds the limit, replace valve and/or valve guide. When valve guide must be replaced, Refer to Removal & Installation.
Valve Seat Contact
After confirming that the dimensions of valve guides and valves are within the specifications, perform this procedure.
Apply prussian blue (or white lead) onto contacting surface of valve seat to check the condition of the valve contact on the surface.
Check if the contact area band is continuous all around the circumference.
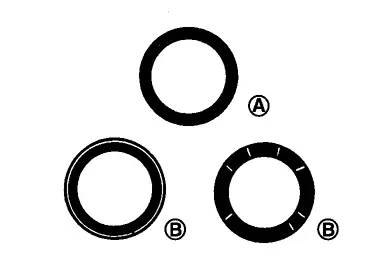
: OK : NG If not, grind to adjust valve fitting and check again. If the contacting surface still has “NG” conditions even after the recheck, replace valve seat. Refer to Exploded View.
Valve Spring Squareness
Set a try square (A) along the side of valve spring and rotate spring. Measure the maximum clearance
between the top of spring and try square.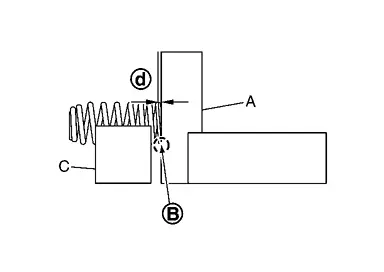
: Contact C : V-block Limit : Refer to CylinderHead. If it exceeds the limit, replace valve spring.
Valve Spring Dimensions and Valve Spring Pressure Load
Check the valve spring pressure at specified spring height.
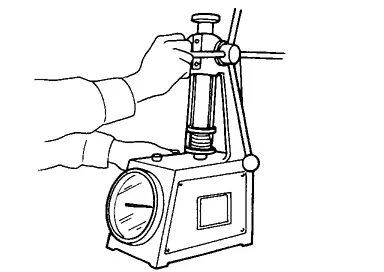
Standard :Refer to CylinderHead. If the installation load or load with valve open is out of the standard, replace valve spring.
INSPECTION AFTER INSTALLATION
Inspection for Leakage
The following are procedures for checking fluid leakage, lubricant leakage.
Before starting engine, check oil/fluid levels including engine coolant and engine oil. If any are less than the required quantity, fill them to the specified level. Refer to Fluids and Lubricants.
Follow the procedure below to check for fuel leakage.
Turn ignition switch to the “ON” position (with engine stopped). With fuel pressure applied to fuel piping, check for fuel leakage at connection points.
Start engine. With engine speed increased, check again for fuel leakage at connection points.
Run engine to check for unusual noise and vibration.
Warm up engine thoroughly to check that there is no leakage of fuel, or any oil/fluids including engine oil and engine coolant.
Bleed air from lines and hoses of applicable lines, such as in cooling system.
After cooling down engine, again check oil/fluid levels including engine oil and engine coolant. Refill them to the specified level, if necessary.
Summary of the inspection items: Items Before starting engine Engine running After engine stopped Engine coolant Level Leakage Level Engine oil Level Leakage Level Transmission / transaxle fluid AT & CVT Models Leakage Level / Leakage Leakage MT Models Level / Leakage Leakage Level / Leakage Other oils and fluids* Level Leakage Level Fuel Leakage Leakage Leakage Exhaust gases — Leakage — *: Power steering fluid, brake fluid, etc.