Oil Pan Removal and Installation
GENERAL INFORMATION
A standard sealant, such as Loctite, is used to seal the oil pan. Warning: Do not apply too much sealant; be especially careful near the bolt holes. Parts must be assembled within 5 minutes after applying the sealant. After this time, the sealant must be removed and reapplied. RemovalPROCEDURE
1. Disconnect the negative battery cable.
Warning: This will erase electronic memory, such as the engine fault code memory or radio code. Before disconnecting the battery, read the instructions in subsection 7.
2.
2. Raise the vehicle.
3. Remove the engine undercover.
4. Drain the engine oil.
5. Remove the center member.
6. Remove the exhaust tail pipe.
7. Remove the oil pan bolts.
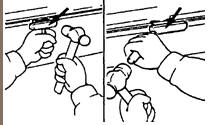
8. Drive a wedge into the seal between the cylinder block and the oil pan (arrows indicate the seal locations). In workshops, the KV-10111100 tool is used for this, inserted between the cylinder block and the oil pan.
9. If the tool is not available, an old knife may be used. Carefully tap the knife between the block and the oil pan with a hammer.
Warning: Never pry off the oil pan with a screwdriver or chisel without first cutting the seal. When removing, be careful not to damage the oil pan mating surface.
10. Remove the oil pan.
11. It is recommended that, with the oil pan removed, the oil strainer be removed and cleaned with cold cleaner.
12. Check the strainer for damage, such as tears, and replace if necessary.
Installation
PROCEDURE
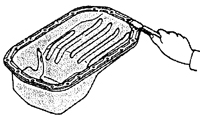
1. Carefully clean the sealing surfaces of the oil pan and block of residual sealant using a triangular scraper and a razor blade.
2. Carefully wipe the block, crankshaft mechanism, and oil pump. Otherwise, oil will drip onto the oil pan seal.
3. Install the oil strainer with a new gasket and tighten to 20 N·m.
4. Degrease and dry the mating surfaces of the oil pan and cylinder block. Alcohol or acetone can be used as a cleaner.
Warning: Do not use cleaners that attack the paint surface.
5. Insert new gaskets into both semicircular recesses of the oil pan and apply sealant to the ends on both sides.
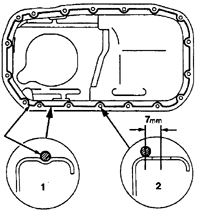
6. Apply a sealant bead 4–5 mm wide around the entire perimeter of the oil pan sealing surface. Apply the sealant bead between the bolt holes into the groove (1) of the oil pan. Apply a sealant bead to the bolt holes (2) on the inner side of the oil pan at a distance of 7 mm.
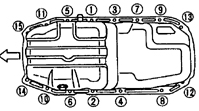
7. Install the oil pan onto the cylinder block. Tighten the bolts by hand first, then in a crisscross pattern (1 through 15) to 8 N·m.
Warning: Wait 30 minutes before filling with oil to allow the sealant to set.
8. Install the exhaust tail pipe.
9. Install the center member.
10. Install the engine undercover.
11. Lower the vehicle.
12. Fill with engine oil.
13. Connect the negative battery cable.
14. If equipped, set the clock and enter the radio security code.
15. Perform a road test, check the oil level and the oil pan seal for leaks. If necessary, carefully retighten all bolts.
Test yourself
A quick Nissan Sunny quiz: every answer comes with an explanation and a link to the manual page.