Toothed Belt
GENERAL INFORMATION
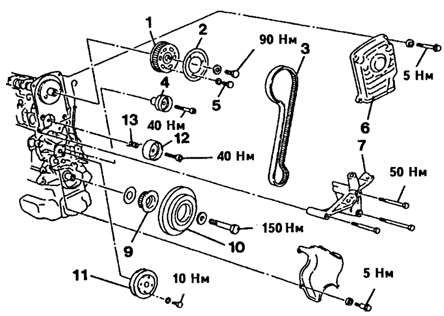
Camshaft Drive
1. Front camshaft sprocket
2. Side plate
3. Timing belt
4. Intermediate roller
5. Mounting bolt, 7 N·m. (apply thread-locking compound)
6. Upper timing belt cover
7. Center timing belt cover section
9. Crankshaft sprocket
10. Crankshaft pulley
11. Coolant pump pulley
12. Tensioner roller
13. Return spring
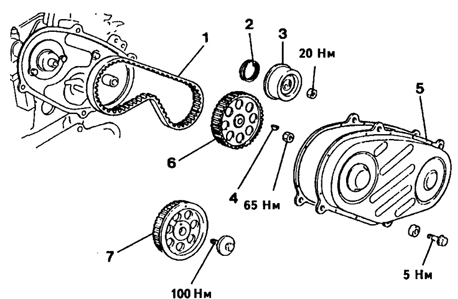
High-Pressure Fuel Injection Pump Drive
Removal of crankshaft sprocket
2. Spring
3. Tensioner roller
4. Woodruff key
5. Timing belt cover
6. Injection pump sprocket
7. Rear camshaft sprocket
CAMSHAFT DRIVE Removal
PROCEDURE
1. Disconnect the ground cable from the battery.
Warning This will erase electronic memory, such as the radio code. Before disconnecting the battery, read the instructions in subsection 7.
2.
2. Unscrew the cylinder head cover.
3. Set the piston of cylinder 1 to TDC.
4. To do this, place the transmission in neutral and apply the parking brake.
5. Turn the crankshaft by the center bolt in the direction of engine rotation (clockwise) until the mark on the crankshaft pulley aligns with the pointer on the engine block.
6. At the same time, the camshaft must be positioned so that the cams of cylinder 1 face up.
7. If not, turn the crankshaft one full revolution forward in the direction of engine rotation.
8. Alternative method of turning the crankshaft: raise the front of the vehicle on one side, engage 5th gear and turn the wheel by hand.
9. Raise the engine with a jack and a block of wood to relieve the front engine mount.
10. Unscrew the front engine mounting bracket.
11. Remove the generator V-belt.
12. If equipped, remove the power steering pump and air conditioning compressor V-belt.
Warning After the engine is set to TDC, shut off the transmission and check again that the mark on the crankshaft pulley aligns with the pointer on the engine block; correct if necessary. If the marks align, never change the engine position.
13. Remove the water pump pulley.
14. Lock the engine and unscrew the crankshaft pulley mounting bolt.
15. To lock the engine, engage 5th gear and have an assistant depress the brake pedal.
16. Remove the crankshaft pulley using a standard puller.
Warning The puller hooks must engage only the back side of the pulley.
17. Remove the upper and lower timing belt covers.
18. If the old belt will be reused, mark it. Draw an arrow on the belt with a marker indicating the direction of rotation. The engine rotates clockwise.
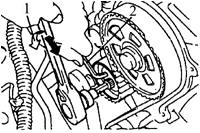
19. Turn the tensioner roller bolt with an Allen key in the direction of arrow (1), and turn the tensioner roller with a second wrench (2) counterclockwise until the timing belt is loosened. Retighten the tensioner roller bolt.
20. Unscrew the side plate from the camshaft sprocket.
21. Unscrew the intermediate roller.
22. Remove the timing belt from the crankshaft sprocket.
Warning Do not change the TDC positions of the camshaft and crankshaft further. If the camshaft must be turned with the timing belt removed, make sure the crankshaft is not at TDC (otherwise there is a risk of damaging valves and pistons). To do this, mark the crankshaft sprocket position (apply a colored mark to the crankshaft sprocket and the cylinder block). Then turn the crankshaft sprocket 1/4 turn (90°) forward or backward. Installation
PROCEDURE
1. Check the condition of the timing belt.
2. Check the tensioner for rust, damage and smooth operation.
3. If removed, install the crankshaft gear side plate so that the chamfered part faces the engine.
4. Make sure the camshaft and crankshaft are at TDC for No. 1 piston. The crankshaft segment key should point vertically upward at TDC.
5. Tighten the idler pulley to 40 N·m.
6. Install the timing belt with the crankshaft gear. Observe the rotation direction mark made during removal. A used belt must rotate only in the same direction as before.
7. Tighten the crankshaft pulley to 150 N·m.
8. To hold the crankshaft, engage 5th gear and have an assistant depress the brake pedal.
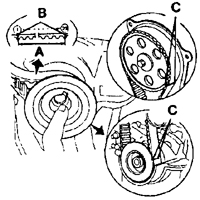
9. Align the white mark on the timing belt with the marks on the camshaft and crankshaft gears (C). The marks (B) on the timing belt are spaced 43 teeth apart (dimension A).
10. The arrow on the timing belt must point toward the cover.
11. Tighten the camshaft gear side plate bolts to 7 N·m. Apply Loctite to the bolts beforehand.
12. Loosen the belt tensioner clamping bolt so that the tensioner presses on the belt.
13. Turn the crankshaft 2 revolutions clockwise. The tensioner will apply the correct belt tension.
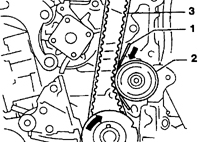
14. Before completing the 2nd revolution, insert the flat feeler gauge (1) from above, at the arrow between the timing belt (3) and the idler gear (2). Feeler gauge dimensions: width 12.5 mm, length 150 mm, thickness 0.3 mm.
15. Tighten the tensioner clamping bolt to 40 N·m, holding the roller from turning with a wrench. Otherwise belt tension may decrease.
16. Check the TDC position of the camshaft and crankshaft again. With the timing belt tensioned, all TDC marks must align at the same time. If necessary, repeat the adjustment.
17. Turn the crankshaft slightly counterclockwise and remove the feeler gauge.
18. Tighten the lower and upper covers to 5 N·m.
19. Tighten the crankshaft pulley center bolt to 120 N·m.
20. To hold the crankshaft, engage 5th gear and have an assistant depress the brake pedal.
21. Tighten the cooling system water pump pulley to 10 N·m.
22. Install the V-belt.
23. Tighten the cylinder head cover.
24. Tighten the cooling system water pump pulley.
25. Tighten the front engine undercover.
26. Connect the battery ground cable.
INJECTION PUMP DRIVE Removal
PROCEDURE
1. Set No. 1 cylinder piston to TDC.
2. Remove the air duct with the air filter.
3. Remove the timing belt cover.
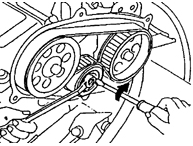
4. Loosen the idler pulley nut with a bent open-end wrench and push the idler pulley with a screwdriver in the direction of the arrow until the timing belt becomes slack.
5. Retighten the idler pulley nut.
WARNING: To protect the idler pulley, wrap the screwdriver with cloth.
6. Remove the belt.
WARNING: Do not change the TDC position of the camshaft and injection pump gear while the timing belt is removed. Installation
PROCEDURE
1. Check the condition of the timing belt.
2. Check the tensioner for rust, damage and smooth operation.
3. Make sure the camshaft and injection pump are at TDC for No. 1 piston.
4. Install the timing belt.
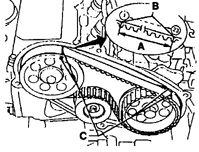
5. Align the white marks on the belt with the marks on the camshaft gear and injection pump gear (C). The marks (B) on the belt are spaced at dimension A – 23 teeth.
6. The arrow on the timing belt must point toward the cover.
7. Loosen the tensioner clamping nut so that the tensioner presses on the belt.
8. Turn the crankshaft 2 revolutions clockwise. The tensioner will apply the correct tension to the timing belt.
WARNING: Do not turn the engine by the camshaft gear, otherwise the timing belts will be overloaded.
9. Tighten the tensioner clamping nut to 20 N·m, holding the idler pulley with a screwdriver. Otherwise the timing belt tension may decrease.
10. Check the TDC setting of the camshaft and injection pump again. With the timing belt tensioned, all TDC marks must align at the same time. If necessary, repeat the adjustment.
11. Tighten the timing belt cover to 5 N·m.
12. Install the air duct with the air filter.
Test yourself
A quick Nissan Sunny quiz: every answer comes with an explanation and a link to the manual page.