Diagnostic System
DIAGNOSTIC SYSTEM
CHECK WHICH SYSTEMS (ECU AND SENSORS) USING CAN COMMUNICATION ARE INSTALLED
(a) The systems (ECU and sensors) that use CAN communication vary depending on the vehicle and optional equipment. Check which systems (ECU and sensors) are installed on the vehicle.
(1) Techstream Screen and Installed Systems
HINT:
The names of the ECUs and sensors displayed on the Techstream screen may differ from those shown in the DTC by ECU table.
Connects to | Code | ECU / Sensor Name | Techstream Display | Applicability |
|---|---|---|---|---|
- |
CGW |
Central Gateway ECU (Network Gateway ECU) |
- |
Installed on all vehicles |
- |
DLC3 |
DLC3 |
- |
Installed on all vehicles |
Bus 1 |
BSM |
Left blind spot monitor sensor |
Main Blind Spot Monitor Control |
Vehicles with blind spot monitor system |
F-CAM |
Front Area Recognition Camera |
Front Camera Module |
Vehicles with Toyota Safety Sense P |
|
F-MR |
Millimeter wave radar sensor assembly |
Front Radar |
Vehicles with Toyota Safety Sense P |
|
Bus 2 |
ENG |
ECM |
ECM (Engine) |
Installed on all vehicles |
Bus 3 |
Front |
Radio and Display Receiver Assembly |
Display and Navigation (AVN) |
Vehicles with radio receiver and display |
DCM |
DCM (Telematics Transceiver) |
DCM |
Vehicles with telematics transceiver |
|
Bus 4 |
STR |
Steering angle sensor |
Spiral Cable (Steering Angle Sensor) |
Installed on all vehicles |
EPS |
Power steering ECU assembly |
Electric Power Steering (EPS) |
Installed on all vehicles |
|
BRK |
Brake Actuator Assembly |
Skid Control (ABS/VSC/TRAC) |
Installed on all vehicles |
|
OCS |
Occupant Detection ECU |
Occupant Detection |
Vehicles equipped with occupant detection ECU |
|
SRS |
Airbag sensor assembly |
Airbag |
Installed on all vehicles |
|
Bus 5 |
d'A/C |
Air Conditioning Amplifier Assembly |
Air Conditioning Amplifier |
Installed on all vehicles |
SMT |
Certification ECU (Smart Key ECU Assy) |
Certification (Smart) |
Vehicles equipped with the smart key system |
|
MB |
Main body ECU (multiplex network body ECU) |
Main body |
Installed on all vehicles |
|
MET |
Combination meter assembly |
Instrument cluster |
Installed on all vehicles |
|
LIT |
Left Headlight ECU Subassembly |
Headlight swivel (AFS) |
Vehicles with LED headlights |
NOTICE:
The following communication bus check screen is for example only. This screen differs from the actual vehicle screen.
Description of the "Communication Bus Check" Screen
HINT:
All ECUs and sensors normally connected to the CAN communication system are displayed on the Techstream.
(a) Select "Communication Bus Check" on the Techstream menu screen.
CAN Bus CheckHINT:
If the items are not selected correctly on the vehicle specification pop-up screen, the name of the CAN junction connector to which the ECUs or sensors are connected may not be displayed on the "Communication Bus Check" screen.
(b) Make sure that the "Communication Bus Check" screen is displayed and that the ECUs and sensors that are correctly connected to the CAN communication system are displayed.
HINT:
- Even if an ECU or sensor connected to a bus that is controlled by a bus control ECU (ECU with gateway function) is not communicating, it remains displayed on the "Communication Bus Check" screen.
- If an ECU or sensor connected to a bus that is not controlled by a bus control ECU (ECU with gateway function) is not displayed on the "Communication Bus Check" screen, it means that it is not communicating.
(c) The default setting of the display selected in the combo box is ALL. When searching for ECUs or sensors on a specific bus, select the bus from the drop-down list. ALL, each bus, each sub bus and Central Gateway are listed in the drop-down list.
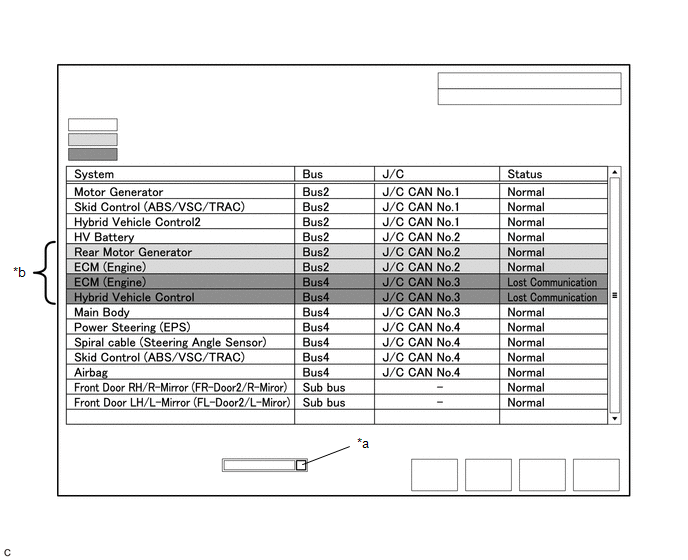
*a |
Combo box |
*b |
The background color is red or yellow |
Item | Details |
|---|---|
Combo box: ALL |
Displays all ECUs and sensors connected to the central bus and sub buses. |
Combo box: Bus |
Displays the ECUs and sensors connected to the selected bus. |
Combo box: Sub bus |
Displays the ECUs and sensors connected to the selected sub bus. |
Combo box: Central Gateway |
Displays all ECUs and sensors connected to the central bus. |
NOTICE:
- When using the combined area, it may be possible to select a secondary bus (in the drop-down list) that has no ECUs or sensors connected. This is not a malfunction. It occurs when no optional device is connected to a secondary bus monitored by a secondary bus control ECU (ECU equipped with the gateway function).
- The drop-down list shows all sub buses applicable to the model (for example, LIN communication sub buses are also shown). For more information on the sub buses required to diagnose the CAN communication system, refer to the system diagram.
Click here

HINT:
The background color of an ECU or sensor changes depending on its connection status, as shown in the following table.
Description of the "Communication Bus Check" ScreenBus type | Background color | Connection status |
|---|---|---|
Bus |
White |
Communication has been normal. |
Yellow |
At least one communication stop has occurred since the start of the CAN bus check, but communication is currently established (unstable communication). |
|
Red |
Communication is currently not established (one of the following cases):
|
|
Not displayed |
This is one of the following cases:
|
|
Sub bus with a gateway ECU that does not store the connected ECUs or sensors*2 |
White |
Communication has been normal since the start of the CAN bus check. |
Yellow |
At least one communication stop has occurred since the start of the CAN bus check, but communication is currently established (unstable communication). |
|
Red |
Communication has occurred at least once since the start of the CAN bus check, but is not currently established. |
|
Not displayed |
The communication stop has continued since the start of the CAN bus check.*1 |
|
Sub bus with a gateway ECU that stores the connected ECUs and sensors*3 |
White |
Communication has been normal. |
Yellow |
At least one communication stop has occurred since the start of the CAN bus check, but communication is currently established (unstable communication). |
|
Red |
Communication is currently not established (one of the following cases):
|
|
Not displayed |
This is one of the following cases:
|
- Relay signals of the ECU with gateway function between the ECUs and sensors connected to the different buses.
- *1: An ECU or sensor is installed on the vehicle, but is not displayed on the "Communication Bus Check" screen.
- *2: The ECU with gateway function does not store the ECUs and sensors connected to its respective sub bus.
- *3: The ECU with gateway function stores the ECUs and sensors connected to its respective sub bus.
- *4: When the central gateway ECU (network gateway ECU) has an internal malfunction or cannot communicate with the Techstream, the bus names, sub buses, ECUs and sensors will not be displayed.
- *5: When no ECU or sensor is connected to a bus, the message "There is no system found on the communication Bus." is displayed.
- *6: When an ECU with gateway function cannot communicate with the central gateway ECU (network gateway ECU), the sub bus names and the ECUs or sensors connected to the sub bus are not displayed.
- *7: When no ECU or sensor is connected to the sub bus, the message "There is no system found on the communication Bus." is displayed.
- If there is no communication between the Techstream and the vehicle, or if no ECU or sensor is displayed as connected, check the central gateway ECU (network gateway ECU) and the diagnosis bus (bus connecting the DLC3 to the central gateway ECU (network gateway ECU)) for malfunctions.
(d) Monitor the screen for changes in the connection status of the ECUs or sensors for 2 minutes.
HINT:
- If an open occurs in any of the wires of the CAN sub bus, it may interfere with communication of other ECUs or sensors, causing an incorrect status to be displayed.
- If the connection status changes intermittently during the check, repair the open circuit in the branch line of the ECU or sensor that is not communicating, then perform the communication bus check again.
NOTICE:
The following communication bus check screen is for example only. This screen differs from the actual vehicle screen.
Description of the "Communication Bus Check (Detail)" Screen
HINT:
The communication error history of ECUs or sensors that have a communication error history can be displayed on the "Communication Bus Check (Detail)" screen.
(a) Select "Communication Bus Check" on the Techstream menu screen.
CAN Bus CheckHINT:
If the items are not selected correctly on the vehicle specification pop-up screen, the name of the CAN junction connector to which the ECUs or sensors are connected may not be displayed on the "Communication Bus Check" screen.
(b) Select "Detail" on the "Communication Bus Check" screen.
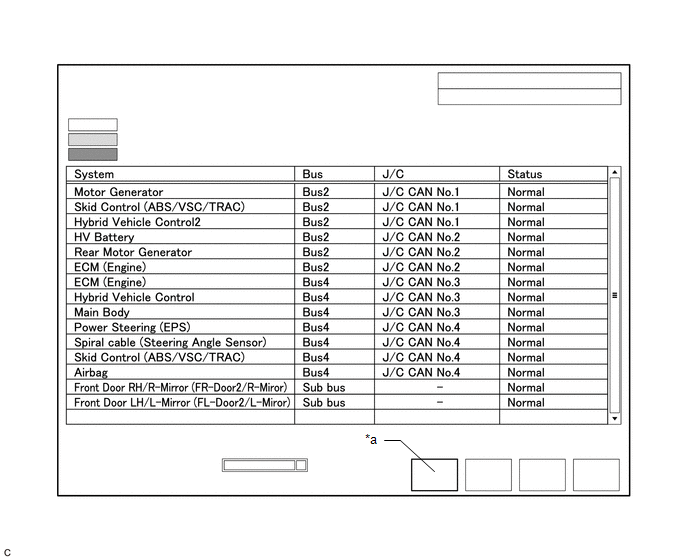
*a |
Communication Bus Check (Detail) |
- |
- |
(c) Check that the "Communication Bus Check (Detail)" screen is displayed and that the communication error history of the ECUs or sensors up to now is displayed.
HINT:
- Lost Communication Time and Lost Communication Trip are displayed only for the central bus.
- Lost Communication Time and Lost Communication Trip are not displayed for branch buses.
(d) The default setting of the display selected in the combo box is ALL. When searching for a specific bus for ECUs or sensors, select the bus from the drop-down list. ALL, each bus, each sub bus and Central Gateway are listed in the drop-down list.
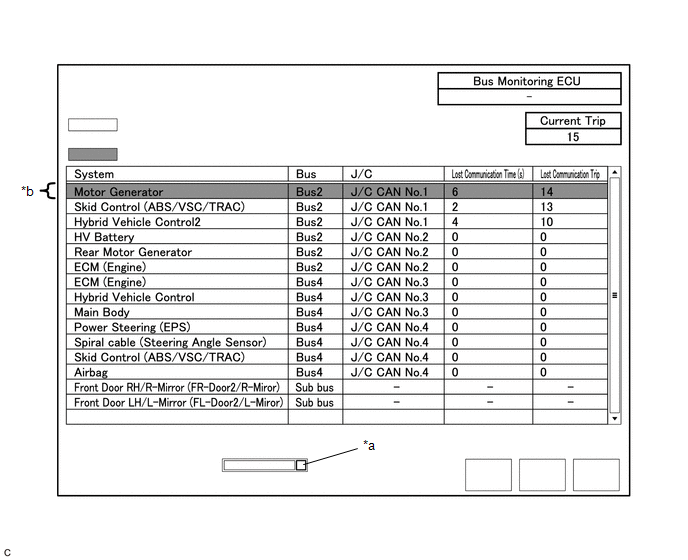
*a |
Combo box |
*b |
The background color is red. |
Item | Details |
|---|---|
Combo box: ALL |
Displays all ECUs and sensors connected to the central bus and sub buses. |
Combo box: Bus |
Displays the ECUs and sensors connected to the selected bus. |
Combo box: Sub bus |
Displays the ECUs and sensors connected to the selected sub bus. |
Combo box: Central Gateway |
Displays all ECUs and sensors connected to the central bus. |
Bus Control ECU |
Displays the ECU equipped with the gateway function that controls the bus or the sub bus. |
Current Trip |
Displays the total number of cycles up to now* |
Lost Communication Time(s) |
Displays the longest period of time in seconds during which the ECU or sensor connected to the central bus was not communicating. |
Lost Communication Trip |
Displays the cycle in which the longest period of time during which the ECU or sensor connected to the central bus was not communicating occurred. |
- *: If the component part has been replaced with a new part, the total number of cycles after replacement is displayed.
NOTICE:
- The Lost Communication Time column displays the longest period of time in seconds during which the Central Gateway ECU (Network Gateway ECU) detected a communication stop in the respective ECU or sensor.
- The Lost Communication Trip column displays the cycle in which the Central Gateway ECU (Network Gateway ECU) detected the longest communication stop in the respective ECU or sensor.
- When using the combined area, it may be possible to select a secondary bus (in the drop-down list) that has no ECUs or sensors connected. This is not a malfunction. It occurs when no optional device is connected to a secondary bus monitored by a secondary bus control ECU (ECU equipped with the gateway function).
- The drop-down list shows all sub buses applicable to the model (for example, LIN communication sub buses are also shown). For more information on the sub buses required to diagnose the CAN communication system, refer to the system diagram.
Click here
HINT:
The background color of an ECU or sensor changes depending on its connection status, as shown in the following table.
Description of the "Communication Bus Check (Detail)" ScreenBus type | Background color | Connection status |
|---|---|---|
Bus |
White |
This is one of the following cases:
|
Red |
The lost communication time is 6 seconds or more. |
|
Not displayed |
This is one of the following cases:
|
|
Sub bus |
White |
The lost communication time is displayed as "-". |
Not displayed |
This is one of the following cases:
|
- If there is no communication between the Techstream and the vehicle, or if no ECU or sensor is displayed as connected, check the central gateway ECU (network gateway ECU) and the diagnosis bus (bus connecting the DLC3 to the central gateway ECU (network gateway ECU)) for malfunctions.
- Lost Communication Time and Lost Communication Trip are not displayed for branch buses.
- *1: When the Central Gateway ECU (Network Gateway ECU) has an internal malfunction or cannot communicate with the Techstream, the bus names, sub buses, ECUs and sensors will not be displayed.
- *2: When no ECU or sensor is connected to a bus, the message "There is no system found on the communication Bus." is displayed.
- *3: When an ECU equipped with the gateway function cannot communicate with the Central Gateway ECU (Network Gateway ECU), the sub bus names and the ECUs or sensors connected to the sub bus are not displayed.
- *4: When no ECU or sensor is connected to the sub bus, the message "There is no system found on the communication Bus." is displayed.
Communication Bus Check (Communication Malfunction Check)
HINT:
The DTCs related to CAN communication are displayed for each ECU on the Techstream.
(a) Select "Communication Bus Check" on the Techstream menu screen.
CAN Bus Check(b) Select "Communication Malfunction Check" on the "Communication Bus Check" screen.
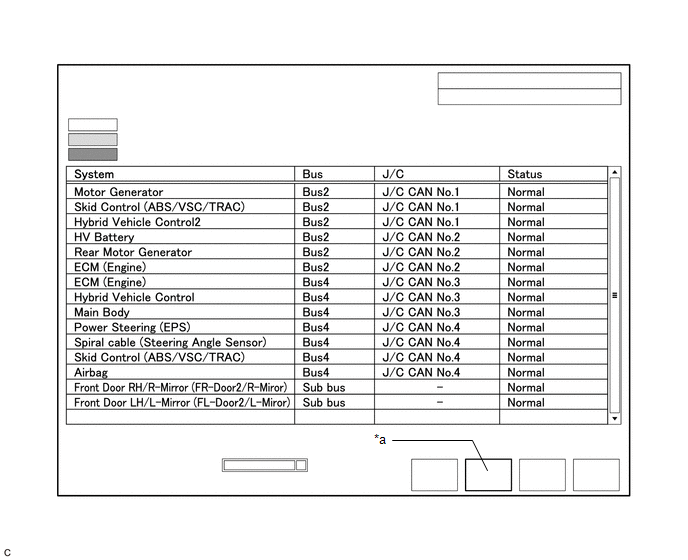
*a |
Communication Malfunction Check |
- |
- |
(c) Check that the "Communication Malfunction Check" screen is displayed and that the CAN communication DTCs of each ECU are displayed.
HINT:
If no CAN communication DTCs are stored, no DTCs are displayed.
How to Use the "Communication Bus Check" Screen During Troubleshooting
NOTICE:
The following CAN bus wiring diagram or communication bus check screen is for reference only. The wiring diagram on the screen differs from that of the vehicle.
HINT:
- If the CAN communication system malfunctions, it is recommended to use the communication bus check rather than the communication DTCs to identify the suspect area.
- Turn the ignition switch ON, or perform the operations necessary to reproduce the trouble symptom, select "Communication Bus Check" and wait approximately 2 minutes. Check the communication status of each ECU or sensor on the screen during this time.
(a) If the CAN communication system malfunctions, identify the suspect area using the communication bus check as follows:
Symptom TableExample of Trouble Symptom | Displayed on the communication bus check screen | Suspected Area |
|---|---|---|
A |
Almost all ECUs and sensors connected to the malfunctioning CAN bus are displayed as not communicating on the "Communication Bus Check" screen. |
|
B |
ECUs or sensors farther from the Central Gateway ECU (Network Gateway ECU) than the open circuit in the wire harness are displayed as not communicating on the "Communication Bus Check" screen. |
Open circuit in both wires of a main bus line in the central bus |
C |
An ECU or sensor is displayed as not communicating on the "Communication Bus Check" screen. |
|
D |
No ECU or sensor is displayed on the "Communication Bus Check" screen. |
|
E |
An ECU or sensor is displayed as not communicating on multiple buses on the "Communication Bus Check" screen. |
|
F |
Some ECUs or sensors are displayed as not communicating on the central bus, and other ECUs or sensors are displayed as not communicating on a sub bus. |
|
G |
An ECU with Access Portal function is displayed as not communicating on the central bus, and the ECUs and sensors connected to their respective sub buses are not displayed. |
|
H |
An ECU or sensor is displayed as not communicating on a sub bus on the "Communication Bus Check" screen. |
|
I |
ECUs or sensors farther from the sub bus control ECU (ECU with Access Portal function) than the open circuit in the cables are displayed as not communicating on the "Communication Bus Check" screen. |
Open circuit in both wires of a main bus line in a sub bus |
(b) Example of Problem Symptom A
Malfunction details |
|
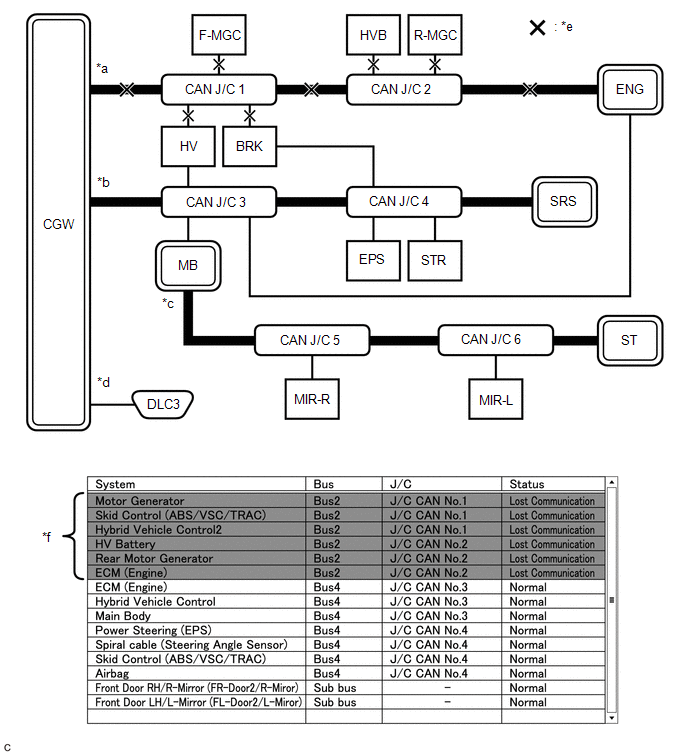
*a |
Bus 2 |
*b |
Bus 4 |
*c |
Sub bus |
*d |
Diagnostic bus |
*e |
Malfunction location |
*f |
The background color is red. |
HINT:
- Due to a malfunction, almost all ECUs and sensors connected to bus 2 are displayed as not communicating, and their background color is red.
- The malfunction in bus 2 does not affect the other buses.
- The defective part can be identified by checking for an open circuit in the main bus line, a short circuit between the bus lines, or a short to +B or ground.
- Be sure to perform the resistance measurement of the buses to determine the cause of the malfunction.
Malfunction details |
|
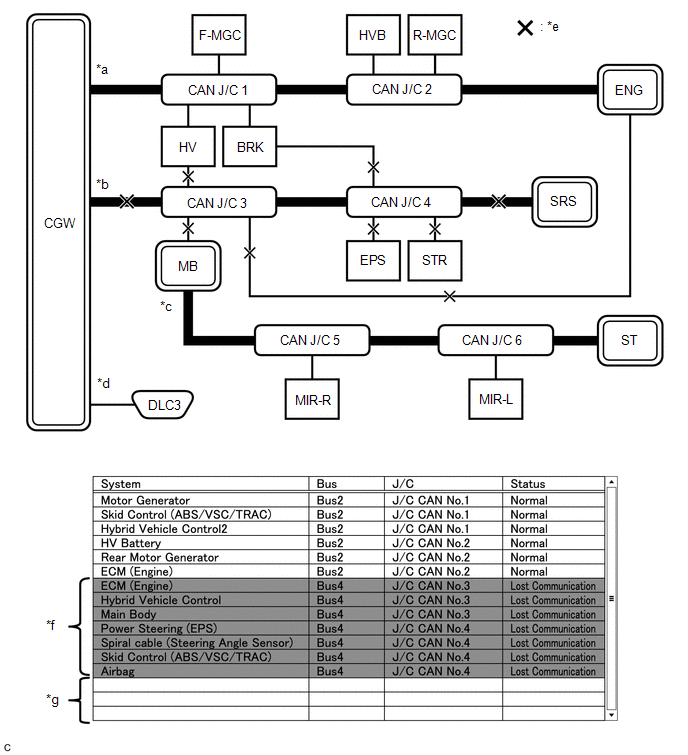
*a |
Bus 2 |
*b |
Bus 4 |
*c |
Sub bus |
*d |
Diagnostic bus |
*e |
Malfunction location |
*f |
The background color is red. |
*g |
Not displayed |
- |
- |
HINT:
- Due to a malfunction, almost all ECUs and sensors connected to bus 4 are displayed as not communicating, and their background color is red.
- The malfunction will not affect the other buses of the central bus. However, the sub bus connected to bus 4 is likely affected. The ECU with Access Portal function connected to bus 4 is not communicating, so the sub bus and its respective ECUs and sensors controlled by the ECU with Access Portal function (sub bus control ECU) are not displayed, indicating that the ECU with Access Portal function is not communicating with the central Access Portal ECU (Network Access Portal ECU).
- The defective part can be identified by checking for an open circuit in the main bus line, a short circuit between the bus lines, or a short to +B or ground.
- Be sure to perform the resistance measurement of the buses to determine the cause of the malfunction.
(c) Example of Problem Symptom B
Malfunction details |
Open circuit in both wires of the main bus line between CGW 1 and CAN junction connector No. 1 in bus 2 |
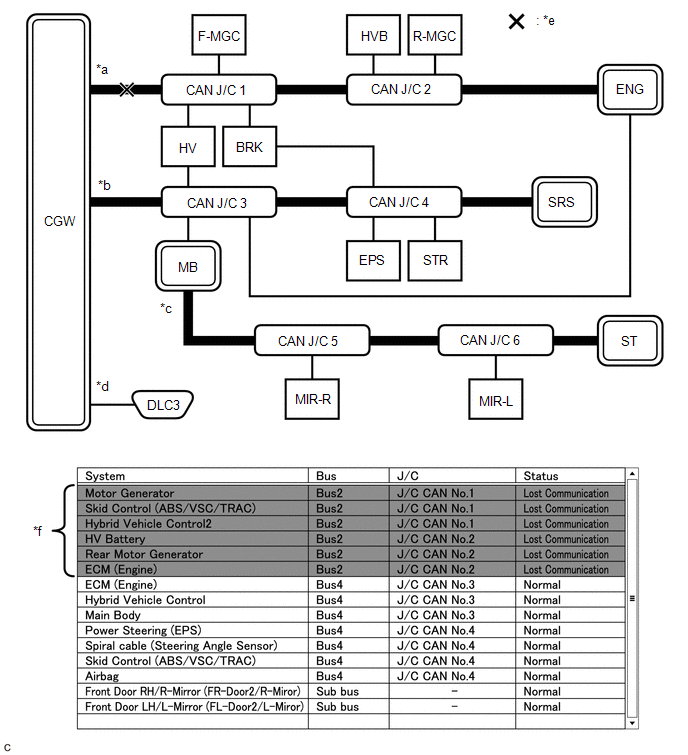
*a |
Bus 2 |
*b |
Bus 4 |
*c |
Sub bus |
*d |
Diagnostic bus |
*e |
Malfunction location |
*f |
The background color is red. |
HINT:
- Due to a malfunction, almost all ECUs and sensors connected to bus 2 are displayed as not communicating, and their background color is red.
- The malfunction in bus 2 does not affect the other buses.
- The defective part can be identified by checking for an open circuit in the main bus line.
- Be sure to perform the resistance measurement of the buses to determine the cause of the malfunction.
Malfunction details |
Open circuit in both wires of the main bus line between CAN junction connector No. 1 and CAN junction connector No. 2 in bus 2 |
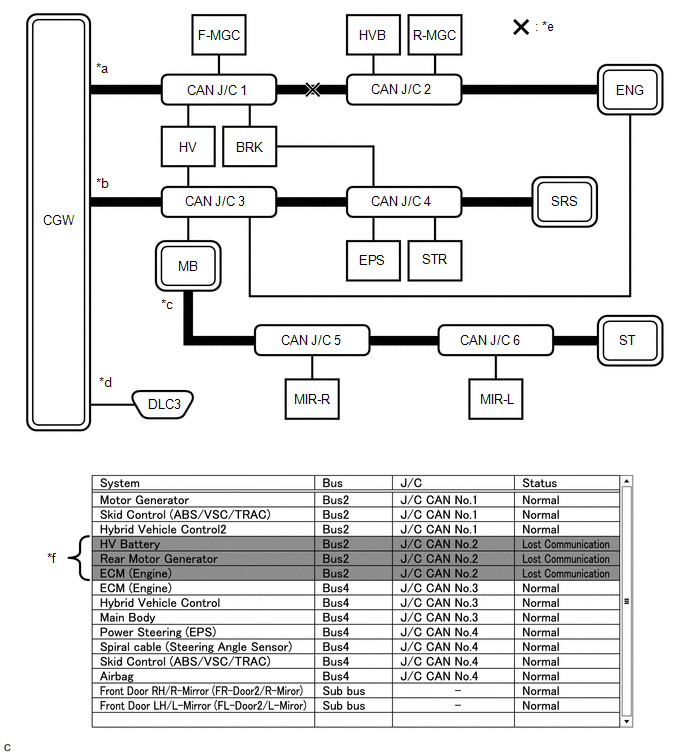
*a |
Bus 2 |
*b |
Bus 4 |
*c |
Sub bus |
*d |
Diagnostic bus |
*e |
Malfunction location |
*f |
The background color is red. |
HINT:
- Due to a malfunction, ECUs or sensors farther from the CGW than the open circuit in the cables are displayed as not communicating, and their background color is red.
- The malfunction in bus 2 does not affect the other buses.
- The defective part can be identified by checking for an open circuit in the main bus line.
- Be sure to perform the resistance measurement of the buses to determine the cause of the malfunction.
Malfunction details |
Open circuit in both wires of the main bus line between CAN junction connector No. 2 and ENG in bus 2 |
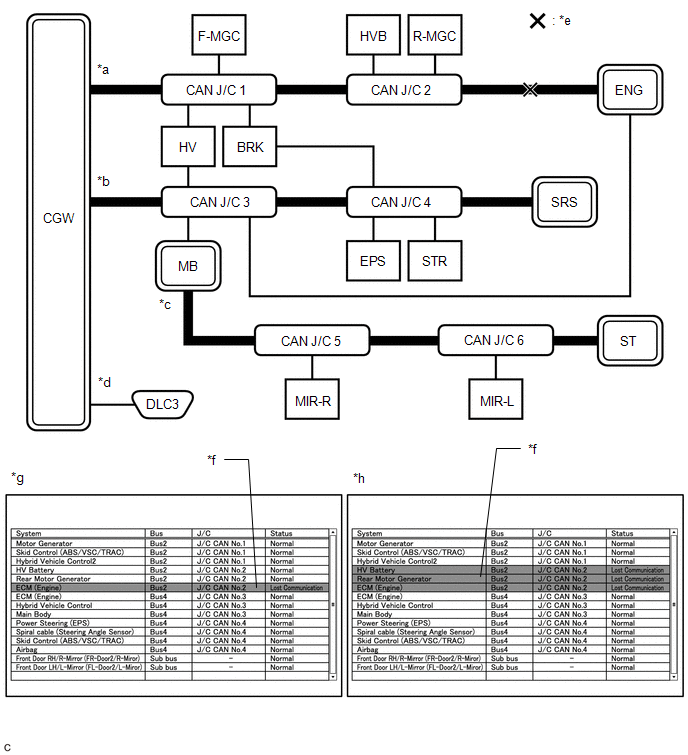
*a |
Bus 2 |
*b |
Bus 4 |
*c |
Sub bus |
*d |
Diagnostic bus |
*e |
Malfunction location |
*f |
The background color is red. |
*g |
Sequence 1 |
*h |
Sequence 2 |
HINT:
- Even when the same part of the main bus line has an open circuit, the information displayed on the "Communication Bus Check" screen may differ depending on the internal electrical noise, which changes depending on the position of the open circuit in the line.
- In example 2, the information displayed may be the same as when there is a break in both wires of the main bus line between CAN junction connector No. 1 and CAN junction connector No. 2. In this case, it may be difficult to identify the faulty part.
- The malfunction in bus 2 does not affect the other buses.
- Be sure to perform the resistance measurement of the buses to determine the cause of the malfunction.
(d) Example of Malfunction Symptom C
Malfunction details |
Open in both wires of the branch line connected to F-MGC on bus 2 |
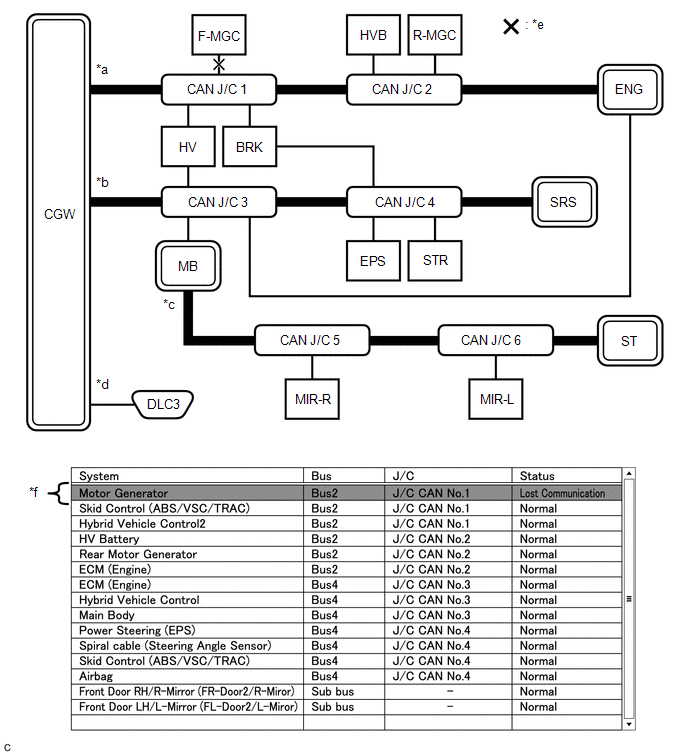
*a |
Bus 2 |
*b |
Bus 4 |
*c |
Sub bus |
*d |
Diagnostic bus |
*e |
Malfunction location |
*f |
The background color is red. |
HINT:
The information displayed on the Communication Bus Check screen is the same for an open in both wires of a branch line, an internal malfunction of an ECU or sensor, or a malfunction in the power supply to an ECU or sensor. In this example, the background color of the malfunctioning ECU or sensor is red.
Malfunction details |
|
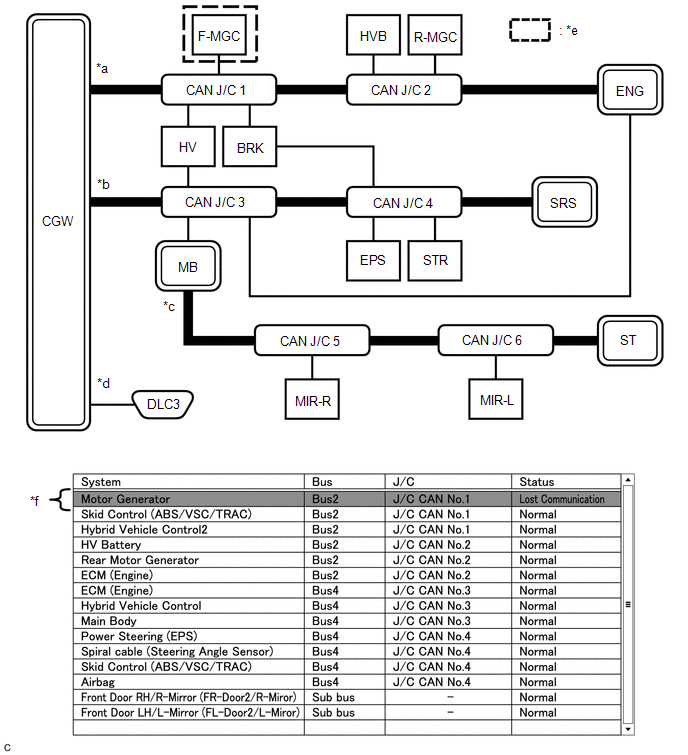
*a |
Bus 2 |
*b |
Bus 4 |
*c |
Sub bus |
*d |
Diagnostic bus |
*e |
Malfunction location |
*f |
The background color is red. |
HINT:
The information displayed on the Communication Bus Check screen is the same for an open in both wires of a branch line, an internal malfunction of an ECU or sensor, or a malfunction in the power supply to an ECU or sensor. In this example, the background color of the malfunctioning ECU or sensor is red.
Malfunction details |
Open in both wires of the branch line connected to ENG on bus 4 |
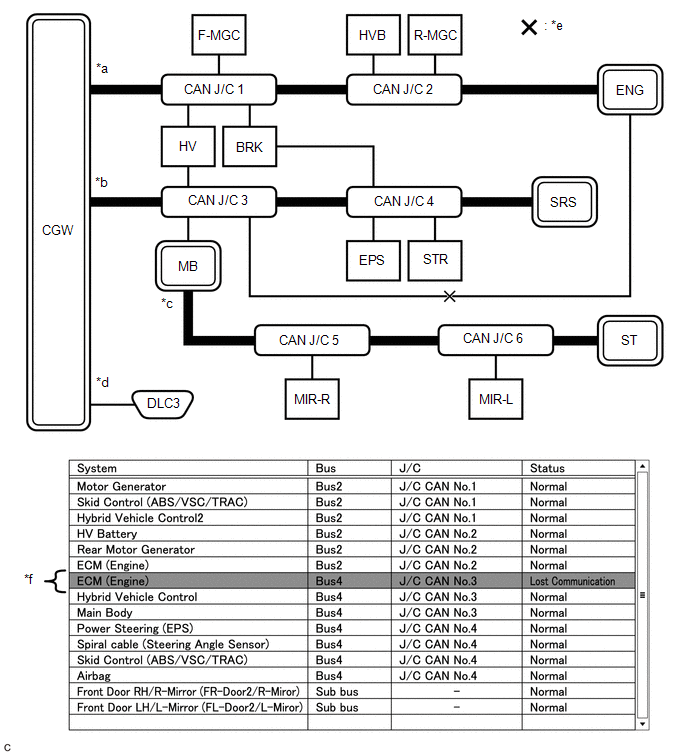
*a |
Bus 2 |
*b |
Bus 4 |
*c |
Sub bus |
*d |
Diagnostic bus |
*e |
Malfunction location |
*f |
The background color is red. |
HINT:
- The malfunction on bus 4 does not affect the other buses.
- Due to the malfunction, even though ENG communicates normally with CGW via bus 2, it does not communicate with CGW via bus 4. Therefore, it is displayed as not communicating on bus 4.
(e) Example of Malfunction Symptom D
Malfunction details |
|
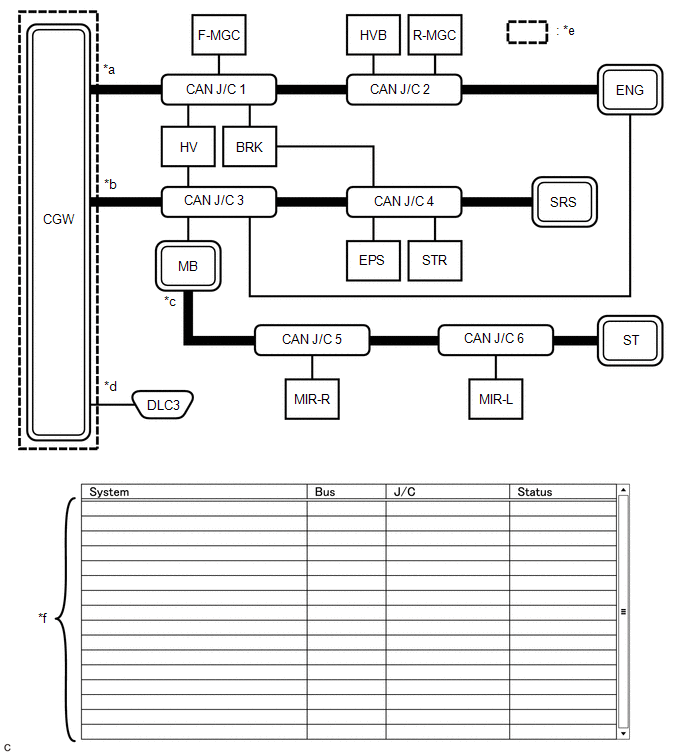
*a |
Bus 2 |
*b |
Bus 4 |
*c |
Sub bus |
*d |
Diagnostic bus |
*e |
Malfunction location |
*f |
Not displayed |
HINT:
When there is no communication between the vehicle and Techstream, no ECU or sensor is displayed.
Malfunction details |
Open in both wires of the branch lines of the diagnostic bus |
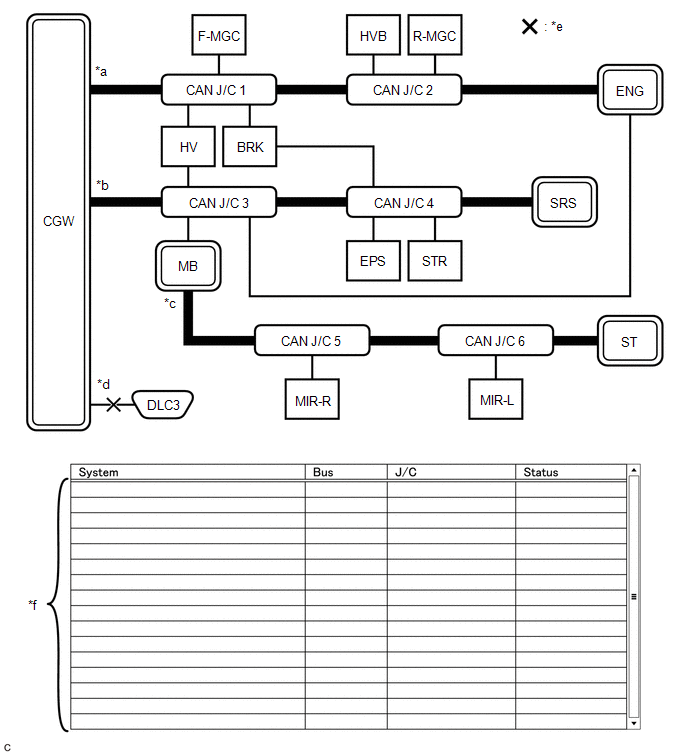
*a |
Bus 2 |
*b |
Bus 4 |
*c |
Sub bus |
*d |
Diagnostic bus |
*e |
Malfunction location |
*f |
Not displayed |
HINT:
When there is no communication between the vehicle and Techstream, no ECU or sensor is displayed.
(f) Example of Malfunction Symptom E
Malfunction details |
|
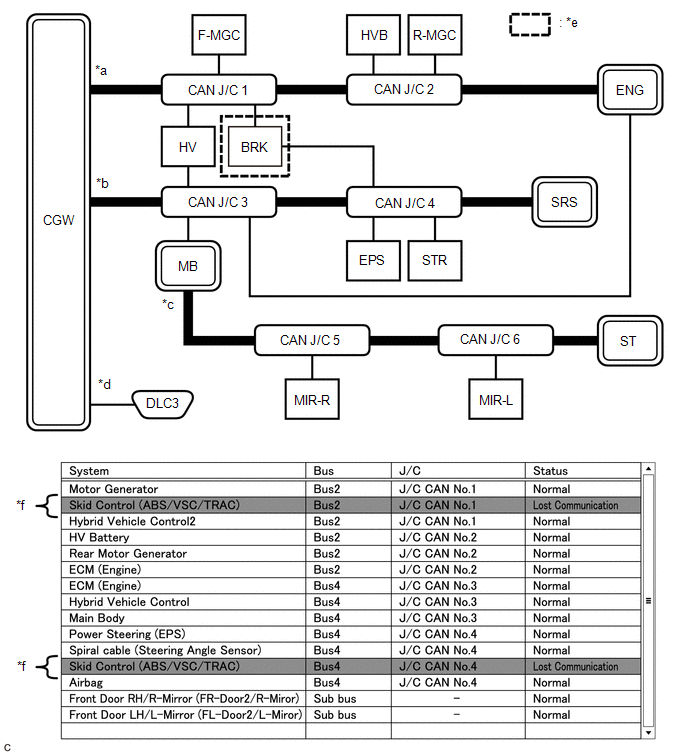
*a |
Bus 2 |
*b |
Bus 4 |
*c |
Sub bus |
*d |
Diagnostic bus |
*e |
Malfunction location |
*f |
The background color is red. |
HINT:
The information displayed on the Communication Bus Check screen is the same for an internal malfunction of an ECU or sensor, or a malfunction in the power supply to an ECU or sensor.
Due to the malfunction, BRK does not communicate with CGW via bus 2 and bus 4. Therefore, the background color of BRK is red for bus 2 and bus 4.
(g) Example of Malfunction Symptom F
Malfunction details |
|
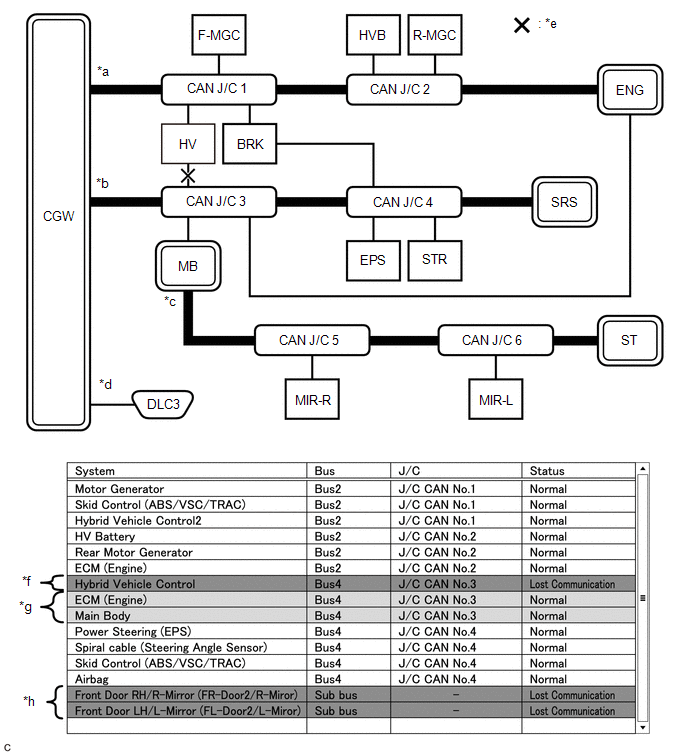
*a |
Bus 2 |
*b |
Bus 4 |
*c |
Sub bus |
*d |
Diagnostic bus |
*e |
Malfunction location |
*f |
The background color is red. |
*g |
The background color changes intermittently to yellow or red |
*h |
Not displayed, or the background color is yellow or red |
HINT:
- On the Communication Bus Check screen shown in the illustration, electrical noise in the CAN bus caused by an open circuit in a wire of the branch line connected to HV interferes with MB communication, resulting in unstable communication. Furthermore, since MB is an ECU equipped with the gateway function, communication of the ECUs connected to their respective branch buses will also be unstable.
- On the Communication Bus Check screen shown in the illustration, since the background color of HV is red, HV is considered to be the probable cause of the malfunction. Under these conditions, HV is considered to be not communicating.
(h) Example of Malfunction Symptom G
Malfunction details |
|
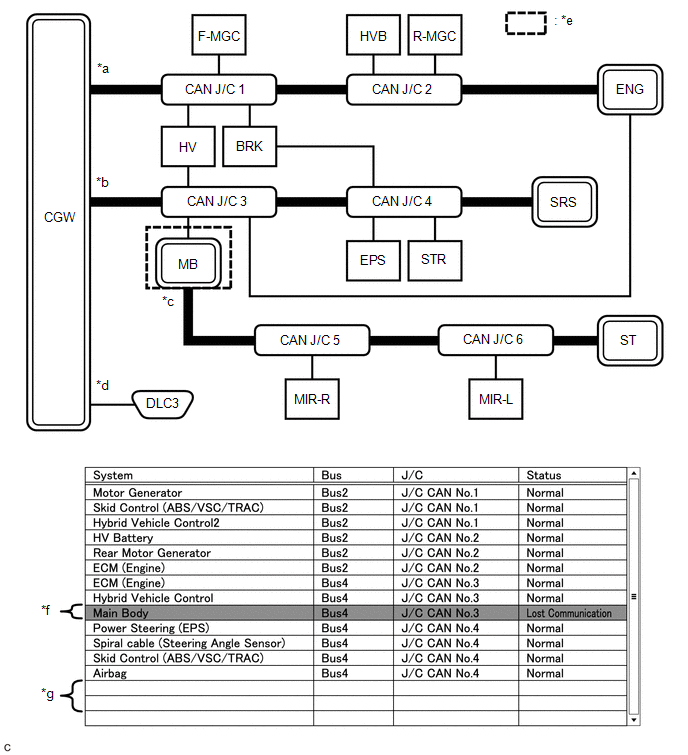
*a |
Bus 2 |
*b |
Bus 4 |
*c |
Sub bus |
*d |
Diagnostic bus |
*e |
Malfunction location |
*f |
The background color is red. |
*g |
Not displayed |
- |
- |
HINT:
- If the communication of the ECU equipped with the gateway function malfunctions, the ECUs connected to their respective branch buses will also be affected and will not be displayed.
- On the Communication Bus Check screen shown in the illustration, MB is an ECU equipped with the gateway function. Therefore, MB is considered to be not communicating.
(i) Example of Malfunction Symptom H
Malfunction details |
|
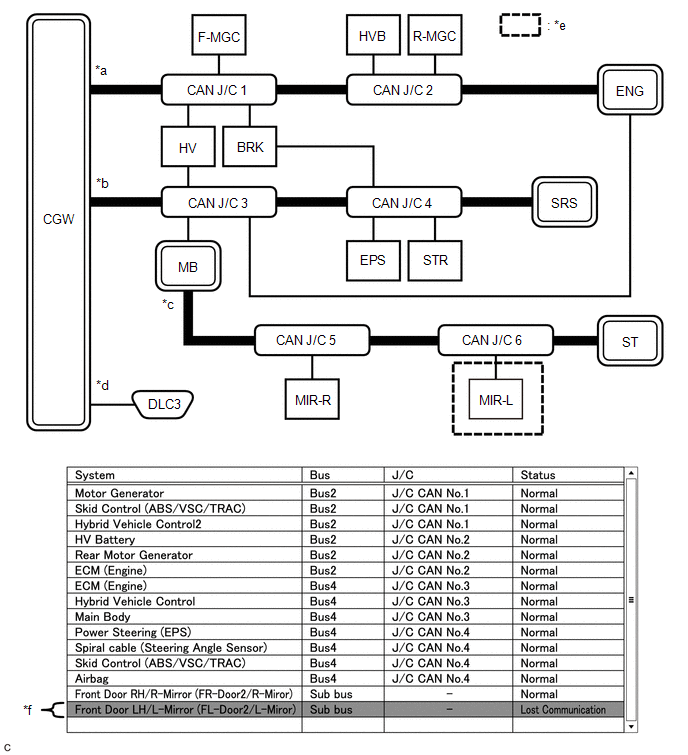
*a |
Bus 2 |
*b |
Bus 4 |
*c |
Sub bus |
*d |
Diagnostic bus |
*e |
Malfunction location |
*f |
The background color is red. |
HINT:
- A malfunction on the branch bus does not affect the other buses.
- When the ECU equipped with the gateway function stores the ECUs and sensors connected to their respective branch buses, and a communication malfunction occurs in one of the ECUs or sensors, the background color of that ECU or sensor turns red and the ECU or sensor remains displayed.
- The information displayed on the Communication Bus Check screen is the same for an open in both wires of a branch line, an internal malfunction of an ECU or sensor, or a malfunction in the power supply to an ECU or sensor.
Malfunction details |
Open in both wires of the branch line connected to MIR-L on the branch bus |
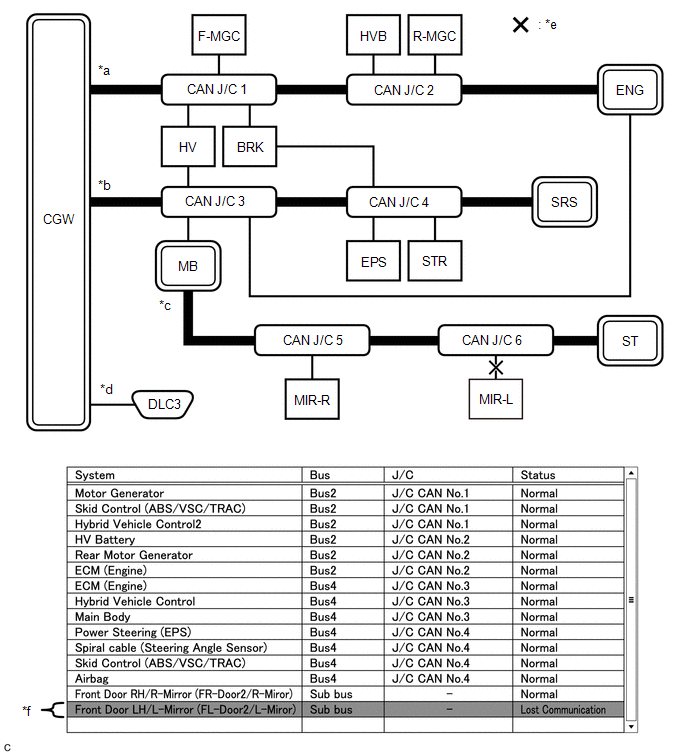
*a |
Bus 2 |
*b |
Bus 4 |
*c |
Sub bus |
*d |
Diagnostic bus |
*e |
Malfunction location |
*f |
The background color is red. |
HINT:
- A malfunction on the branch bus does not affect the other buses.
- When the ECU equipped with the gateway function stores the ECUs and sensors connected to their respective branch buses, and a communication malfunction occurs in one of the ECUs or sensors, the background color of that ECU or sensor turns red and the ECU or sensor remains displayed.
- The information displayed on the Communication Bus Check screen is the same for an open in both wires of a branch line, an internal malfunction of an ECU or sensor, or a malfunction in the power supply to an ECU or sensor.
(j) Example of Malfunction Symptom I
Malfunction details |
Open in both wires of a main bus line on the branch bus |
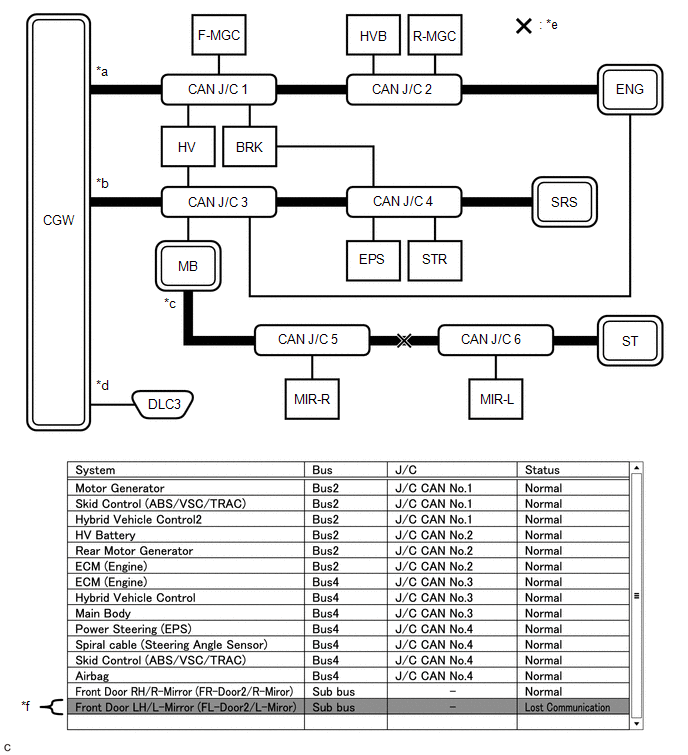
*a |
Bus 2 |
*b |
Bus 4 |
*c |
Sub bus |
*d |
Diagnostic bus |
*e |
Malfunction location |
*f |
The background color is red. |
HINT:
Due to the malfunction, the ECUs or sensors located farther from the branch bus control ECU (ECU equipped with the gateway function) than the open circuit are displayed as not communicating, and their background color is red.
How to use the Communication Bus Check (Detail) screen during inspection
(a) If the CAN communication system is currently normal but has a history of communication stops, identify the faulty part using Communication Bus Check (Detail) as follows:
NOTICE:
- The following CAN bus wiring diagram or communication bus check screen is for reference only. The wiring diagram on the screen differs from that of the vehicle.
- The Lost Communication Time column displays the longest period of time in seconds during which the Central Gateway ECU (Network Gateway ECU) detected a communication stop in the respective ECU or sensor.
- The Lost Communication Trip column displays the cycle in which the Central Gateway ECU (Network Gateway ECU) detected the longest communication stop in the respective ECU or sensor.
- When using the combined area, it may be possible to select a secondary bus (in the drop-down list) that has no ECUs or sensors connected. This is not a malfunction. It occurs when no optional device is connected to a secondary bus monitored by a secondary bus control ECU (ECU equipped with the gateway function).
- The drop-down list shows all sub buses applicable to the model (for example, LIN communication sub buses are also shown). For more information on the sub buses required to diagnose the CAN communication system, refer to the system diagram.
Click here
HINT:
- If the CAN communication system is malfunctioning, it is better to use Communication Bus Check rather than Communication Bus Check (Detail) to identify the suspect area.
- The communication error history of ECUs or sensors that have a communication error history can be displayed on the "Communication Bus Check (Detail)" screen.
- Lost Communication Time and Lost Communication Trip are displayed only for the central bus.
- Lost Communication Time and Lost Communication Trip are not displayed for branch buses.
(b) If an ECU or sensor is displayed with a red background on the Communication Bus Check (Detail) screen to indicate that it is not communicating, it is considered that the ECU or sensor was not communicating.
Malfunction details |
Previous malfunction of the wire harness or power supply to F-MGC on bus 2 |
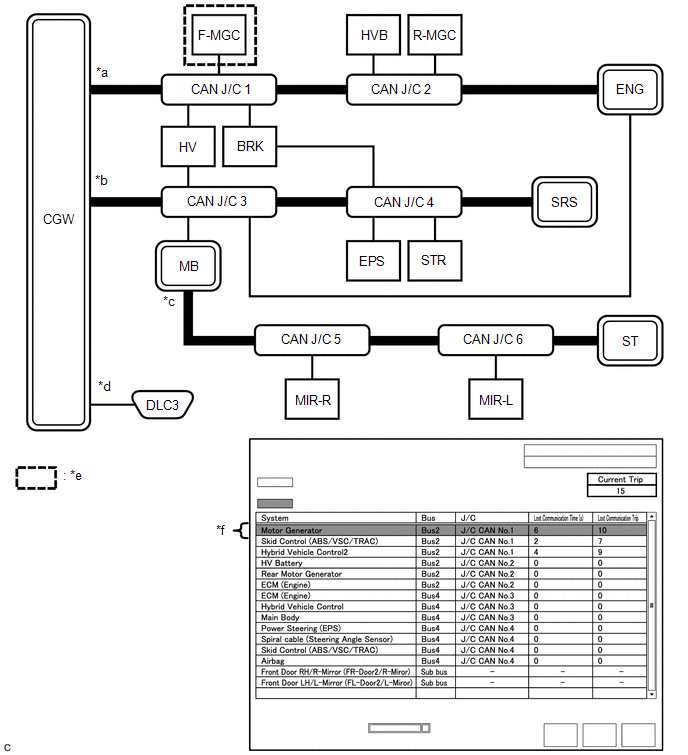
*a |
Bus 2 |
*b |
Bus 4 |
*c |
Sub bus |
*d |
Diagnostic bus |
*e |
Malfunction location |
*f |
The background color is red. |
Bus type | Background color | Connection status |
|---|---|---|
Bus |
White |
This is one of the following cases:
|
Red |
The lost communication time is 6 seconds or more. |
|
Not displayed |
This is one of the following cases:
|
|
Sub bus |
White |
The lost communication time is displayed as "-". |
Not displayed |
This is one of the following cases:
|
HINT:
- Check the Lost Communication Trip and Current Trip values for ECUs or sensors that have a red background color.
- If the Lost Communication Trip and Current Trip values are the same for an ECU or sensor, that ECU or sensor is not currently communicating. In this case, it is better to use the Communication Bus Check value rather than Communication Bus Check (Detail) to identify the faulty component.
- On the "Communication Bus Check (Detail)" screen shown in the diagram, F-MGC had a communication problem in the 10th cycle. Therefore, F-MGC may not be communicating.
- *1: When the Central Gateway ECU (Network Gateway ECU) has an internal malfunction or cannot communicate with the Techstream, the bus names, sub buses, ECUs and sensors will not be displayed.
- *2: When no ECU or sensor is connected to a bus, the message "There is no system found on the communication Bus." is displayed.
- *3: When an ECU equipped with the gateway function cannot communicate with the Central Gateway ECU (Network Gateway ECU), the sub bus names and the ECUs or sensors connected to the sub bus are not displayed.
- *4: When no ECU or sensor is connected to the sub bus, the message "There is no system found on the communication Bus." is displayed.
DTC CHART BY ECU
HINT:
- In the CAN communication system, the CAN communication DTCs of each ECU can be displayed using the Techstream.
- If CAN communication system DTCs are output, the malfunction cannot be determined from the DTCs alone. Troubleshoot according to How to Use Troubleshooting.
Click here
- If a malfunction is currently present, the DTCs can be checked by following the steps in the DTC check procedure.
(a) ECM / Techstream display "Engine and ECT"
Powertrain > Engine and ECT > Trouble CodesHINT:
- This ECU uses the CAN communication system for DTC communication.
- *1: Refer to the SFI system.
with fuel vapor pump module: Click here
without fuel vapor pump module: Click here
DTC | Detection Item | DTC Detection Condition | DTC Detection Condition | DTC Check Procedure | Warning Displayed | DTC Storage Method |
|
|---|---|---|---|---|---|---|---|
Meter Indication | Multi-information display |
||||||
U011B*1 |
Communication lost with Rocker Control Module "A" |
The ECM does not receive data sent by the variable valve lift control device assembly for approximately 1 second or more. |
Both of the following conditions are met:
|
Turn the ignition switch ON and wait for approximately 2 seconds or more. |
MIL comes on. |
- |
The DTC is stored until it is cleared using the Techstream. |
U0124 |
Communication lost with side acceleration sensor module |
The ECM does not receive data sent by the airbag sensor assembly for approximately 3 seconds or more. |
Both of the following conditions are met:
|
Turn the ignition switch ON and wait for approximately 13 seconds or more. |
MIL comes on. |
- |
The DTC is stored until it is cleared using the Techstream. |
U0129 |
Communication lost with brake control module |
The ECM does not receive data sent by the brake actuator assembly for approximately 3 seconds or more. |
Both of the following conditions are met:
|
Turn the ignition switch ON and wait for approximately 13 seconds or more. |
MIL comes on. |
- |
The DTC is stored until it is cleared using the Techstream. |
(b) Brake Actuator Assembly / Techstream display "ABS/VSC/TRAC/EPB"
Chassis > ABS/VSC/TRAC/EPB > Trouble CodesHINT:
This ECU uses the CAN communication system for DTC communication.
DTC | Detection Item | DTC Detection Condition | DTC Detection Condition | DTC Check Procedure | Warning Displayed | DTC Storage Method |
|
|---|---|---|---|---|---|---|---|
Meter Indication | Multi-information display |
||||||
U0073 |
Control module communication bus off |
A communication error (bus off state) occurs repeatedly for approximately 1 second or more. |
Both of the following conditions are met:
|
Turn the ignition switch ON and wait for approximately 2 seconds or more. |
|
- |
The DTC is stored until it is cleared using the Techstream. |
U0100 |
Communication lost with ECM/PCM "A" |
The brake actuator assembly does not receive data from the ECM for approximately 1 second or more. |
All of the following conditions are met:
|
Drive the vehicle at a speed of approximately 6 km/h or more for at least 2 seconds. |
|
- |
The DTC is stored until it is cleared using the Techstream. |
U0123 |
Communication lost with yaw rate sensor module |
The brake actuator assembly does not receive data from the airbag sensor assembly for approximately 1 second or more. |
All of the following conditions are met:
|
Drive the vehicle at a speed of approximately 6 km/h or more for at least 2 seconds. |
|
- |
The DTC is stored until it is cleared using the Techstream. |
U0126 |
Communication lost with steering angle sensor module |
The brake actuator assembly does not receive data from the steering angle sensor for approximately 1 second or more. |
All of the following conditions are met:
|
Drive the vehicle at a speed of approximately 6 km/h or more for at least 2 seconds. |
|
- |
The DTC is stored until it is cleared using the Techstream. |
U0142 |
Communication lost with body control module "B" |
The brake actuator assembly does not receive data from the main body ECU (multiplex network body ECU) for approximately 1 second or more. |
Both of the following conditions are met:
|
Turn the ignition switch ON and wait for approximately 2 seconds or more. |
|
- |
The DTC is stored until it is cleared using the Techstream. |
(c) Power Steering ECU Assembly / Techstream display "EMPS"
Chassis > EMPS > Trouble CodesHINT:
This ECU uses the CAN communication system for DTC communication.
DTC | Detection Item | DTC Detection Condition | DTC Detection Condition | DTC Check Procedure | Warning Displayed | DTC Storage Method |
|
|---|---|---|---|---|---|---|---|
Meter Indication | Multi-information display |
||||||
U0100 |
Communication lost with ECM/PCM "A" |
The power steering ECU assembly does not receive data from the ECM for approximately 5 minutes or more. |
All of the following conditions are met:
|
Drive the vehicle at a speed of approximately 20 km/h or more for at least 5 minutes. |
- |
- |
The DTC remains stored only while the malfunction is occurring. |
U0129 |
Communication lost with brake control module |
The power steering ECU assembly does not receive data from the brake actuator assembly for approximately 3 seconds or more. |
Both of the following conditions are met:
|
Turn the ignition switch ON and wait for approximately 6 seconds or more. |
The EPS warning light comes on. |
- |
The DTC remains stored only while the malfunction is occurring. |
U023A |
Loss of communication with front camera module |
The power steering ECU assembly does not receive data sent by the front recognition camera for approximately 2 seconds or more. |
Both of the following conditions are met:
|
Turn the ignition switch ON and wait for approximately 5 seconds or more. |
- |
- |
The DTC remains stored only while the malfunction is occurring. |
(d) Main Body ECU (Multiplex Network Body ECU) / Techstream display "Main Body"
Body Electrical > Main Body > Trouble CodesHINT:
This ECU uses the CAN communication system for DTC communication.
DTC | Detection Item | DTC Detection Condition | DTC Detection Condition | DTC Check Procedure | Warning Displayed | DTC Storage Method |
|
|---|---|---|---|---|---|---|---|
Meter Indication | Multi-information display |
||||||
U0100 |
Communication lost with ECM/PCM "A" |
The main body ECU (multiplex network body ECU) does not receive data from the ECM for approximately 10 seconds or more. |
Both of the following conditions are met:
|
Turn the ignition switch ON and wait for approximately 20 seconds or more. |
- |
- |
The DTC is stored until it is cleared using the Techstream. |
U0101 |
Communication lost with TCM |
The main body ECU (multiplex network body ECU) does not receive data from the ECM for approximately 10 seconds or more. |
Both of the following conditions are met:
|
Turn the ignition switch ON and wait for approximately 20 seconds or more. |
- |
- |
The DTC is stored until it is cleared using the Techstream. |
U0120 |
Communication lost with starter / generator control module |
The main body ECU (multiplex network body ECU) does not receive data from the certification ECU (smart key system ECU assembly) for approximately 10 seconds or more. |
Both of the following conditions are met:
|
Turn the ignition switch ON and wait for approximately 20 seconds or more. |
- |
- |
The DTC is stored until it is cleared using the Techstream. |
U0129 |
Communication lost with brake control module |
The main body ECU (multiplex network body ECU) does not receive data from the brake actuator assembly for approximately 10 seconds or more. |
Both of the following conditions are met:
|
Turn the ignition switch ON and wait for approximately 20 seconds or more. |
- |
- |
The DTC is stored until it is cleared using the Techstream. |
U0151 |
Lost communication with restraint control module |
The main body ECU (multiplex network body ECU) does not receive data from the airbag sensor assembly for approximately 10 seconds or more. |
Both of the following conditions are met:
|
Turn the ignition switch ON and wait for approximately 20 seconds or more. |
- |
- |
The DTC is stored until it is cleared using the Techstream. |
U0155 |
Communication lost with instrument panel control module (IPC) |
The main body ECU (multiplex network body ECU) does not receive data from the combination meter assembly for approximately 10 seconds or more. |
Both of the following conditions are met:
|
Turn the ignition switch ON and wait for approximately 20 seconds or more. |
- |
- |
The DTC is stored until it is cleared using the Techstream. |
U0182 |
Loss of communication with AFS |
The main body ECU (multiplex network body ECU) does not receive data sent by the LH headlamp ECU sub-assembly for approximately 10 seconds or more. |
Both of the following conditions are met:
|
Turn the ignition switch ON and wait for approximately 20 seconds or more. |
- |
- |
The DTC is stored until it is cleared using the Techstream. |
U023A |
Loss of communication with image processing module "A" |
The main body ECU (multiplex network body ECU) does not receive data sent by the forward recognition camera for approximately 5 seconds or more. |
Both of the following conditions are met:
|
Turn the ignition switch to ON and wait for approximately 15 seconds or more. |
The automatic high beam indicator flashes. |
- |
The DTC is stored until it is cleared using the Techstream. |
U0327 |
Software incompatibility with vehicle security control module |
The main body ECU (multiplex network body ECU) does not receive data from the certification ECU (smart key system ECU assembly) for approximately 10 seconds or more. |
Both of the following conditions are met:
|
Turn the ignition switch ON and wait for approximately 20 seconds or more. |
- |
- |
The DTC is stored until it is cleared using the Techstream. |
(e) Certification ECU (smart key ECU assembly) / Techstream displays "Smart Key"
Body Electrical > Smart Key > Trouble CodesHINT:
This ECU uses the CAN communication system for DTC communication.
DTC | Detection Item | DTC Detection Condition | DTC Detection Condition | DTC Check Procedure | Warning Displayed | DTC Storage Method |
|
|---|---|---|---|---|---|---|---|
Meter Indication | Multi-information display |
||||||
U0100 |
Communication lost with ECM/PCM "A" |
The certification ECU (smart key ECU assembly) does not receive data sent by the ECM for approximately 10 seconds or more. |
Both of the following conditions are met:
|
Turn the ignition switch ON and wait for approximately 20 seconds or more. |
- |
- |
The DTC is stored until it is cleared using the Techstream. |
U0142 |
Communication lost with body control module "B" |
The certification ECU (smart key ECU assembly) does not receive data from the main body ECU (multiplex network body ECU) for approximately 10 seconds or more. |
Both of the following conditions are met:
|
Turn the ignition switch ON and wait for approximately 20 seconds or more. |
- |
- |
The DTC is stored until it is cleared using the Techstream. |
U0155 |
Communication lost with instrument panel control module (IPC) |
The certification ECU (smart key ECU assembly) does not receive data from the combination meter assembly for approximately 10 seconds or more. |
Both of the following conditions are met:
|
Turn the ignition switch ON and wait for approximately 20 seconds or more. |
- |
- |
The DTC is stored until it is cleared using the Techstream. |
(f) Certification ECU (smart key ECU assembly) / Techstream display "Power Source Control"
Body Electrical > Power Source Control > Trouble CodesHINT:
This ECU uses the CAN communication system for DTC communication.
DTC | Detection Item | DTC Detection Condition | DTC Detection Condition | DTC Check Procedure | Warning Displayed | DTC Storage Method |
|
|---|---|---|---|---|---|---|---|
Meter Indication | Multi-information display |
||||||
U0100 |
Loss of communication with ECM |
The certification ECU (smart key ECU assembly) does not receive data sent by the ECM for approximately 4 seconds or more. |
Both of the following conditions are met:
|
Turn the ignition switch to ON and wait for approximately 4 seconds or more. |
- |
- |
The DTC is stored until it is cleared using the Techstream. |
U0140 |
Loss of communication with body control module |
The certification ECU (smart key ECU assembly) does not receive data from the main body ECU (multiplex network body ECU) for approximately 3 seconds or more. |
Both of the following conditions are met:
|
Turn the ignition switch to ON and wait for approximately 3 seconds or more. |
- |
- |
The DTC is stored until it is cleared using the Techstream. |
U0155 |
Communication lost with instrument panel control module (IPC) |
The certification ECU (smart key ECU assembly) does not receive data from the combination meter assembly for approximately 4 seconds or more. |
Both of the following conditions are met:
|
Turn the ignition switch to ON and wait for approximately 4 seconds or more. |
- |
- |
The DTC is stored until it is cleared using the Techstream. |
(g) LH headlamp ECU sub-assembly / Techstream display "HL AutoLeveling"
Body Electrical > HL AutoLeveling > Trouble CodesHINT:
- This ECU uses the CAN communication system for DTC communication.
- *1: Refer to the lighting system.
Click here
- *2: Refer to the lighting system.
Click here
DTC | Detection Item | DTC Detection Condition | DTC Detection Condition | DTC Check Procedure | Warning Displayed | DTC Storage Method |
|
|---|---|---|---|---|---|---|---|
Meter Indication | Multi-information display |
||||||
U0073 |
Control module communication bus off |
The LH headlamp ECU sub-assembly cannot send/receive data. |
Both of the following conditions are met:
|
Turn the ignition switch to ON and wait for approximately 3 seconds or more. |
- |
- |
The DTC is stored until it is cleared using the Techstream. |
U0100 |
Communication lost with ECM/PCM "A" |
The LH headlamp ECU sub-assembly does not receive data sent by the ECM for approximately 10 seconds or more. |
Both of the following conditions are met:
|
Turn the ignition switch ON and wait for approximately 13 seconds or more. |
- |
- |
The DTC is stored until it is cleared using the Techstream. |
U0129 |
Communication lost with brake control module |
The LH headlamp ECU sub-assembly does not receive data sent by the brake booster with master cylinder assembly for approximately 10 seconds or more. |
Both of the following conditions are met:
|
Turn the ignition switch ON and wait for approximately 13 seconds or more. |
- |
- |
The DTC is stored until it is cleared using the Techstream. |
U0142 |
Communication lost with body control module "B" |
The LH headlamp ECU sub-assembly does not receive data sent by the main body ECU (multiplex network body ECU) for approximately 10 seconds or more. |
Both of the following conditions are met:
|
Turn the ignition switch ON and wait for approximately 13 seconds or more. |
- |
- |
The DTC is stored until it is cleared using the Techstream. |
U0242*1 |
Communication lost with headlight control module "B" |
The LH headlamp ECU sub-assembly does not receive data sent by the RH headlamp ECU sub-assembly for approximately 10 seconds or more. |
Both of the following conditions are met:
|
Turn the ignition switch ON and wait for approximately 13 seconds or more. |
- |
- |
The DTC is stored until it is cleared using the Techstream. |
U1000*2 |
CAN communication failure (message register) |
CAN communication malfunction (message log) |
Both of the following conditions are met:
|
Turn the ignition switch to ON and wait for approximately 3 seconds or more. |
- |
- |
The DTC is stored until it is cleared using the Techstream. |
(h) Combination meter assembly / Techstream display "Combination Meter"
Body Electrical > Combination Meter > Trouble CodesHINT:
This ECU uses the CAN communication system for DTC communication.
DTC | Detection Item | DTC Detection Condition | DTC Detection Condition | DTC Check Procedure | Warning Displayed | DTC Storage Method |
|
|---|---|---|---|---|---|---|---|
Meter Indication | Multi-information display |
||||||
U0100 |
Communication lost with ECM/PCM "A" |
The combination meter assembly does not receive data from the ECM for approximately 2 seconds or more. |
Both of the following conditions are met:
|
Turn the ignition switch to ON and wait for approximately 3 seconds or more. |
MIL comes on. |
- |
The DTC is stored until it is cleared using the Techstream. |
U0129 |
Communication lost with brake control module |
The combination meter assembly does not receive data sent by the brake actuator assembly for approximately 3 seconds or more. |
Both of the following conditions are met:
|
Turn the ignition switch to ON and wait for approximately 3 seconds or more. |
|
- |
The DTC is stored until it is cleared using the Techstream. |
U0131 |
Lost communication with power steering control module |
The combination meter assembly does not receive data from the power steering ECU assembly for approximately 3 seconds or more. |
Both of the following conditions are met:
|
Turn the ignition switch to ON and wait for approximately 3 seconds or more. |
The EPS warning light comes on. |
- |
The DTC is stored until it is cleared using the Techstream. |
U0142 |
Communication lost with body control module "B" |
The combination meter assembly does not receive data from the main body ECU (multiplex network body ECU) for approximately 10 seconds or more. |
Both of the following conditions are met:
|
Turn the ignition switch to ON and wait for approximately 10 seconds or more. |
The low tire pressure warning light comes on. |
- |
The DTC is stored until it is cleared using the Techstream. |
U0151 |
Lost communication with restraint control module |
The combination meter assembly does not receive data from the airbag sensor assembly for approximately 10 seconds or more. |
Both of the following conditions are met:
|
Turn the ignition switch to ON and wait for approximately 10 seconds or more. |
The SRS warning light comes on. |
- |
The DTC is stored until it is cleared using the Techstream. |
U0182 |
Lost communication with front light control module |
The combination meter assembly does not receive data sent by the LH headlamp ECU sub-assembly for approximately 10 seconds or more. |
Both of the following conditions are met:
|
Turn the ignition switch to ON and wait for approximately 10 seconds or more. |
- |
- |
The DTC is stored until it is cleared using the Techstream. |
U0235 |
Loss of communication with cruise control front distance sensor |
The combination meter assembly does not receive data from the millimeter wave radar sensor assembly for approximately 10 seconds or more. |
Both of the following conditions are met:
|
Turn the ignition switch to ON and wait for approximately 10 seconds or more. |
- |
Displays messages on the multi-information display. |
The DTC is stored until it is cleared using the Techstream. |
U023A |
Loss of communication with front camera module |
When any of the following conditions is met*1:
|
Both of the following conditions are met:
|
Turn the ignition switch to ON and wait for approximately 10 seconds or more. |
- |
Displays messages on the multi-information display. |
The DTC is stored until it is cleared using the Techstream. |
- *1: When U0235 and U023A are output simultaneously, there may be a malfunction in the millimeter wave radar sensor assembly.
(i) Air conditioner amplifier assembly / Techstream display "Air Conditioner"
Body Electrical > Air Conditioner > Trouble CodesHINT:
This ECU uses the CAN communication system for DTC communication.
DTC | Detection Item | DTC Detection Condition | DTC Detection Condition | DTC Check Procedure | Warning Displayed | DTC Storage Method |
|
|---|---|---|---|---|---|---|---|
Meter Indication | Multi-information display |
||||||
U0100 |
Communication Lost with ECM |
The air conditioner amplifier assembly does not receive data from the ECM assembly for approximately 5 seconds or more. |
Both of the following conditions are met:
|
Turn the ignition switch ON and wait for approximately 5 seconds or more. |
- |
- |
The DTC is stored until it is cleared using the Techstream. |
U0131 |
Lost communication with power steering control module |
The air conditioner amplifier assembly does not receive data from the power steering ECU assembly for approximately 5 seconds or more. |
Both of the following conditions are met:
|
Turn the ignition switch ON and wait for approximately 5 seconds or more. |
- |
- |
The DTC is stored until it is cleared using the Techstream. |
U0142 |
Communication lost with body control module "B" |
The air conditioner amplifier assembly does not receive data from the main body ECU (multiplex network body ECU) for approximately 5 seconds or more. |
Both of the following conditions are met:
|
Turn the ignition switch ON and wait for approximately 5 seconds or more. |
- |
- |
The DTC is stored until it is cleared using the Techstream. |
U0155 |
Communication lost with instrument panel control module (IPC) |
The air conditioning amplifier assembly does not receive data from the combination meter assembly for at least approximately 5 seconds. |
Both of the following conditions are met:
|
Turn the ignition switch ON and wait for approximately 5 seconds or more. |
- |
- |
The DTC is stored until it is cleared using the Techstream. |
(j) Airbag Sensor Assembly / Techstream Display "SRS Airbag"
Body Electrical > SRS Airbag > Trouble CodesHINT:
This ECU uses the CAN communication system for DTC communication.
DTC | Detection Item | DTC Detection Condition | DTC Detection Condition | DTC Check Procedure | Warning Displayed | DTC Storage Method |
|
|---|---|---|---|---|---|---|---|
Meter Indication | Multi-information display |
||||||
U0154 |
Lost Communication with Occupant Classification System Module |
The airbag sensor assembly does not receive data sent from the occupant detection ECU for at least approximately 5 seconds. |
The ignition switch is ON for approximately 3 seconds or more. |
Turn the ignition switch to ON and wait for at least approximately 8 seconds. |
The SRS warning light comes on. |
- |
The DTC is stored until it is cleared using the Techstream. |
(k) Occupant Detection ECU / Techstream Displays "Occupant Detection"
Body Electrical > Occupant Detection > Trouble CodesHINT:
This ECU uses the CAN communication system for DTC communication.
DTC | Detection Item | DTC Detection Condition | DTC Detection Condition | DTC Check Procedure | Warning Displayed | DTC Storage Method |
|
|---|---|---|---|---|---|---|---|
Meter Indication | Multi-information display |
||||||
U0125 |
Communication lost with multi-axis acceleration sensor module |
The occupant detection ECU does not receive data sent from the airbag sensor assembly for at least approximately 5 seconds. |
Both of the following conditions are met:
|
Turn the ignition switch to ON and wait for at least approximately 8 seconds. |
The SRS warning light comes on. |
- |
The DTC is stored until it is cleared using the Techstream. |
U0129 |
Communication lost with brake control module |
The occupant detection ECU does not receive data sent from the servo brake with master cylinder assembly for at least approximately 5 seconds. |
Both of the following conditions are met:
|
Turn the ignition switch to ON and wait for at least approximately 8 seconds. |
The SRS warning light comes on. |
- |
The DTC is stored until it is cleared using the Techstream. |
(l) ECM / Techstream Displays "Cruise Control"
Powertrain > Cruise Control > Trouble CodesHINT:
This ECU uses the CAN communication system for DTC communication.
DTC | Detection Item | DTC Detection Condition | DTC Detection Condition | DTC Check Procedure | Warning Displayed | DTC Storage Method |
|
|---|---|---|---|---|---|---|---|
Meter Indication | Multi-information display |
||||||
U0122 |
Communication lost with vehicle dynamics control module |
The ECM does not receive data sent by the brake actuator assembly for approximately 3 seconds or more. |
All of the following conditions are met:
|
Turn the cruise control main switch to ON and wait for at least approximately 4 seconds. |
- |
Displays messages on the multi-information display. |
The DTC is stored until it is cleared using the Techstream. |
(m) ECM / Techstream Displays "Radar Cruise1"
Powertrain > Radar Cruise1 > Trouble CodesHINT:
This ECU uses the CAN communication system for DTC communication.
DTC | Detection Item | DTC Detection Condition | DTC Detection Condition | DTC Check Procedure | Warning Displayed | DTC Storage Method |
|
|---|---|---|---|---|---|---|---|
Meter Indication | Multi-information display |
||||||
U0100 |
Communication lost with ECM/PCM "A" |
The ECM does not receive data sent from the brake actuator assembly for at least approximately 1 second. |
All of the following conditions are met:
|
Turn the cruise control main switch to ON and wait for at least approximately 2 seconds. |
- |
Displays messages on the multi-information display. |
The DTC is stored until it is cleared using the Techstream. |
U0122 |
Communication lost with vehicle dynamics control module |
The ECM does not receive data sent by the brake actuator assembly for approximately 3 seconds or more. |
All of the following conditions are met:
|
Turn the cruise control main switch to ON and wait for at least approximately 4 seconds. |
- |
Displays messages on the multi-information display. |
The DTC is stored until it is cleared using the Techstream. |
U1104 |
Communication lost with cruise control module |
The ECM does not receive data sent from the millimeter wave radar sensor assembly for at least approximately 1 second. |
All of the following conditions are met:
|
Turn the cruise control main switch to ON and wait for at least approximately 2 seconds. |
- |
Displays messages on the multi-information display. |
The DTC is stored until it is cleared using the Techstream. |
(n) Millimeter Wave Radar Sensor Assembly / Techstream Displays "Radar Cruise2"
Powertrain > Radar Cruise2 > Trouble CodesHINT:
This ECU uses the CAN communication system for DTC communication.
DTC | Detection Item | DTC Detection Condition | DTC Detection Condition | DTC Check Procedure | Warning Displayed | DTC Storage Method |
|
|---|---|---|---|---|---|---|---|
Meter Indication | Multi-information display |
||||||
U0100 |
Communication lost with ECM/PCM "A" |
The millimeter wave radar sensor assembly does not receive data sent from the ECM for at least approximately 1 second. |
All of the following conditions are met:
|
Turn the cruise control main switch to ON, then drive the vehicle at a speed of approximately 5 km/h or more for at least approximately 2 seconds. |
- |
Displays messages on the multi-information display. |
The DTC is stored until it is cleared using the Techstream. |
U0125 |
Communication lost with yaw rate sensor module |
The millimeter wave radar sensor assembly does not receive data sent from the airbag sensor assembly for at least approximately 1 second. |
All of the following conditions are met:
|
Turn the cruise control main switch to ON, then drive the vehicle at a speed of approximately 5 km/h or more for at least approximately 4 seconds. |
- |
Displays messages on the multi-information display. |
The DTC is stored until it is cleared using the Techstream. |
U0126 |
Communication lost with steering angle sensor module |
The millimeter wave radar sensor assembly does not receive data sent from the steering angle sensor for at least approximately 1 second. |
All of the following conditions are met:
|
Turn the cruise control main switch to ON, then drive the vehicle at a speed of approximately 5 km/h or more for at least approximately 2 seconds. |
- |
Displays messages on the multi-information display. |
The DTC is stored until it is cleared using the Techstream. |
U0129 |
Communication lost with brake control module |
The millimeter wave radar sensor assembly does not receive data sent from the brake actuator assembly for at least approximately 3 seconds. |
All of the following conditions are met:
|
Turn the cruise control main switch to ON, then drive the vehicle at a speed of approximately 5 km/h or more for at least approximately 5 seconds. |
- |
Displays messages on the multi-information display. |
The DTC is stored until it is cleared using the Techstream. |
(o) Millimeter Wave Radar Sensor Assembly / Techstream Displays "Pre-Collision 2"
Body Electrical > Pre-Collision 2 > Trouble CodesHINT:
- This ECU uses the CAN communication system for DTC communication.
- *1: Refer to the Pre-Collision System.
Click here
DTC | Detection Item | DTC Detection Condition | DTC Detection Condition | DTC Check Procedure | Warning Displayed | DTC Storage Method |
|
|---|---|---|---|---|---|---|---|
Meter Indication | Multi-information display |
||||||
U0100 |
Communication lost with ECM/PCM "A" |
The millimeter wave radar sensor assembly does not receive data sent from the ECM for at least approximately 1 second. |
All of the following conditions are met:
|
Drive the vehicle at a speed of approximately 5 km/h or more for at least 4 seconds. |
The PCS (Pre-Collision System) warning light flashes. |
Displays messages on the multi-information display. |
The DTC is stored until it is cleared using the Techstream. |
U0125 |
Communication lost with yaw rate sensor module |
The millimeter wave radar sensor assembly does not receive data sent from the airbag sensor assembly for at least approximately 1 second. |
Both of the following conditions are met:
|
Turn the ignition switch to ON and wait for approximately 4 seconds or more. |
The PCS (Pre-Collision System) warning light flashes. |
Displays messages on the multi-information display. |
The DTC is stored until it is cleared using the Techstream. |
U0126 |
Communication lost with steering angle sensor module |
The millimeter wave radar sensor assembly does not receive data sent from the steering angle sensor for at least approximately 1 second. |
Both of the following conditions are met:
|
Turn the ignition switch to ON and wait for approximately 4 seconds or more. |
The PCS (Pre-Collision System) warning light flashes. |
Displays messages on the multi-information display. |
The DTC is stored until it is cleared using the Techstream. |
U0129 |
Communication lost with brake control module |
The millimeter wave radar sensor assembly does not receive data sent from the brake actuator assembly for at least approximately 4 seconds. |
Both of the following conditions are met:
|
Turn the ignition switch to ON and wait for at least approximately 7 seconds. |
The PCS (Pre-Collision System) warning light flashes. |
Displays messages on the multi-information display. |
The DTC is stored until it is cleared using the Techstream. |
U0235*1 |
Loss of communication with cruise control front distance sensor |
The millimeter wave radar sensor assembly does not receive data sent from the brake actuator assembly for at least approximately 2 seconds. |
Both of the following conditions are met:
|
Turn the ignition switch to ON and wait for approximately 4 seconds or more. |
The PCS (Pre-Collision System) warning light flashes. |
Displays messages on the multi-information display. |
The DTC is stored until it is cleared using the Techstream. |
U023A*1 |
Loss of communication with image processing module "A" |
The millimeter wave radar sensor assembly does not receive data sent from the front camera for at least approximately 1 second. |
Both of the following conditions are met:
|
Turn the ignition switch to ON and wait for approximately 4 seconds or more. |
The PCS (Pre-Collision System) warning light flashes. |
Displays messages on the multi-information display. |
The DTC is stored until it is cleared using the Techstream. |
U1002*1 |
Loss of communication with entry gate module |
The millimeter wave radar sensor assembly does not receive data sent from the front camera for at least approximately 1 second. |
Both of the following conditions are met:
|
Turn the ignition switch to ON and wait for approximately 4 seconds or more. |
The PCS (Pre-Collision System) warning light flashes. |
Displays messages on the multi-information display. |
The DTC is stored until it is cleared using the Techstream. |
(p) Front Camera / Techstream Displays "LKA/LDA"
Chassis > LKA/LDA > Trouble CodesHINT:
- This ECU uses the CAN communication system for DTC communication.
- *1: Refer to the Lane Departure Warning System.
Click here
DTC | Detection Item | DTC Detection Condition | DTC Detection Condition | DTC Check Procedure | Warning Displayed | DTC Storage Method |
|
|---|---|---|---|---|---|---|---|
Meter Indication | Multi-information display |
||||||
U0100 |
Communication lost with ECM/PCM "A" |
The front camera does not receive data sent from the ECM for at least approximately 5 seconds. |
All of the following conditions are met:
|
Turn the LDA main switch to ON, then drive the vehicle at a speed of 5 km/h or more for at least approximately 7 seconds. |
The LDA indicator light comes on (yellow). |
Displays messages on the multi-information display. |
The DTC is stored until it is cleared using the Techstream. |
U0123 |
Communication lost with yaw rate sensor module |
The front camera does not receive data sent from the airbag sensor assembly for at least approximately 5 seconds. |
All of the following conditions are met:
|
Turn the LDA main switch to ON, then drive the vehicle at a speed of 5 km/h or more for at least approximately 7 seconds. |
The LDA indicator light comes on (yellow). |
Displays messages on the multi-information display. |
The DTC is stored until it is cleared using the Techstream. |
U0126 |
Communication lost with steering angle sensor module |
The front camera does not receive data sent from the steering angle sensor for at least approximately 5 seconds. |
All of the following conditions are met:
|
Turn the LDA main switch to ON, then drive the vehicle at a speed of 1 km/h or more for at least approximately 7 seconds. |
The LDA indicator light comes on (yellow). |
Displays messages on the multi-information display. |
The DTC is stored until it is cleared using the Techstream. |
U0129 |
Communication lost with brake control module |
The front camera does not receive data sent from the brake actuator assembly for at least approximately 5 seconds. |
Both of the following conditions are met:
|
Turn the ignition switch to ON and wait for at least approximately 7 seconds. |
The LDA indicator light comes on (yellow). |
Displays messages on the multi-information display. |
The DTC is stored until it is cleared using the Techstream. |
U0131 |
Lost communication with power steering control module |
The front camera does not receive data sent from the power steering ECU assembly for at least approximately 5 seconds. |
All of the following conditions are met:
|
Turn the LDA main switch to ON, then drive the vehicle at a speed of 5 km/h or more for at least approximately 7 seconds. |
The LDA indicator light comes on (yellow). |
Displays messages on the multi-information display. |
The DTC is stored until it is cleared using the Techstream. |
U0142 |
Communication lost with body control module "B" |
The front camera does not receive data sent from the main body ECU (multiplex network body ECU) for at least approximately 5 seconds. |
All of the following conditions are met:
|
Turn the ignition switch to ON, turn the LDA main switch to ON, and wait for at least approximately 7 seconds. |
The LDA indicator light comes on (yellow). |
Displays messages on the multi-information display. |
The DTC is stored until it is cleared using the Techstream. |
U0155 |
Communication lost with instrument panel control module (IPC) (combination meter) |
The front camera does not receive data sent from the combination meter assembly for at least approximately 50 seconds. |
All of the following conditions are met:
|
Turn the ignition switch to ON, turn the LDA main switch to ON, and wait for at least approximately 52 seconds. |
The LDA indicator light comes on (yellow). |
Displays messages on the multi-information display. |
The DTC is stored until it is cleared using the Techstream. |
U0235*1 |
Loss of communication with cruise control front distance sensor |
The front recognition camera does not receive data sent by the millimeter wave radar sensor assembly for approximately 5 seconds or more. |
All of the following conditions are met:
|
Drive the vehicle at a speed of approximately 5 km/h or more for at least 7 seconds. |
The LDA indicator light comes on (yellow). |
Displays messages on the multi-information display. |
The DTC is stored until it is cleared using the Techstream. |
U023A*1 |
Loss of communication with image processing module "A" |
The power steering ECU assembly does not receive data sent by the front recognition camera for approximately 5 seconds or more. |
All of the following conditions are met:
|
Turn the LDA main switch to ON, then drive the vehicle at a speed of 5 km/h or more for at least approximately 7 seconds. |
The LDA indicator light comes on (yellow). |
Displays messages on the multi-information display. |
The DTC is stored until it is cleared using the Techstream. |
(q) Front Recognition Camera / Techstream displays "Front Recognition Camera"
Chassis > Front Recognition Camera > Trouble CodesHINT:
- This ECU uses the CAN communication system for DTC communication.
- *1: Refer to the Front Recognition Camera System
Click here
DTC | Detection Item | DTC Detection Condition | DTC Detection Condition | DTC Check Procedure | Warning Displayed | DTC Storage Method |
|
|---|---|---|---|---|---|---|---|
Meter Indication | Multi-information display |
||||||
U0100 |
Communication lost with ECM/PCM "A" |
The front camera does not receive data sent from the ECM for at least approximately 5 seconds. |
All of the following conditions are met:
|
Drive the vehicle at a speed of approximately 1 km/h or more for at least 7 seconds. |
- |
- |
The DTC is stored until it is cleared using the Techstream. |
U0101 |
Communication lost with TCM |
The front camera does not receive data sent from the ECM for at least approximately 5 seconds. |
All of the following conditions are met:
|
Drive the vehicle at a speed of approximately 1 km/h or more for at least 7 seconds. |
- |
- |
The DTC is stored until it is cleared using the Techstream. |
U0123 |
Communication lost with yaw rate sensor module |
The front camera does not receive data sent from the airbag sensor assembly for at least approximately 5 seconds. |
All of the following conditions are met:
|
Drive the vehicle at a speed of approximately 1 km/h or more for at least 7 seconds. |
- |
- |
The DTC is stored until it is cleared using the Techstream. |
U0126 |
Communication lost with steering angle sensor module |
The front camera does not receive data sent from the steering angle sensor for at least approximately 5 seconds. |
All of the following conditions are met:
|
Turn the ignition switch to ON and wait for at least approximately 7 seconds. |
- |
- |
The DTC is stored until it is cleared using the Techstream. |
U0129 |
Communication lost with brake control module |
The front camera does not receive data sent from the brake actuator assembly for at least approximately 5 seconds. |
Both of the following conditions are met:
|
Turn the ignition switch to ON and wait for at least approximately 7 seconds. |
- |
- |
The DTC is stored until it is cleared using the Techstream. |
U0131 |
Lost communication with power steering control module |
The front camera does not receive data sent from the power steering ECU assembly for at least approximately 5 seconds. |
Both of the following conditions are met:
|
Turn the ignition switch to ON and wait for at least approximately 7 seconds. |
- |
- |
The DTC is stored until it is cleared using the Techstream. |
U0142 |
Communication lost with body control module "B" |
The front camera does not receive data sent from the main body ECU (multiplex network body ECU) for at least approximately 5 seconds. |
All of the following conditions are met:
|
Turn the ignition switch to ON and wait for at least approximately 7 seconds. |
- |
- |
The DTC is stored until it is cleared using the Techstream. |
U0155 |
Communication lost with instrument panel control module (IPC) |
The front area recognition camera does not receive data sent by the instrument cluster assembly for approximately 5 seconds or more. |
All of the following conditions are met:
|
Turn the ignition switch to ON and wait for at least approximately 7 seconds. |
- |
- |
The DTC is stored until it is cleared using the Techstream. |
U0235*1 |
Loss of communication with cruise control front distance sensor |
The front recognition camera does not receive data sent by the millimeter wave radar sensor assembly for approximately 5 seconds or more. |
Both of the following conditions are met:
|
Turn the ignition switch to ON and wait for at least approximately 7 seconds. |
- |
- |
The DTC is stored until it is cleared using the Techstream. |
U023A*1 |
Loss of communication with image processing module "A" |
The power steering ECU assembly does not receive data sent by the front recognition camera for approximately 5 seconds or more. |
Both of the following conditions are met:
|
Turn the ignition switch to ON and wait for at least approximately 7 seconds. |
- |
- |
The DTC is stored until it is cleared using the Techstream. |
(r) Left Blind Spot Sensor / Techstream displays "Blind Spot Monitor Master"
Body Electrical > Blind Spot Monitor Master > Trouble CodesHINT:
- This ECU uses the CAN communication system for DTC communication.
- *1: Refer to the Blind Spot Monitor System
Click here
- *2: Refer to the Blind Spot Monitor System
Click here
DTC | Detection Item | DTC Detection Condition | DTC Detection Condition | DTC Check Procedure | Warning Displayed | DTC Storage Method |
|
|---|---|---|---|---|---|---|---|
Meter Indication | Multi-information display |
||||||
U0100 |
Communication lost with ECM/PCM "A" |
The left blind spot sensor does not receive data from the ECM for approximately 11 seconds or more. |
All of the following conditions are met:
|
Turn the ignition switch to the ON position, turn the blind spot monitor system ON using the blind spot monitor main switch (ON/OFF switch), and wait for approximately 12 seconds or more. |
- |
Displays messages on the multi-information display. |
The DTC is stored until it is cleared using the Techstream. |
U0125 |
Communication lost with yaw rate sensor module |
The left blind spot monitor sensor does not receive data from the airbag sensor assembly for approximately 4 seconds or more. |
All of the following conditions are met:
|
Turn the ignition switch to the ON position, turn the blind spot monitor system ON using the blind spot monitor main switch (ON/OFF switch), and wait for approximately 5 seconds or more. |
- |
Displays messages on the multi-information display. |
The DTC is stored until it is cleared using the Techstream. |
U0126 |
Communication lost with steering angle sensor module |
The left blind spot monitor sensor does not receive data from the steering angle sensor for approximately 11 seconds or more. |
All of the following conditions are met:
|
Turn the ignition switch to the ON position, turn the blind spot monitor system ON using the blind spot monitor main switch (ON/OFF switch), and wait for approximately 12 seconds or more. |
- |
Displays messages on the multi-information display. |
The DTC is stored until it is cleared using the Techstream. |
U0129 |
Communication lost with brake control module |
The left blind spot monitor sensor does not receive data from the brake booster with master cylinder assembly for approximately 3 seconds or more. |
All of the following conditions are met:
|
Turn the ignition switch to the ON position, turn the blind spot monitor system ON using the blind spot monitor main switch (ON/OFF switch), and wait for approximately 5 seconds or more. |
- |
Displays messages on the multi-information display. |
The DTC is stored until it is cleared using the Techstream. |
U0142 |
Communication lost with body control module "B" |
The left blind spot monitor sensor does not receive data from the main body ECU (multiplex network body ECU) for approximately 11 seconds or more. |
All of the following conditions are met:
|
Turn the ignition switch to the ON position, turn the blind spot monitor system ON using the blind spot monitor main switch (ON/OFF switch), and wait for approximately 12 seconds or more. |
- |
Displays messages on the multi-information display. |
The DTC is stored until it is cleared using the Techstream. |
U0232*1 |
Communication lost with blind spot monitor slave control module |
The left blind spot monitor sensor does not receive data from the right blind spot monitor sensor for at least 11 seconds. |
All of the following conditions are met:
|
Turn the ignition switch to the ON position, turn the blind spot monitor system ON using the blind spot monitor main switch (ON/OFF switch), and wait for approximately 12 seconds or more. |
- |
Displays messages on the multi-information display. |
The DTC is stored until it is cleared using the Techstream. |
U1331*2 |
Software incompatibility with body control module "B" |
The destination information of the main body ECU (multiplex network body ECU) and the left blind spot sensor do not match. |
All of the following conditions are met:
|
Turn the ignition switch to the ON position, turn the blind spot monitor system ON using the blind spot monitor main switch (ON/OFF switch), and wait for approximately 1 second or more. |
- |
Displays messages on the multi-information display. |
The DTC is stored until it is cleared using the Techstream. |
(s) Radio and Display Receiver Assembly / Techstream displays "Navigation System"
Body Electrical > Navigation System > Trouble CodesHINT:
This ECU uses the CAN communication system for DTC communication.
DTC | Detection Item | DTC Detection Condition | DTC Detection Condition | DTC Check Procedure | Warning Displayed | DTC Storage Method |
|
|---|---|---|---|---|---|---|---|
Meter Indication | Multi-information display |
||||||
U0073 |
Malfunction Transmission (Navigation with APGS) |
The radio and display receiver assembly is unable to transmit/receive data for approximately 10 seconds or more. |
Both of the following conditions are met:
|
Turn the ignition switch ON and wait for approximately 20 seconds or more. |
- |
- |
The DTC is stored until it is cleared using the Techstream. |
U0100 |
Engine ECU Communication |
The radio and display system assembly does not receive data sent by the ECM for approximately 10 seconds or more. |
Both of the following conditions are met:
|
Turn the ignition switch ON and wait for approximately 20 seconds or more. |
- |
- |
The DTC is stored until it is cleared using the Techstream. |
U0129 |
VSC (ECB) ECU Communication |
The radio and display system assembly does not receive data from the brake actuator assembly for approximately 10 seconds or more. |
Both of the following conditions are met:
|
Turn the ignition switch ON and wait for approximately 20 seconds or more. |
- |
- |
The DTC is stored until it is cleared using the Techstream. |
U0140 |
Loss of communication with body control module |
The radio and display receiver assembly does not receive data from the main body ECU (multiplex network body ECU) for approximately 10 seconds or more. |
Both of the following conditions are met:
|
Turn the ignition switch ON and wait for approximately 20 seconds or more. |
- |
- |
The DTC is stored until it is cleared using the Techstream. |
U0155 |
Combination Meter ECU Communication |
The radio and display system assembly does not receive data from the instrument cluster assembly for approximately 30 seconds or more. |
Both of the following conditions are met:
|
Turn the ignition switch to the ON position and wait for approximately 60 seconds or more. |
- |
- |
The DTC is stored until it is cleared using the Techstream. |
U0164 |
Air Conditioning ECU Communication |
The radio and display receiver assembly does not receive data from the air conditioning amplifier assembly for approximately 10 seconds or more. |
Both of the following conditions are met:
|
Turn the ignition switch ON and wait for approximately 20 seconds or more. |
- |
- |
The DTC is stored until it is cleared using the Techstream. |
U0198 |
Communication loss with telematics control module |
The radio and display receiver assembly does not receive data from the DCM (telematics transceiver) for approximately 3 seconds or more. |
Both of the following conditions are met:
|
Turn the ignition switch ON and wait for approximately 6 seconds or more. |
- |
- |
The DTC is stored until it is cleared using the Techstream. |
(t) DCM (Telematics Transceiver) / Techstream displays "Telematics"
Body Electrical > Telematics > Trouble CodesHINT:
This ECU uses the CAN communication system for DTC communication.
DTC | Detection Item | DTC Detection Condition | DTC Detection Condition | DTC Check Procedure | Warning Displayed | DTC Storage Method |
|
|---|---|---|---|---|---|---|---|
Meter Indication | Multi-information display |
||||||
U0142 |
Communication lost with body control module "B" |
The DCM (telematics transceiver) does not receive data from the main body ECU (multiplex network body ECU) for approximately 10 seconds or more. |
Both of the following conditions are met:
|
Turn the ignition switch ON and wait for approximately 20 seconds or more. |
- |
- |
The DTC is stored until it is cleared using the Techstream. |
U0155 |
Communication lost with instrument panel control module (IPC) |
The DCM (telematics transceiver) does not receive data from the instrument cluster assembly for approximately 10 seconds or more. |
Both of the following conditions are met:
|
Turn the ignition switch ON and wait for approximately 20 seconds or more. |
- |
- |
The DTC is stored until it is cleared using the Techstream. |
U0163 |
Communication lost with navigation control module |
The DCM (telematics transceiver) does not receive data sent by the radio and display receiver assembly for approximately 10 seconds or more. |
Both of the following conditions are met:
|
Turn the ignition switch ON and wait for approximately 20 seconds or more. |
- |
- |
The DTC is stored until it is cleared using the Techstream. |
(u) Central Gateway ECU (Network Gateway ECU) / Techstream displays "Central Gateway"
HINT:
The central gateway ECU (network gateway ECU) is connected to the CAN communication system, but the central gateway ECU (network gateway ECU) does not store or output CAN communication-related DTCs.
(v) Steering Angle Sensor / Techstream displays "-"
HINT:
The steering angle sensor is connected to the CAN communication system, but the steering angle sensor does not store or output CAN communication DTCs.
CAN BUS WAVEFORMS
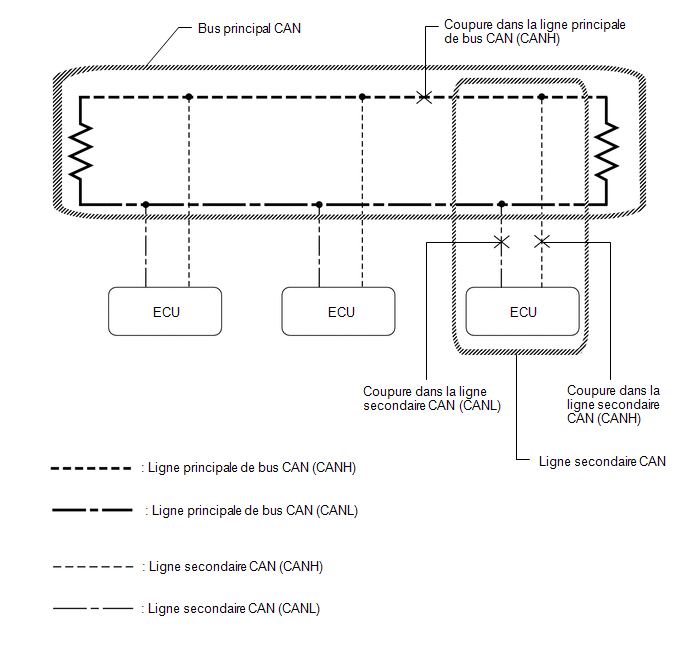
HINT:
- This waveform is measured between the CANH and GND terminals, and between the CANL and GND terminals of the central gateway ECU (network gateway ECU). (Use it as a reference for diagnosing CAN communication lines.)
- When malfunctions are suspected in several ECUs based on the CAN bus check and the DTCs retrieved using the Techstream, first check the CAN bus resistance using an ohmmeter. If no problem is found, check the following waveforms.
Click here
- If a waveform does not resemble any of the 3 patterns below (Group 1), suspect an open in a CAN main bus line, an open in a CAN branch line, or a short between a CAN line (CANH or CANL) and ground (Group 2).
- Shake the wire harness and connector to check whether the waveform changes.
(a) CAN Bus Waveforms (Group 1)
(1) Normal waveform
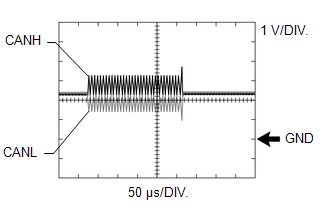
(2) Open in both lines (CANH and CANL) of a CAN branch line
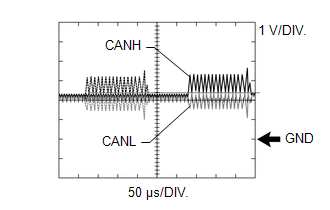
HINT:
- Waveforms (shown as dotted lines) are not present in an ECU or sensor connected to the CAN branch line with an open circuit in both lines. (The waveforms of the other ECUs or sensors operate normally.)
- Since this waveform resembles a normal waveform, instead of using the waveform, identify the defective part by checking the CAN bus.
(3) Short between CAN bus lines (CANH and CANL)
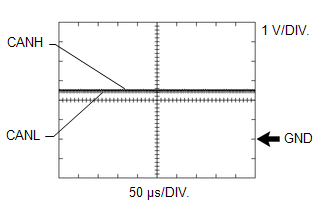
HINT:
- The waveforms disappear.
- If the malfunction is in an ECU, disconnecting the ECU will change the waveform. If the waveform does not change, a malfunction in the wire harness is suspected.
(b) CAN Bus Waveforms (Reference) (Group 2)
NOTICE:
The following CAN bus waveforms can be used for reference only. The actual measured waveform may vary significantly depending on the location of the open or short circuit.
(1) Open in CAN branch line (CANH)
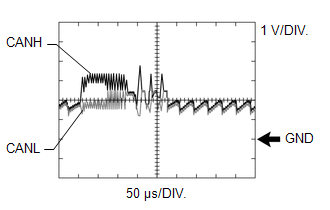
HINT:
- An abnormal waveform is output by an ECU with an open in one of its CAN branch lines. Since this abnormal output interferes with the signals of other ECUs, the output of other ECUs will also appear abnormal.
- Identify the defective part by checking the DTCs when performing the CAN bus check, or by checking the waveform changes when the ECUs or sensors are disconnected. The waveform will become the waveform for an open in both sides of a CAN branch line when the ECU or sensor with an open in a CAN branch line is disconnected.
(2) Open in CAN branch line (CANL)
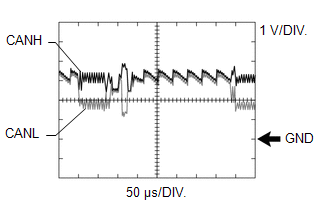
HINT:
- An abnormal waveform is output by an ECU with an open in one of its CAN branch lines. Since this abnormal output interferes with the signals of other ECUs, the output of other ECUs will also appear abnormal.
- Identify the defective part by checking the DTCs when performing the CAN bus check, or by checking the waveform changes when the ECUs or sensors are disconnected. The waveform will become the waveform for an open in both sides of a CAN branch line when the ECU or sensor with an open in a CAN branch line is disconnected.
(3) Open in CAN main bus line (CANH)
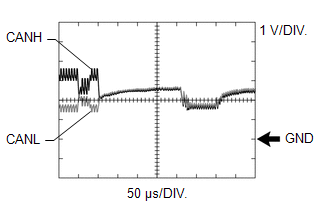
HINT:
- The waveforms of ECUs or sensors closer to the Central Gateway ECU (Network Gateway ECU) than the part with the open are almost normal.
- The waveforms of ECUs or sensors located on the opposite side of the Central Gateway ECU (Network Gateway ECU) from the part with the open are abnormal.
- An open in a CAN main bus line can be checked by measuring the resistance between the CANH and CANL terminals of a CAN branch line.
(4) Short between CAN bus line (CANH) and ground
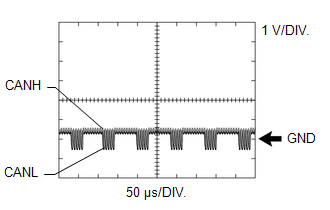
HINT:
- Identify the shorted part by checking the waveform changes when disconnecting the connectors of the CAN junction connectors, or when disconnecting the ECUs or sensors.
- A short to ground in the CANH line can be checked by measuring the resistance between CANH and ground using an ohmmeter.
(5) Short between CAN bus line (CANL) and ground
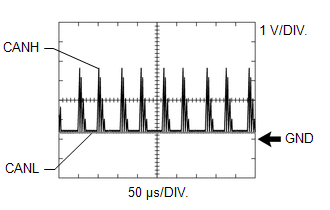
HINT:
- Identify the shorted part by checking the waveform changes when disconnecting the connectors of the CAN junction connectors, or when disconnecting the ECUs or sensors.
- A short to ground in the CANL line can be checked by measuring the resistance between CANL and ground using an ohmmeter.
DATA TRANSMISSION/RECEPTION TABLE
(a) Data Transmission/Reception Table
HINT:
If the Data List items related to sent/received data are not displayed correctly, the part with interrupted communication can be identified using the table below.
Data Contents | Data detected and sent by | Data received by | Relevant Data List item |
|||
|---|---|---|---|---|---|---|
Can be checked in Data List | Cannot be checked in Data List | Selected System | Data List Item | Link |
||
Accelerator Position |
ECM |
Brake Actuator Assembly |
|
Engine and ECT |
Accelerator Position (w/ Canister Pump Module) |
|
Accelerator Position (w/o Canister Pump Module) |
|
|||||
ABS/VSC/TRAC/EPB |
Accelerator Opening Angle % |
|
||||
Engine speed |
ECM |
|
|
Engine and ECT |
Engine Speed (w/ Canister Pump Module) |
|
Engine Speed (w/o Canister Pump Module) |
|
|||||
ABS/VSC/TRAC/EPB |
Engine Revolution |
|
||||
EMPS |
Engine Revolution |
|
||||
Engine Coolant Temperature |
ECM |
|
- |
Engine and ECT |
Coolant Temperature (w/ Canister Pump Module) |
|
Coolant Temperature (w/o Canister Pump Module) |
|
|||||
Combination Meter |
Coolant Temperature |
|
||||
Air Conditioner |
Engine Coolant Temp (w/ Top-mounted Air Conditioner Pressure Sensor) |
|
||||
Engine Coolant Temp (w/ Side-mounted Air Conditioner Pressure Sensor) |
|
|||||
Vehicle speed |
Brake Actuator Assembly |
|
|
ABS/VSC/TRAC/EPB |
Vehicle Speed |
|
EMPS |
Meter Vehicle Velocity |
|
||||
Engine and ECT |
Vehicle Speed (w/ Canister Pump Module) |
|
||||
Vehicle Speed (w/o Canister Pump Module) |
|
|||||
Combination Meter |
Vehicle Speed Meter |
|
||||
Navigation System |
Vehicle Speed |
|
||||
Radar Cruise2 |
Vehicle Spd-Brake ECU |
|
||||
Occupant Detection |
VSC Vehicle Speed |
|
||||
Vehicle speed |
Combination Meter Assembly*3 |
- |
|
Combination Meter |
Vehicle Speed Meter |
|
Wheel Speed |
Brake Actuator Assembly |
|
|
ABS/VSC/TRAC/EPB |
|
|
HL Auto Leveling |
|
|
||||
EMPS |
|
|
||||
Gear Engaged |
ECM |
|
|
Engine and ECT |
Neutral Position SW (w/ Canister Pump Module) |
|
Neutral Position SW (w/o Canister Pump Module) |
|
|||||
Power Source Control |
Shift P Signal |
|
||||
Navigation System |
Reverse Signal |
|
||||
Blind Spot Monitor Master |
Reverse (Only for AT/CVT) |
|
||||
Ambient Temperature |
Air Conditioning Amplifier Assembly |
Combination meter assembly |
|
Air Conditioner |
Ambient Temp Sensor (w/ Top-mounted Air Conditioner Pressure Sensor) |
|
Ambient Temp Sensor (w/ Side-mounted Air Conditioner Pressure Sensor) |
|
|||||
Combination Meter |
Ambient Temperature |
|
||||
Driver Door Courtesy Light Switch |
Main body ECU (multiplex network body ECU) |
- |
|
Main Body |
FL Door Courtesy SW |
|
Steering angle |
Steering angle sensor |
|
|
Blind Spot Monitor Master |
Steering Angle |
|
EMPS |
Steering Angle Velocity |
|
||||
ABS/VSC/TRAC/EPB |
Steering Angle Sensor |
|
||||
Radar Cruise2 |
Steering Angle |
|
||||
Yaw rate sensor |
Airbag sensor assembly |
|
|
ABS/VSC/TRAC/EPB |
|
|
Radar Cruise2 |
Yaw Rate Sensor |
|
||||
Acceleration |
Airbag sensor assembly |
|
|
ABS/VSC/TRAC/EPB |
|
|
Occupant Detection |
|
|
||||
IG Switch Position |
Main body ECU (multiplex network body ECU) |
Left Headlight ECU Subassembly |
Certification ECU (Smart Key ECU Assy) |
Main Body |
IG SW |
|
HL Auto Leveling |
+B |
|
||||
Stop Light Switch Signal |
Brake Actuator Assembly |
Certification ECU (Smart Key ECU Assy) |
|
ABS/VSC/TRAC/EPB |
Stop Light SW |
|
Power Source Control |
Stop Light Switch1 |
|
||||
Headlight Switch Signal (High Beam) |
Main body ECU (multiplex network body ECU) |
Left Headlight ECU Subassembly |
|
Main Body |
Head Light SW (Head) |
|
HL Auto Leveling |
HeadLight High Beam State |
|
||||
Side Turn Signal |
Combination Meter Assembly*2 |
|
|
Combination Meter |
|
|
Blind Spot Monitor Master |
Turn Switch State |
|
||||
LKA/LDA |
|
|
||||
Tail Light Signal |
Main body ECU (multiplex network body ECU) |
Left Headlight ECU Subassembly |
|
Main Body |
Head Light SW (Tail) |
|
HL Auto Leveling |
Clearance Light State |
|
||||
ECM Power Source Voltage*1 |
ECM |
- |
- |
Engine and ECT |
BATT Voltage |
|
Combination Meter Assembly Power Source Voltage*1 |
Combination meter assembly |
- |
- |
Combination Meter |
+B Voltage Value |
|
Power Steering ECU Assembly Power Supply Voltage*1 |
Power steering ECU assembly |
- |
- |
EMPS |
IG Power Supply |
|
Left Headlight Sub-assembly ECU Power Supply Voltage*1 |
Left Headlight ECU Subassembly |
- |
- |
HL Auto Leveling |
+B Voltage Value |
|
Driver Door Touch Sensor*1 |
Certification ECU (Smart Key ECU Assy) |
- |
- |
Smart Key |
D-Door Touch Sensor |
|
Blind Spot Monitor Main Switch Condition*1 |
Left blind spot monitor sensor |
- |
- |
Blind Spot Monitor Master |
Main Switch |
|
Solar Sensor*1 |
Air Conditioning Amplifier Assembly |
- |
- |
Air Conditioner |
Solar Sensor (D Side) (w/ Top-mounted Air Conditioner Pressure Sensor) |
|
Solar Sensor (D Side) (w/ Side-mounted Air Conditioner Pressure Sensor) |
|
|||||
Radio and Display Receiver Assembly Power Supply Voltage*1 |
Radio and Display Receiver Assembly |
- |
- |
Navigation System |
Battery Voltage |
|
- *1: The operation of the ECU sending the data can be evaluated using the Techstream to check items such as sensors or switches that send signals to the ECU via the direct lines.
- *2: Although the received content cannot be checked in the Data List, normal data reception can be confirmed by observing the combination meter assembly.
- *3: The combination meter assembly receives a vehicle speed signal from the brake actuator assembly and sends the signal to other ECUs.