Stabilizer Bar (Rear Suspension) and Bushings
* On some models, it may be necessary to lower the fuel tank to obtain sufficient clearance for removing the stabilizer bar (see Subsection 5.7).
Removal and installation
PROCEDURE
1. Loosen the rear wheel nuts. Raise the rear of the vehicle and support it on stands. Remove the rear wheels.
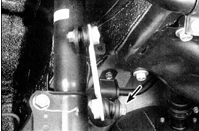
2. Remove the nuts securing the stabilizer bar link (nut indicated by arrow) to the connecting links. If the stud turns together with the nut, hold it using a box-end wrench.
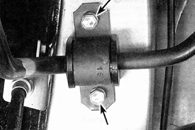
3. Remove the bolts securing the stabilizer bar bushing clamps (bolts indicated by arrows).
4. The stabilizer bar can now be removed from the vehicle. Remove the brackets from the stabilizer bar.
5. Inspect the bushings for signs of wear, seal condition, deformation, cracks or other damage, and replace them if necessary. Also inspect the connecting link bushings.
6. Using a wire brush, clean the areas of the stabilizer bar on which the bushings sit. Installation is performed in the reverse order of removal. If necessary, lubricate the bushings and U-brackets with vegetable oil to ease installation (do not use petroleum oils or brake fluid, as they will damage the rubber bushings).
7. To check the condition of the connecting links, refer to the instructions (see Subsection 10.4).
8. Installation is performed in the reverse order of removal.
Test yourself
A quick Toyota Corolla quiz: every answer comes with an explanation and a link to the manual page.