Suspension Arm
Removal
PROCEDURE
1. Loosen the wheel nuts, raise the front of the vehicle, support it on jack stands, and remove the wheel.
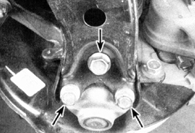
2. Remove the bolt and two nuts (indicated by the arrows) securing the suspension arm to the steering knuckle.

3. Using a pry bar, separate the suspension arm from the steering knuckle and remove the suspension arm from the ball joint.

4. To release the front mounting of the suspension arm, remove the front pivot bolt (indicated by the arrow).
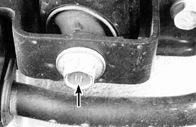
5. To release the rear control arm mounting to the crossmember on models produced from 1996, remove the rear pivot bolt (indicated by the arrow).
6. To release the rear control arm mounting to the crossmember on earlier models, remove the nut securing the pivot bolt to the bracket and bushing (see figure Front Suspension Control Arm and Stabilizer Bar Components).
* Do not remove the nut and two bolts securing the control arm bracket unless it is necessary to replace the bushing.
7. Remove the control arm.
Inspection
PROCEDURE
Inspect the control arm for distortion and the bushings for signs of wear. Replace as necessary. Do not attempt to straighten a bent control arm; replace it.
Installation
PROCEDURE
1. Installation is performed in the reverse order of removal (see figure Front Suspension Control Arm and Stabilizer Bar Components).
2. Tighten all threaded connections to the specified torque values listed in the Specifications section at the beginning of this chapter.
* Before tightening the pivot bolts, raise the outer end of the control arm with a jack to position the arm as it is when the vehicle is standing on its wheels.
3. Install the wheel and start the wheel nuts by hand. Lower the vehicle to the ground and tighten the nuts to the specified torque listed in the Specifications section of the relevant chapter.
4. It is recommended to check the front wheel alignment and adjust if necessary.
Test yourself
A quick Toyota Corolla quiz: every answer comes with an explanation and a link to the manual page.