Stabilizer Bar (Front Suspension) and Bushings
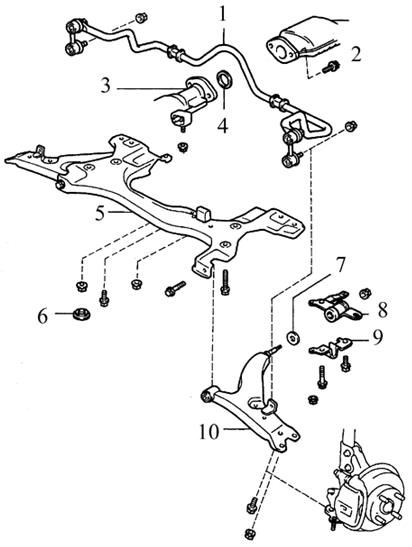
Stabilizer Bar and Front Suspension Arm Components
1. Stabilizer bar
2. Center exhaust pipe section
3. Front exhaust pipe section
4. Gasket
5. Suspension crossmember
6. Bushing
7. Washer
8. Suspension arm bracket
9. Stabilizer bar bracket
10. Suspension arm
The illustration shows components of 1993-1995 model year vehicles. On models from 1996 onward, a vertical bolt is used instead of a nut and hinge bolt to secure the rear of the suspension arm to the crossmember.
Removal
PROCEDURE
1. Loosen the front wheel nuts. Raise the front of the vehicle and support it on jack stands. Apply the parking brake and chock the rear wheels to prevent the vehicle from rolling. Remove the front wheels.
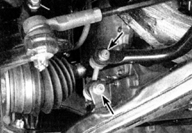
2. Disconnect the stabilizer bar links by removing the two nuts (indicated by the arrows) on each link. If the stud turns with the nut, use a hex key to hold the stud.
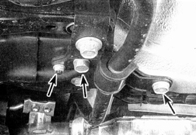
3. Remove the nut (indicated by the left arrow) and bolts (indicated by the remaining arrows) securing the stabilizer bushing clamps (the left clamp is shown; the right clamp is identical).
4. Remove the bolts securing the front exhaust pipe section to the catalytic converter (see subsection 5.13) and lower it far enough to allow removal of the stabilizer bar.
5. Once the stabilizer bar is removed from the vehicle, remove the mounting bushings and inspect them. If they are cracked, worn, or damaged, replace them.
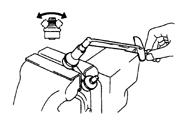
6. It is also recommended to check the stabilizer bar links. To do this, rock the ball joint stud from side to side 5–6 times, then install the nut. Using a torque wrench, tighten the nut one turn every 2–4 seconds and read the torque wrench on the fifth turn. It should indicate a torque of 0.54–11.8 N·m. If not, replace the link.
7. Clean the bushing mounting locations on the stabilizer bar with a stiff wire brush to remove dirt and rust.
Installation
PROCEDURE
1. Lubricate the new bushings inside and out with vegetable cooking oil to ease installation of the stabilizer bar.
* Do not use mineral oil, petroleum-based oils, or brake fluid, as they will damage the bushings.
2. Installation is performed in the reverse order of removal.
Test yourself
A quick Toyota Corolla quiz: every answer comes with an explanation and a link to the manual page.