Strut (Front)
Removal
PROCEDURE
1. Loosen the wheel nuts, raise the vehicle and support it on stands. Remove the wheel.
2. Remove the bolts securing the brake hose bracket to the strut. If the vehicle is equipped with ABS, disconnect the wheel speed sensor wire harness from the strut by removing the bracket bolt.

3. Remove the two nuts (indicated by arrows) securing the strut to the steering knuckle, and drive out the bolts using a hammer and punch.
4. Remove the strut from the steering knuckle. Take care not to overextend the inner CV joint of the driveshaft. Also make sure the steering knuckle does not tip outward or hang by the brake hose.
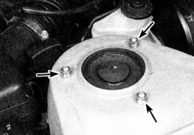
5. Holding the strut assembly with the spring with one hand, remove the upper mounting nuts securing the strut to the body (indicated by arrows). Remove the strut with spring from the wheel housing.
Inspection
PROCEDURE
1. Check the strut for fluid leakage from the shock absorber, dents, cracks, or other damage requiring strut replacement.
2. Check the spring for cracks or chipped coating (this will lead to premature spring failure due to corrosion). Inspect the spring seat for cuts, seals, or other damage and signs of wear.
3. If any damage or signs of wear are present, proceed to the section describing strut disassembly (see Subsection 10.3).
Installation
PROCEDURE
1. Position the strut under the wheel housing and insert the upper mounting bolts into the body holes. Start the nuts by hand. This work is best done by two people, as the strut is fairly heavy and bulky.
2. Install the steering knuckle onto the strut flanges and insert the two mounting bolts. Tighten the nuts to the specified torque (see Subsection 10.1).
3. Install the brake hose bracket on the strut and securely tighten the mounting bolt. If the vehicle is equipped with ABS, install the wheel speed sensor wire bracket.
4. Install the wheel and start the wheel nuts, then lower the vehicle to the ground and tighten the wheel nuts to the specified torque (see Subsection 10.1).
5. Tighten the upper strut mounting nuts to the specified torque (see Subsection 10.1).
6. Have the front wheel alignment checked and adjusted if necessary at an automotive service facility.
Test yourself
A quick Toyota Corolla quiz: every answer comes with an explanation and a link to the manual page.