Strut (Rear Suspension)

Correct Position of the Mount When Assembling the Rear Suspension Strut
1. Strut mount
2. Hub carrier bracket attachment point
Install the strut mount so that its flat side faces forward, and so that the hub carrier bracket attachment point is 5° from the midpoint between the mount holes.
Removal
PROCEDURE
1. On models with a one-piece rear seatback, remove the rear seatback. On models with split rear seatbacks, remove all seatbacks. On station wagon models, remove the upper strut mount cover (plastic panel/cap on the side trim panel, secured by one screw) (see Subsection 11.18).
2. Loosen the rear wheel nuts, raise the rear of the vehicle and support it on stands. Remove the wheel.
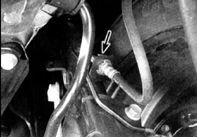
3. Remove the clip (indicated by arrow), disconnect the brake hose from the bracket on the rear strut and pull the hose fitting out through the bracket opening. If the vehicle is equipped with ABS, disconnect the wheel speed sensor wire from the strut.
4. Disconnect the stabilizer bar link from the strut.
5. Place a jack under the hub carrier bracket.
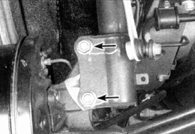
6. Remove the nuts securing the hub carrier bracket to the strut (nuts indicated by arrows), and drive out the bolts using a hammer and punch.
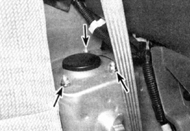
7. Remove the three nuts (indicated by arrows) securing the upper strut mount to the body.
8. Lower the hub carrier bracket together with the jack, and remove the two bolts securing the hub carrier bracket to the strut.
9. Remove the strut.
Inspection
PROCEDURE
1. When inspecting the strut, refer to the instructions (see Subsection 10.3).
2. If the strut must be disassembled to replace the spring or shock absorber, refer to the instructions (see Subsection 10.3).
3. When assembling the strut, make sure the strut mount is installed as shown in the illustration (see Fig. Correct Position of the Mount When Assembling the Rear Suspension Strut).
Installation
PROCEDURE
1. Install the strut under the vehicle body and insert the upper mounting bolts into the body holes. Install the nuts, but do not fully tighten them yet.
2. Install the knuckle bracket on the strut, insert the mounting bolts and tighten the nuts to the torque specified in the Specifications section at the beginning of this chapter.
3. Install the stabilizer bar connecting link on the strut bracket.
4. Install the brake hose on the strut bracket and secure it with the clip. If the vehicle is equipped with ABS, install the wheel speed sensor wire on the strut.
5. Install the wheel and nuts. Lower the vehicle to the ground and tighten the nuts to the torque specified in the Specifications section at the beginning of this chapter.
6. Tighten the three upper strut mounting nuts to the torque specified in the Specifications section at the beginning of this chapter.
7. Repeat the procedure for the second strut, starting from removal (see step 2.).
8. Install the rear seat, rear seatback or seatbacks, or the rear strut upper mount cover (see subsection 11.18).
Test yourself
A quick Toyota Corolla quiz: every answer comes with an explanation and a link to the manual page.