GENERAL INFORMATION
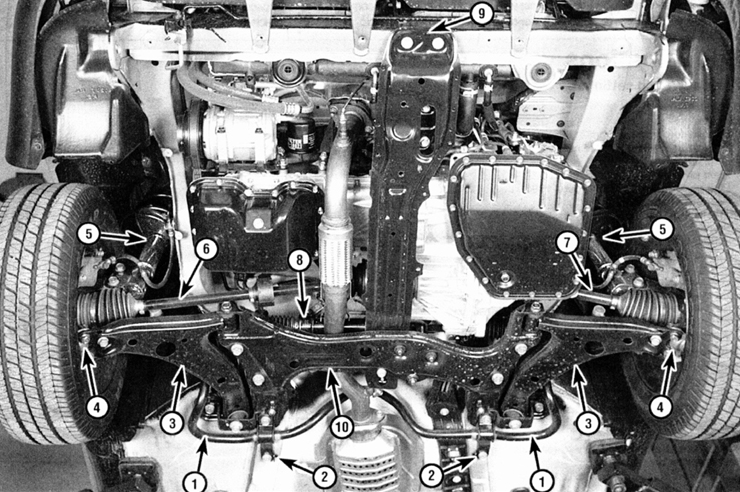
Front Suspension Components 1. Stabilizer bar
2. Stabilizer bar bushing clamp
3. Control arm
4. Ball joint
5. Strut assembly with coil spring
6. Right driveshaft
7. Left driveshaft
8. Rack and pinion steering gear
9. Engine mount crossmember
10. Suspension crossmember
The front suspension uses MacPherson struts. At the top, each strut with coil spring is attached to a strut mount, which in turn is attached to the body. The lower end of the strut is attached to the steering knuckle. The steering knuckle is also attached to a ball joint installed on the outer end of the control arm. The stabilizer bar reduces body roll.
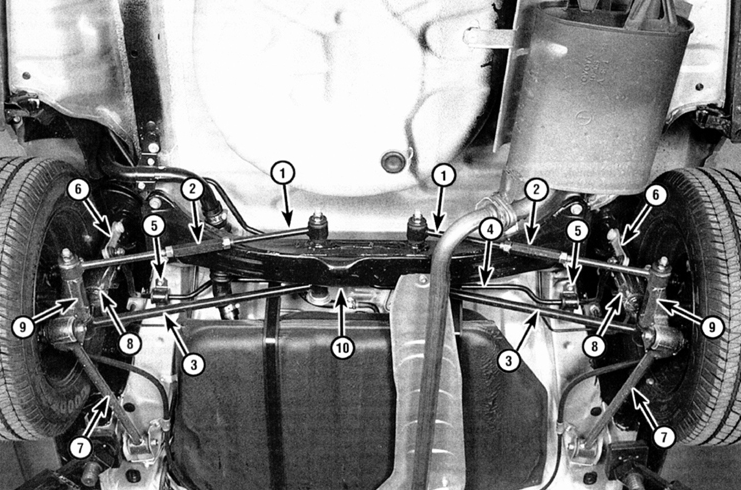
Rear Suspension Components 1. Rear transverse link N2
2. Link length adjuster
3. Rear transverse link N1 (front)
4. Rear stabilizer bar
5. Stabilizer bar bushing clamp
6. Stabilizer bar connecting link
7. Trailing arm
8. Strut assembly with coil spring
9. Rear wheel bearing carrier
10. Rear suspension crossmember
The rear suspension also uses strut assemblies with coil springs. The upper end of the strut is attached to the vehicle body. The lower end of the strut is attached to the wheel bearing carrier. The carrier is attached to two transverse suspension links, and longitudinal location is provided by a trailing arm installed between the wheel bearing carrier and the body.
The rack and pinion steering gear is installed behind the engine/transmission on the body bulkhead and actuates the tie rods, which are attached to the steering knuckles. The inner ends of the tie rods are protected by rubber boots, which must be periodically inspected for secure attachment, cracks, and grease leakage.
The power steering system consists of a pump driven by the engine drive belt and includes pipes and hoses. Check the hydraulic fluid level in the pump reservoir periodically (see Subsection 2.5).
The steering wheel rotates the steering column shaft, which operates the steering gear through a universal joint. Steering play may be caused by wear of the steering column shaft universal joint, wear of the steering gear, wear of the tie rod mounts, or loose mounting bolts.
Precautions
When working on suspension or steering components, you often encounter threaded connections that seem impossible to loosen. These connections under the underbody are constantly exposed to moisture, dust, dirt, etc., and may rust or seize, making them very difficult to loosen. To solve this problem without rounding off the bolt or nut flats (and without damaging other components), apply a generous amount of penetrating oil and wait several minutes to let it soak in. Cleaning the exposed thread with a wire brush also makes it easier to loosen the bolt or nut. Sometimes a sharp blow from a hammer or chisel can break the seizing bond between the nut and bolt; however, be careful not to damage the thread. Sometimes it is helpful to heat the seized connection with a torch, but be extremely careful when working with an open flame. Try using a wrench with a longer handle or a length of pipe slipped over the wrench to increase leverage. Sometimes, before loosening, it helps to tighten the nut or bolt slightly more, after which it may loosen more easily. Bolts and nuts that were very difficult to loosen must be replaced.
Since most operations described in this chapter require raising the vehicle and working under it, be sure to obtain a pair of good support stands. A hydraulic floor jack is recommended for lifting the vehicle. It can also be used to support certain components and assemblies during various operations.
* Do not use a floor jack as a support. After loosening and removing bolts or nuts, inspect them and replace with new ones if necessary. Tighten threaded connections to the specified torque. Do not attempt to weld or straighten any suspension or steering components. Replace deformed or damaged parts with new ones.
Test yourself
A quick Toyota Corolla quiz: every answer comes with an explanation and a link to the manual page.