Brake control
Calibration
In this manual: Brake control
28steps
~173min
5/5difficulty
1special tools
Done 0 of 28
- Description
- After replacing components relating to the vsc or performing "front wheel alignment adjustment", clear and read the sensor calibration data.
- Follow the chart to perform calibration.

- Clear zero point calibration data (when using intelligent tester)

- Clear the zero point calibration data.
- Connect the intelligent tester (with can vim) to the dlc3.
- Turn the ignition switch on.

- Operate the intelligent tester to erase the codes (select "reset memory").
Refer to the intelligent tester operator's manual for further details.
- Using the intelligent tester, perform the zero point calibration of the yaw rate and deceleration sensor.
- Preform zero point calibration of yaw rate and deceleration sensor (when using intelligent tester)
- While obtaining the zero point, do not vibrate the vehicle by tilting, moving or shaking it and keep it stationary. (Do not start the engine.)
- Perform this on a level surface (with an inclination of less than 1°).
- Procedures for test mode.
- Check that the shift lever is in the p position and apply the parking brake.
Dtcs c1210/36 and c1336/39 will be recorded if the shift lever is not the p position (see page bc-88).
- Connect the intelligent tester (with can vim) to the dlc3.
- Turn the ignition switch on.

- Set the intelligent tester to test mode (select "test mode").
Refer to the intelligent tester operator's manual for further details.
- Obtain the zero point of the yaw rate and deceleration sensor.
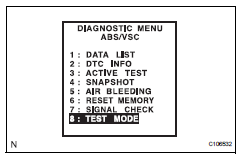
- Keep the vehicle stationary on a level surface for 2 seconds or more.
- Check that the vsc warning light blinks as shown in the illustration.
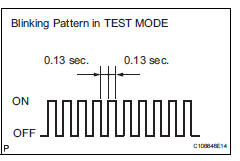
Hint:
- If the vsc warning light does not blink, perform the zero point calibration again.
- The zero point calibration is performed only once after the system enters test mode.
- Calibration cannot be performed again until the stored data is cleared once.
- Turn the ignition switch off.
- Clear zero point calibration data (when not using intelligent tester)
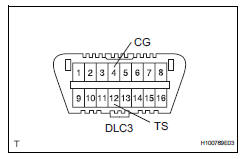
- Clear the zero point calibration data.
- Turn the ignition switch on.
- The warning light and indicator light come on for 3 seconds to indicate that the initial check is completed.
- Using sst, connect and disconnect terminals 12 (ts) and 4 (cg) of the dlc3 4 times or more within 8 seconds.
- Check that the vsc warning light comes on.
- Remove sst from the terminals of the dlc3.
- Using a check wire, perform the zero point calibration of the yaw rate and deceleration sensor.
- Perform zero point calibration of yaw rate and deceleration sensor (when not using intelligent tester)
- While obtaining the zero point, do not vibrate the vehicle by tilting, moving or shaking it and keep it stationary. (Do not start the engine.)
- Perform this on a level surface (with an inclination of less than 1°).
- Procedures for test mode.
- Turn the ignition switch off
- Using sst, connect terminals 12 (ts) and 4 (cg) of the dlc3.
- Check that the shift lever is in the p position and apply the parking brake.
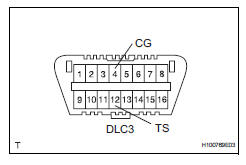
Notice:
Dtcs c1210/36 and c1336/39 will be recorded if the shift lever is not the p position (see page bc-88).
- Obtain the zero point of the yaw rate and deceleration sensor.
- Turn the ignition switch on.
- Keep the vehicle stationary on a level surface for 2 seconds or more.
- Check that the vsc warning light blinks as shown in the illustration.
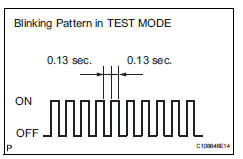
Hint:
- If the vsc warning light does not blink, perform the zero point calibration again.
- The zero point calibration is performed only once after the system enters test mode.
- Calibration cannot be performed again until the stored data is cleared once.
- Turn the ignition switch off.
Test yourself
A quick Toyota RAV4 quiz: every answer comes with an explanation and a link to the manual page.
Was this page helpful?