General processing notes for repair and painting systems
Aqua-Premium processing notes for water-thinnable products
When using water-thinnable products, the substrate pretreatment must always be carried out very carefully and only with pretreatment agents recommended for water-thinnable products.
Substrate
Pretreatment of substrates:
- Metal substrates should preferably be cleaned with nitro thinner -LVE 856 000 A3-.
- Sanded filler surfaces and old paint must be cleaned with silicone remover -LSW 019 000 A5-.
- Plastic surfaces must first be thoroughly pretreated according to the "Painting system for plastic parts" and cleaned again with silicone remover -LSW 019 000 A5- before further processing.
Masking work
Only commercially available water-resistant masking tapes and water-resistant glued masking paper or plastic masking film may be used.
Spray guns/spray systems
Suitable spray guns are compliant spray guns.

Note
Alternating use of water-thinnable and conventional products with one spray gun/spray system is not advisable. For spray guns/spray systems used for water-thinnable products, the parts carrying the material must be corrosion-resistant (stainless steel, plastic).
Mixing/adjustment containers
Only plastic containers or tinplate containers with an internal coating may be used for mixing or viscosity adjustment of water-thinnable products.
Material temperature
Since the viscosity, and therefore also the processing behavior, of water-thinnable products depends significantly on the material temperature, make sure that water-thinnable products have a temperature of +18 °C to +35 °C at the time of viscosity adjustment/processing.
Processing
Processing of water-thinnable products is significantly influenced by temperature and air humidity. This influence can range from restrictions to suspension of application if certain conditions are not met or established. The corner points are defined in the processing window for water-thinnable products.
For optimal processing under different climatic conditions and object sizes, the climate table below gives a recommendation for the use of Additive for Aqua-Premium -LVM 035 200 A3- or Additive for Aqua-Premium -LVM 035 301 A3-.
Climate table
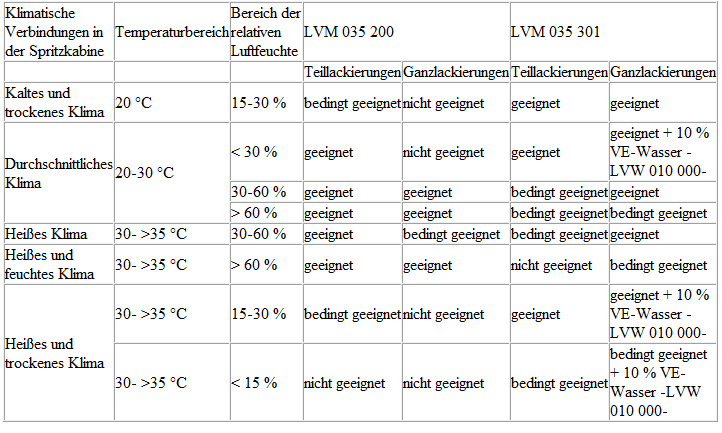
The temperature and humidity ranges given in the table are rough guideline values and always depend on local conditions. The air volume flow in the booth, the spray guns (type and/or nozzle size) and the application technique itself have a major influence on film formation and coating quality.
Assuming that a modern paint shop maintains an application temperature of +20 °C or above, special measures are only necessary with regard to humidity if it is outside the application range.
Measures for excessive relative humidity
Excessive humidity can cause shade deviations, cloud formation in metallic shades and poor sag resistance on vertical surfaces. Increasing the temperature in the spray booth can help, provided this is acceptable for the painter. Use only the additive for Aqua Premium -LVM 035 200-.
Measures for insufficient relative humidity
Insufficient humidity leads to increased overspray generation and poorer overspray extraction. If possible, lowering the application temperature can help, but it must not fall below +18 °C. Use only the additive for Aqua Premium -LVM 035 301-.
Flash-off times and recoat times
Flash-off times between spray passes and final flash-off or recoat times of waterborne products are negatively affected by low temperatures and high humidity. Drying between individual spray passes or before further refinishing can be accelerated by:
- rapid removal of humid air by blowing with variable and stationary air acceleration systems with or without drying (hand-held or floor-standing units, ceiling systems).
- Oven drying.
- Infrared drying.
Personal protective equipment:
- Observe the safety data sheet
- Wear personal protective equipment during application
Gloss level adjustment of HS clearcoats and HS topcoats
Adjusting different gloss levels of HS clearcoats and HS topcoats by mixing with matting component -LVM 769 810 A2- for plastic and metal substrates.
The notes in this information sheet on factors that influence gloss level are intended to help the painter achieve the desired gloss level even under varying operating conditions.
Application range
- For small and attached parts
Usable products
- Matting component -LVM 769 810 A2-
- 2K HS clearcoat -L2K 769 500 A5-
- 2K HS Brillant Plus clearcoat -LZK 769 K05 A5-
- 2K HS Vario clearcoat -L2K 769 K01 A2-
- 2K HS Performance clearcoat -LZK K06 A5-
- 2K HS Optimum Plus clearcoat -LZK 769 K07 A5-
- 2K HS mixing clearcoat/topcoat -L2K 074/073...-
- 2K HS hardener, long -LHA 009 047 A3-
- 2K HS hardener, extra long -LHA 009 048 A3-
- 2K VHS hardener, long -LHA 009 052...-
- 2K VHS hardener, extra long -LHA 009 053 A2-
- 2K thinner -LVE 009 001 A5-
- 2K thinner, special -LVM 009 200...-
- 2K thinner, long -LVM 009 300 A2-
- Clearcoat additive -LVM 007 000 A2-
Gloss level adjustment/matting
See system information "Refinish system for matte-painted vehicles"
See application information "Matting component -LVM 769 810 A2-"
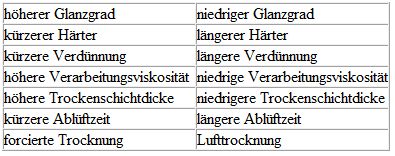
The gloss level actually achieved is influenced by various factors, in addition to shade-dependent differences.
Hardeners and thinners not listed in this information sheet can in principle be used, but, like different application methods, drying conditions and film thicknesses, they may result in different gloss levels (up to 20 %).

Note
It is strongly recommended to prepare test panels to match the vehicle's gloss level. Gloss measurements (60° measuring angle) on the adjacent parts can also be helpful.
HS clearcoat mixing table
Gloss levels
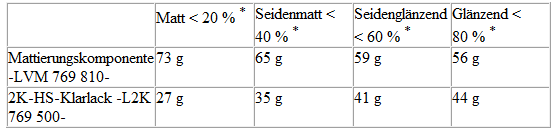
* Since these designations are not subject to any standard, the gloss values are not binding and can only be understood as rough guideline values or as common market values.
Mixing with HS hardener
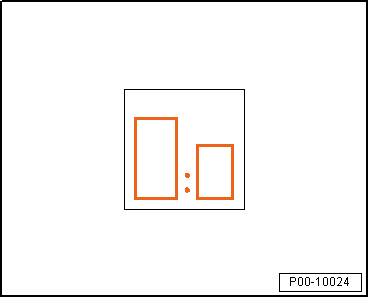
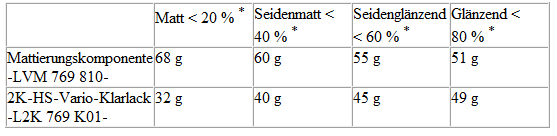
- After mixing the clearcoat with matting component -LVM 769 810-, mix this mixture 2:1 with HS hardener. Ready to spray without adding thinner.
Gloss levels
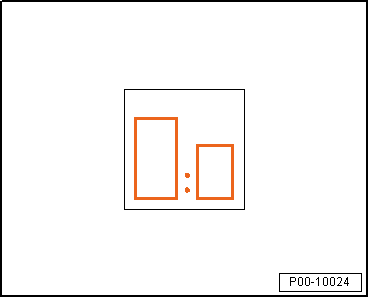
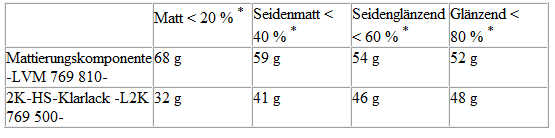
* Since these designations are not subject to any standard, the gloss values are not binding and can only be understood as rough guideline values or as common market values.
Mixing with VHS hardener
- After mixing the clearcoat with matting component -LVM 769 810-, mix this mixture 4:1 by volume with VHS hardener. Ready to spray after adding 15 % thinner.
Gloss levels
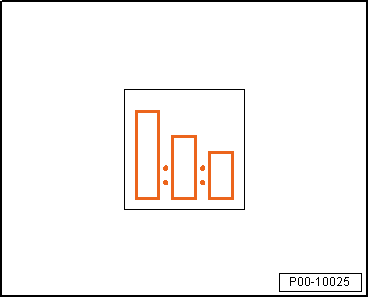
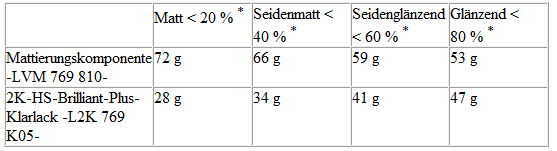
* Since these designations are not subject to any standard, the gloss values are not binding and can only be understood as rough guideline values or as common market values.
Mixing with VHS hardener
- After mixing the clearcoat with matting component -LVM 769 810-, mix this mixture 4:1 by volume with VHS hardener. Ready to spray after adding 5 % clearcoat additive -LVM 007 000 A2-.
Gloss levels
* Since these designations are not subject to any standard, the gloss values are not binding and can only be understood as rough guideline values or as common market values.
Mixing with HS hardener
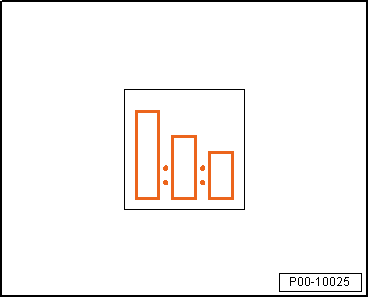
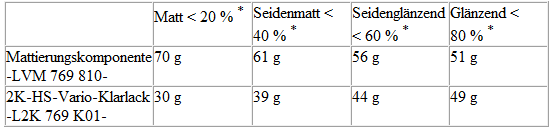
- After mixing the clearcoat with matting component -LVM 769 810-, mix this mixture 2:1 by volume with HS hardener. Ready to spray without adding thinner.
Gloss levels
* Since these designations are not subject to any standard, the gloss values are not binding and can only be understood as rough guideline values or as common market values.
Mixing with VHS hardener
- After mixing the clearcoat with matting component -LVM 769 810-, mix this mixture 4:1 by volume with VHS hardener. Ready to spray after adding 15 % thinner.
Gloss levels
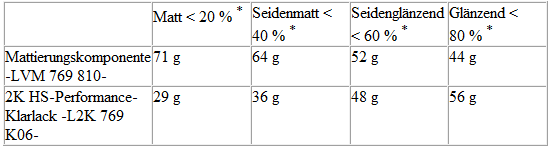
* Since these designations are not subject to any standard, the gloss values are not binding and can only be understood as rough guideline values or as common market values.
Mixing with VHS hardener
- After mixing the clearcoat with matting component -LVM 769 810-, mix this mixture 4:1 by volume with VHS hardener. Ready to spray after adding 5 % clearcoat additive -LVM 007 000 A2-.
Gloss levels
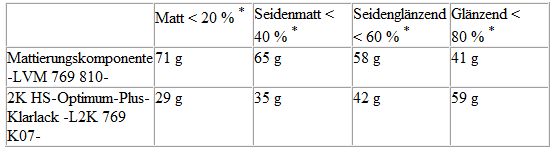
* Since these designations are not subject to any standard, the gloss values are not binding and can only be understood as rough guideline values or as common market values.
Mixing with VHS hardener
- After mixing the clearcoat with matting component -LVM 769 810-, mix this mixture 4:1 by volume with VHS hardener. Ready to spray after adding 10 % thinner.
Gloss levels
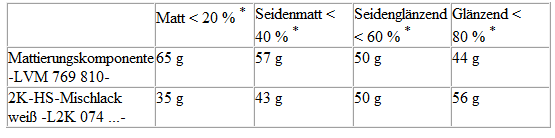
* Since these designations are not subject to any standard, the gloss values are not binding and can only be understood as rough guideline values or as common market values.
Mixing with VHS hardener
- After mixing matting component -LVM 769 810- with HS topcoat, mix this mixture 4:1 by volume with VHS hardener to cure. Ready to spray after adding 15 % thinner.
Gloss levels
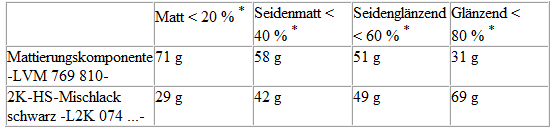
* Since these designations are not subject to any standard, the gloss values are not binding and can only be understood as rough guideline values or as common market values.
Mixing with VHS hardener
- After mixing matting component -LVM 769 810- with HS topcoat, mix this mixture 4:1 by volume with VHS hardener to cure. Ready to spray after adding 15 % thinner.
Processing
Application method "Spray pass"
- Application viscosity 4 mm at +20 °C, DIN 53211
Application viscosity 4 mm, gravity-feed gun "Compliant" and "HVLP"
DIN 4 mm: 16–20 seconds
- Thinner addition at +20 °C material temperature: depending on product used
- Set spray nozzle (see manufacturer's specifications): "Compliant" 1.3–1.4 mm.
- Set spray nozzle (see manufacturer's specifications): "HVLP" 1.3–1.4 mm.
- Set spray pressure (see manufacturer's specifications): "Compliant" 2.0–2.5 bar.
- Set atomizing air pressure (see manufacturer's specifications): "HVLP" 0.7 bar.
- Apply in 2 spray passes with a flash-off time of 5-10 minutes between passes. Apply the first pass light, but still with full coverage (observe processing notes).
The recommended dry film thickness is 60-80 µm.
Processing Notes
For the best possible and uniform matting effect, the following application notes must be strictly observed:

Note
- The spray distance to the object is slightly greater than for standard application, in order to make full use of the atomization of the spray jet. (Avoids streaking.)
- Make sure the spray passes overlap evenly and that a sufficiently wet film is applied. If application is too dry, there is a risk of mottling caused by uneven flash-off or by overspray that is not absorbed.
- With low-hiding shades, it may be necessary to apply an additional spray pass after an appropriate flash-off time.
- Spot repair or refinishing of the matte clearcoat within the panel, e.g. side panel, or Clever-Repair is not possible.
Drying
- The final flash-off time with forced drying is 15-20 minutes.
- Forced drying at an object temperature of +60 to 65 °C takes 45 minutes.

Note
- Do not add 2K flexibilizer -ALZ 011 001-.
- Stir or shake the matting component -LVM 769 810 A2- thoroughly in the can. Then mix with HS clearcoat or HS topcoat as specified, and only mix hardener and thinner immediately before use.
- Use the spray-ready mixture immediately. If the mixture has stood in the mixing cup or spray gun cup for a longer time (15 minutes), it must be thoroughly stirred again before further use (settling behavior).
- Adding matting component -LVM 769 810 A2- can affect hiding power.
- Dust inclusions cannot be polished out, so maintain extreme cleanliness throughout the entire painting process.
Personal protective equipment:
- Observe the safety data sheet
- Wear personal protective equipment during application
Refinish Paint System for Matte Painted Vehicles
The refinish paint system for matte painted vehicles is described below. Application range: larger areas/complete paint jobs.
Application
- Metal substrates
- Plastics
- Partial refinishing/complete refinishing
- Painting matte painted vehicles
Substrate
Suitable substrates:
- Steel sheet
- cleaned and sanded, electrogalvanized steel panels or soft aluminum
- sanded factory primer
- well-sanded original or refinish paint (excluding thermoplastic paint)
- areas pre-worked with 2K polyester products and then finely sanded
Pre-treatment/Cleaning
- Clean thoroughly with long silicone remover -LVM 020 100 A5- or silicone remover -LVM 020 000 A5-.
- Then sand the substrate.
- Use suitable cleaning agents before rework to ensure a clean, residue-free surface.
Approved Products
Filler:
- 2K spray filler -ALN 788 007-
- 2K IR Premium filler -LSP 787 220-
- Fine filler -LSP 784 002 A2-
Primer/Primer-surfacer:
- 2K plastic adhesion primer, white/black -LKF 696 009/040 A2-
- Tinted adhesion promoter -ALO 822 000 10-
- 2K wash primer -LHV 043 000 A2-
- 1K wash primer light grey/dark grey -LVM 044 007/171 A2-
Surfacer:
- 2K HS Premium surfacer -LGF/LVM 013...A4-
- 2K HS Vario surfacer -LGF 786 004 A4-
Flexibilizing:
- Flexibilizer -ALZ 011 001- (for all 2K HS surfacers on plastic parts)
Topcoat:
- 2K HS clearcoat -L2K 769 500 A5-
Matting
- Matting component -LVM 769 810 A2-
Observe the processing notes of the individual original products ("Original Products").
Mixing/matting of the clearcoat
- Mix component A + component B, matting component -LVM 769 810 A2- + 2K HS clearcoat -L2K 769 500 A5-.
Mixing ratio:
Depending on the desired gloss level, matting component -LVM 769 810 A2- and 2K HS clearcoat -L2K 769 500 A5- are mixed in a weight ratio of 75/25% or 70/30%.

Note
Stir or shake the matting component -LVM 769 810 A2- thoroughly in the can. Mix component A and component B thoroughly, and only mix hardener and thinner immediately before use. Use the spray-ready mixture immediately. If the mixture has stood in the mixing cup or spray gun cup for a longer time (15 minutes), it must be thoroughly stirred again before further use (settling behavior).
Adding hardener to component A + B
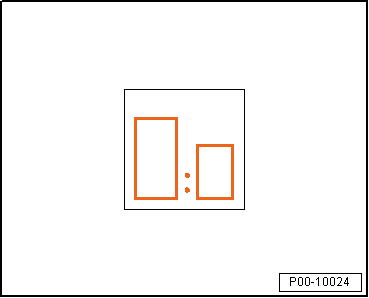
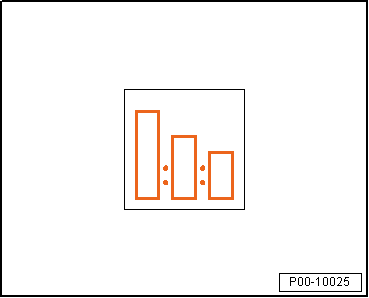
- 4:1 by volume with 2K VHS hardener, extra long -LHA 009 053 A2-
Thinner:
- 2K thinner, long -LVM 009 300 A2-
Pot life:
Spray-ready mixture 60-75 minutes at +20 °C
Application method "Spray pass"
- Application viscosity 4 mm at +20 °C, DIN 53211
Application viscosity 4 mm, gravity-feed gun "Compliant" and "HVLP"
DIN 4 mm: 16–20 seconds
- Add 10% thinner at a material temperature of +20 °C
- Set spray nozzle (see manufacturer's specifications): "HVLP" 1.3–1.4 mm.
- Set spray pressure (see manufacturer's specifications): "Compliant" 2.0–2.5 bar.
- Set atomizing air pressure (see manufacturer's specifications): "HVLP" 0.7 bar.
- Apply in 2 spray passes with a flash-off time of 10-15 minutes between passes.
The recommended dry film thickness is 70-90 µm.
Application:
For the best possible and uniform matting effect, the following application notes must be strictly observed:
The spray distance to the object is slightly greater than for standard application, in order to make full use of the atomization of the spray jet. (Avoids streaking.)
In addition, where possible, it is advantageous for horizontal individual parts, e.g. bonnet, to apply the two spray passes in a cross pattern.
When applying to large objects, e.g. bonnet, vehicle roof, etc., the overlap area of the 2nd spray pass must not be placed in the overlap zone of the 1st spray pass, but must be offset.
Make sure the spray passes overlap evenly and that a sufficiently wet film is applied.
If application is too dry, there is a risk of mottling caused by uneven flash-off or by overspray that is not absorbed.
Where possible, a complete paint job should be divided into sections, i.e. the vehicle body is painted separately from add-on parts such as bonnets, doors, etc., in order to avoid overlap zones and overspray.
Drying
Forced drying:
- Final flash-off time 15-20 minutes
- Drying time 45 minutes at an object temperature of +60 °C
Air drying is not recommended.

Note
- The gloss level actually achieved is influenced by various factors such as different hardeners, thinners, application methods, drying conditions and film thicknesses.
- The recommended material settings must be strictly observed.
- It is essential to prepare test panels for the 75 %/25 % or 70 %/30 % mix in order to match the vehicle's gloss level. Intermediate steps are also possible.
- Gloss measurements (60° measuring angle) on adjacent parts can also be helpful here.
- Blend repair or refinishing of the matt clear coat within the area, e.g. side panel or Clever-Repair, is not possible.
- Large-area paint work (full paint, roof, bonnets, side panels, etc.) should not be carried out at higher temperatures (max. 20 °C).
- Dust inclusions cannot be polished out, so maintain extreme cleanliness throughout the entire painting process.
Personal protective equipment:
- Observe the safety data sheet
- Wear personal protective equipment during application
Paint system for plastic parts
This universal paint system allows all common plastic parts used in exterior areas to be painted safely and easily. (Plastic types: PP, EPDM, ABS, PC, PPO, PBTP, UP-GF, PA, PVC, R-TPU, PUR). This technical data sheet does not apply to plastic parts that are factory-primed.
Substrate
Substrate preparation:
- The substrate must be free of release agents. Before cleaning, temper plastic parts for 60 minutes at +60 °C so that the release agents migrate to the surface.
- Clean with antistatic plastic cleaner -LKR 001 001 A3- or with the milder Silicone Remover, long -LSE 20 100 A3-.
The effort required for cleaning depends on the type and amount of release agent used. A sanding pad is recommended to support cleaning. Allow the thinner to flash off thoroughly (e.g. air-dry overnight at room temperature or 30-40 minutes at +60 °C).
- Before priming, clean again lightly with antistatic plastic cleaner -LKR 001 001 A3- or Silicone Remover, long -LSE 20 100 A3-.
Paint build-up for unprimed plastic parts
Primer:
To achieve reliable adhesion, plastics must be primed after thorough cleaning. The user has two options:
1. Prime with 2K plastic adhesion filler, white -LKF 696 009- or 2K plastic adhesion filler, black -LKF 696 040-. The 2K plastic adhesion filler, white -LKF 696 009- and the 2K plastic adhesion filler, black -LKF 696 040- are primer-fillers that can be topcoated directly.
2. Prime with transparent adhesion promoter -ALO 822 000 10- and then overcoat with elasticised 2K HS filler. Continue with topcoat and clear coat.
Note on damage:
- Small scratches can be filled with 2K fine filler -LSP 784 002 A2- after priming.
- After sanding the filled area, it must be sealed:
1. with 2K plastic adhesion filler, white -LKF 696 009- or 2K plastic adhesion filler, black -LKF 696 040-.
2. Prime with transparent adhesion promoter -ALO 822 000 10- and then overcoat with elasticised 2K HS filler. Continue with topcoat and clear coat.
For processing instructions, flash-off and drying times, refer to the application information:
- "2K plastic adhesion filler"
- "Adhesion promoter (transparent)"
- "Topcoats"
- "Clearcoats"
Use of 2K elasticiser -ALZ 011 001- in 2K HS fillers:
- 15 % for semi-rigid and rigid plastics
- 30 % for highly flexible plastics
For processing, see the application information of the respective filler.

Note
Painted plastic parts must not be cleaned with a high-pressure washer within 6 weeks. After that, maintain a minimum nozzle distance of 30 cm from the object.
Single-stage paint
Topcoat:
- Mix 2K HS topcoat with 15 % 2K elasticiser -ALZ 011 001-, then cross-link this mixture.
- Mixing ratio 3:1 with 2K VHS hardener and 15 % 2K special thinner -LVM 009 200 A2-.
Application:
- Apply in 1.5 spray passes.
- Air-dry overnight at +20 °C or after a final flash-off time of 5-10 minutes, 30-40 minutes at +60 °C. When using 2K elasticiser -ALZ 011 001-, drying times are extended.
Two-stage paint, solid, metallic and pearl
Basecoats:
- Waterborne basecoat with 10 % demineralised water -LVW 010 000 A5-.
Application:
- Apply in 1.5 spray passes.
Clear coats:
- Mix 2K HS clear coats with 2K elasticiser -ALZ 011 001-.
Application:
- Follow the respective application information for the clear coat under "Clear coats".
Drying:
- Air-dry overnight at +20 °C or after a final flash-off time of 10 minutes, 40-45 minutes at +60 °C. When using 2K elasticiser -ALZ 011 001-, drying times are extended.
Painting satin-gloss colour shades
Single-stage paint, topcoat:
- Mix 2K HS topcoat 1:1 with 2K matting component -ALN 775 106-, then cross-link the mixture.
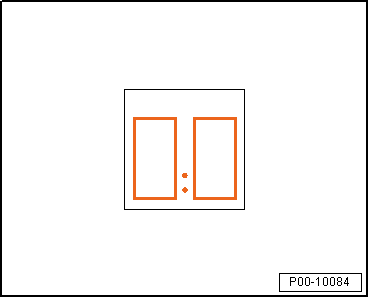
- Mixing ratio 4:1 with 2K VHS hardener and 15 % 2K special thinner -LVM 009 200 A2-.
Application:
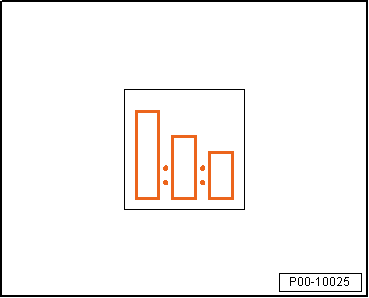
- For a uniform paint film surface, apply 2 spray passes with a 5-10 minute flash-off time between them.
Drying:
- Air-dry overnight at +20 °C or after a final flash-off time of 5-10 minutes, 30-40 minutes at +60 °C.
Painting colour shades with textured effect
Single-stage paint, topcoat:
- Mix 2K HS topcoat 1:1 with 2K coarse/fine texture component -ALN 775 107/108-, then cross-link the mixture.
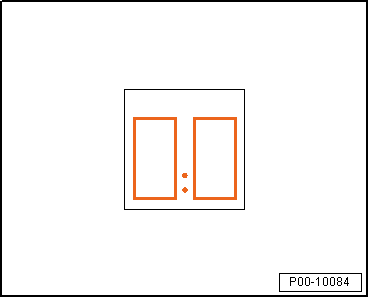
- Mixing ratio 4:1 with 2K VHS hardener and 15 % 2K special thinner -LVM 009 200 A2-.
Application:
- 2 spray passes:
1. Apply the first spray pass normally, flash off for 5-10 minutes.
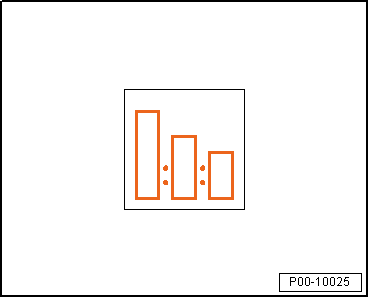
2. Apply the second spray pass, adjusting it to the desired texture.
- Air-dry overnight at +20 °C or after a final flash-off time of 5-10 minutes, 30-40 minutes at +60 °C.
Personal protective equipment:
- Observe the safety data sheet
- Wear personal protective equipment during application
Aqua Premium System, blend-in system for two-stage colour shades
Product description/objectives
To achieve a visually flawless colour transition in the blend area or on adjacent parts, e.g. front fender/door.
Application information
Substrate
Suitable substrates:
- 2K HS filler
- intact existing paint
- for plastic surfaces, prime with transparent adhesion promoter -ALO 822 000 10- and then overcoat with elasticised 2K HS filler
Pretreatment of substrates:
- Thoroughly clean the factory or existing paint, or 2K HS filler, with Silicone Remover -LVM 020 000 A5- or Silicone Remover, long -LVM 020 100 A5-.
Preparation
- Dry-sand the repair area with abrasive paper grit P500-P600 or wet-sand with waterproof abrasive paper P800-1000.
- The adjacent area (the vehicle part around the repair area) must be thoroughly wet-sanded over a wide area with P1000-3000 abrasive paper.

Note
If beads, edges or grip recesses are present, use a sanding pad beforehand.
Cleaning
- Thoroughly clean the entire area with Silicone Remover -LVM 020 000 A5- to remove dust, sanding residue and other contamination.
- Wipe off excess silicone remover with a lint-free cloth, leaving no streaks.
- Allow wet-sanded and cleaned surfaces to flash off thoroughly.
When using a tack cloth, use new-generation cloths with an effective low-tack formula to minimize the risk of chemical or sticky residue (e.g. Tack Cloth -VAS 6177-).
Special Notes
- Sand-through areas must be isolated with 2K Wash Primer -LHV 043 000 A2-, and then filled with 2K HS Performance Filler.
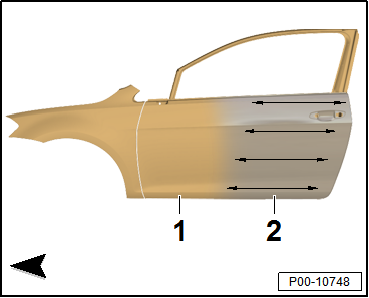
Method 1:
Repair process, blending into adjacent areas (e.g. color matching fender to door)
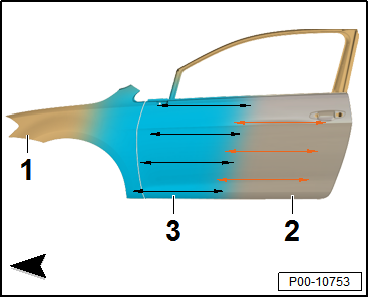
- In the blending area, apply 1-2 closed spray passes of Blend Additive for Aqua Premium -LVM 035 100 A3- at normal spray pressure onto the existing paint/filled substrate -1-.

Note
Make sure the blending area is large enough.
- Then apply the first, light spray pass of the basecoat -1- from the blending area into the wet blend additive -2-.
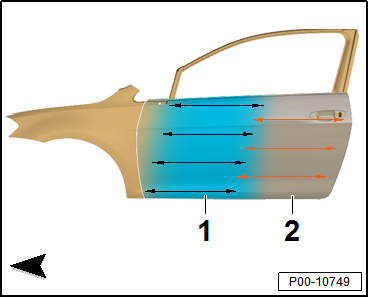
- In the second step, directly and without flash-off time, apply another light spray pass -2-. Make sure to offset this pass forward from the previous one -1- to achieve an even effect formation.
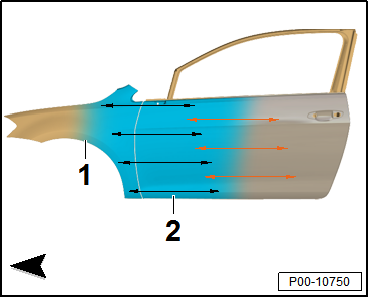
- After blending, finish painting the transition area and the remaining area (starting from the new part) -1- in 1.5 spray passes (standard process).
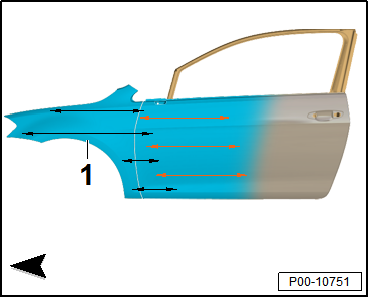
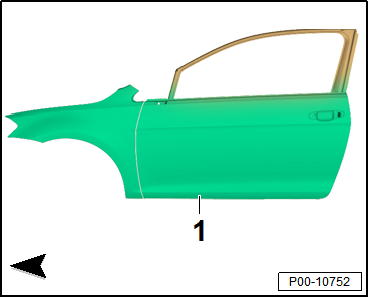
- After flash-off, apply 2K HS clear coat -1- over the entire repair area.
Method 2:
Repair process, blending into adjacent areas (e.g. color matching fender to door, alternative method for solid and dark effect colors)
- In the blending area, apply 1-2 closed spray passes of Blend Additive for Aqua Premium -LVM 035 100 A3- at normal spray pressure onto the existing paint/filled substrate -1-.

Note
Make sure the blending area is large enough.
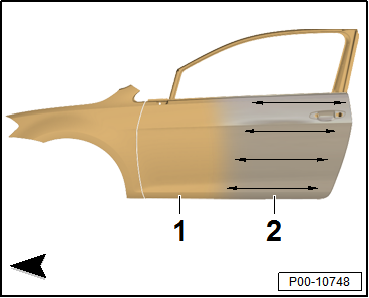
- Then apply the first spray pass of the basecoat -3- from the blending area (starting from the new part) up to the edge of the wet blend additive -2-. Directly follow this with a half effect/finish spray pass with increased spray distance into the wet blend additive -2-, also toward the new part -1-.
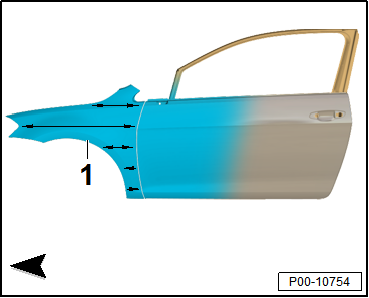
- After blending, apply basecoat -1- to the remaining area in 1.5 spray passes (standard process).
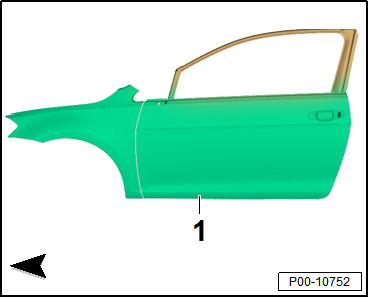
- After flash-off, apply 2K HS clear coat -1- over the entire repair area.

Note
- It is recommended to align the subsequent spray passes toward the repair area, starting from the first spray pass with the widest blending area. That is, the following passes always stay within the previous pass to achieve an even effect formation.
- While processing Aqua Premium waterborne basecoat, keep the fluid flow/trigger lever on the spray gun fully open.
- The spray pressure for the effect spray pass can vary between 1.5-2.0 bar depending on the object size.
Method 3:
Repair process, blending of minor damage, e.g. Clever-Repair

Note
Keep the repair/filler area as small as possible.
Option 1
- For most colors, use the waterborne basecoat that has been fully adjusted.
Option 2
- Recommended for colors with a very high metallic content: adjust Aqua Premium waterborne basecoat 1:1 with Blend Additive for Aqua Premium -LVM 035 100 A3- + 10 % Flop Control -LWM 085 386 A2- (Additive for Aqua Premium -LVM 035 200/301- is not required). Use the Aqua Premium measuring stick for Clever-Repair.
- Depending on the color and hiding power, apply this mixture in 3-5 light spray passes at reduced spray pressure (0.8-1.5 bar) onto the repair area/feather-edge zone. Make sure each spray pass is extended slightly further and is flashed to a matte finish. Flash-off time can be shortened by air blowing.
- After sufficient final flash-off time, the repair can be overcoated with clear coat.

Note
- While processing Aqua Premium waterborne basecoat, keep the fluid flow/trigger lever on the spray gun fully open.
- For efficient flash-off and drying, the use of stationary air-blowing equipment or forced drying, e.g. oven drying, is recommended.
Processing the Products
- Spray equipment must be suitable for water-reducible products; observe the manufacturer's instructions.
- Aqua Premium tinting paints may only be used within the scope of color formulas.
- When individual tinting paints are used on their own, significant deviations from the information provided in the application technical information are possible.
Cleaning the Equipment
- Rinse with deionized water Aquaplus -LVW 010 000 A5- before and after use. Then rinse with Nitro Thinner -LVE 856 000 A3-.
Disposal
- Collect liquid residues of water-reducible products separately from liquid residues of conventional products. If they are mixed, disposal may be impossible, and in any case it is more difficult and therefore more expensive.
Personal protective equipment:
- Observe the safety data sheet
- Wear personal protective equipment during application
Aqua Premium System, blend-in system for three-coat effect colors
Product description/objectives
To achieve a visually flawless colour transition in the blend area or on adjacent parts, e.g. front fender/door.
Application information
Substrate
Suitable substrates:
- 2K HS filler
- intact existing paint
- For plastic surfaces, prime with adhesion promoter, transparent -ALO 822 000 10-, then rework with elastified 2K HS filler (2K Plastic Adhesion Filler -LKF 696 009 A2- / -LKF 696 040 A2-).
Pretreatment of substrates:
- Thoroughly clean the factory or existing paint, or 2K HS filler, with Silicone Remover -LVM 020 000 A5- or Silicone Remover, long -LVM 020 100 A5-.
Preparation
- Dry-sand the repair area with abrasive paper grit P500-P600 or wet-sand with waterproof abrasive paper P800-1000.
- The adjacent area (the vehicle part around the repair area) must be thoroughly wet-sanded over a wide area with P1000-3000 abrasive paper.

Note
If beads, edges or grip recesses are present, use a sanding pad beforehand.
Cleaning
- Thoroughly clean the entire area with Silicone Remover -LVM 020 000 A5- to remove dust, sanding residue and other contamination.
- Wipe off excess silicone remover with a lint-free cloth, leaving no streaks.
- Allow wet-sanded and cleaned surfaces to flash off thoroughly.
When using a tack cloth, use new-generation cloths with an effective low-tack formula to minimize the risk of chemical or sticky residue (e.g. Tack Cloth -VAS 6177-).
Special Notes
- Sand-through areas must be isolated with 2K Wash Primer -LHV 043 000 A2-, and then filled with 2K HS Performance Filler.
- It is strongly recommended to spray a test panel along with the repair.
Blending 3-coat colors:
Mixing the blend additive:
- Mix Blend Additive for Aqua Premium -LVM 035 100 A3- with 10 % Aqua Premium Hardener -LVM 045 000 A1-.
Repair process, blending into adjacent areas (e.g. color matching fender to door)
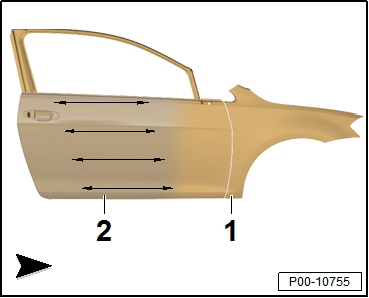
- In the blending area, apply 1-2 closed spray passes of Blend Additive for Aqua Premium -LVM 035 100 A3- at normal spray pressure onto the existing paint/filled substrate -1-.

Note
Make sure the blending area is large enough.
Adjusting the base color:
- Base colour -2- mixed with 5 % Aqua-Premium hardener -LVM 045 000 A1- and 10 % additive for Aqua-Premium -LVM 035 301 A3- for solid shades, or 20 % additive for Aqua-Premium -LVM 035 301 A3- for effect shades, is applied to the repair area and the adjacent blend area until hiding.
- The feathered edge should lie within the wet blending additive for Aqua-Premium -LVM 035 100 A3--1-.

Note
For larger areas, high temperatures and low air humidity, up to 10 % deionised water Aquaplus -LVW 010 000 A5- may be added.
Pot life:
- Effect shade, 45-60 minutes at +20 °C
- Solid shade, 90-120 minutes at +20 °C
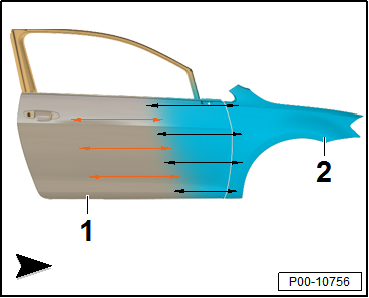
Flash-off/Drying
Options:
- Flash off with air blowers at 20-40 °C until the surface is completely matt.
- Allow an intermediate flash-off of 5-10 minutes, then a final flash-off of 10-15 minutes at 60-65 °C. Let the base colour cool down before applying the effect shade.
- Flash off without air blowers until the surface is completely matt.
- After flashing off to matt, apply 1-2 closed spray passes of blending additive for Aqua-Premium -LVM 035 100 A3--1- without hardener in the blend area.
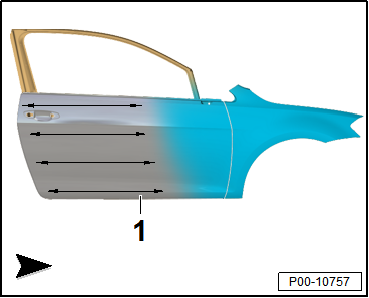
Adjusting the effect shade:
- The effect shade is adjusted with 20 % additive for Aqua-Premium -LVM 035 301 A3-.

Note
For larger areas, high temperatures and low air humidity, up to 10 % deionised water Aquaplus -LVW 010 000 A5- may be added.
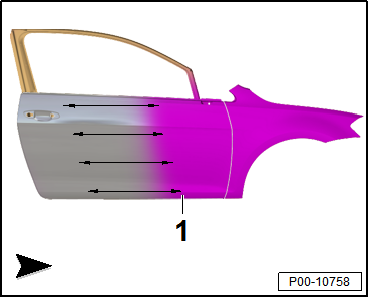
Step 1, blending in the effect shade (outside to inside)
- The effect shade is applied from the feathering zone towards the new part -1-. That means it is applied from outside to inside ("wet on wet") into the blending additive for Aqua-Premium -LVM 035 100 A3-.
- Then, if necessary, apply the next effect shade coat towards the new part.

Note
For some effect shades, 2-3 additional spray passes are required to match the effect.
Step 2, blending in the effect shade (outside to inside)
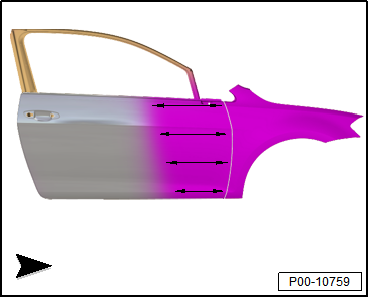
Step 3, blending in the effect shade (outside to inside)
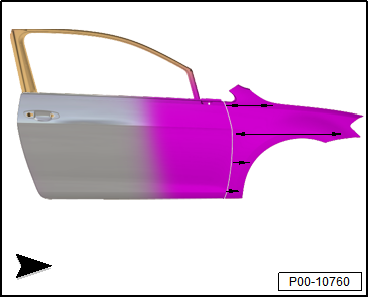
- After flash-off, apply 2K HS clear coat -1- over the entire repair area.

Note
- From the first spray pass onwards, start at the outermost blend area and work the subsequent spray passes towards the repair area/base colour. That means each following spray pass always stays within the previous one, to avoid visible edges/shadows.
- While processing Aqua-Premium waterborne basecoat, keep the material flow (trigger lever on the spray gun) fully open.
- The spray pressure for the effect spray pass can vary between 1.5-2.0 bar depending on the object size.
- Further information on drying times can be found in the technical information for the respective product.
Notes for large-area applications:
- In general, when processing 3-coat effect shades, the additive for Aqua-Pr