Checking Fluid Levels
* The fluid level checks described below are performed every 400 km of mileage or weekly. Descriptions of other fluid level checks can be found further in the Sections dealing with specific maintenance procedures. Regardless of the schedule intervals, do not allow fluid to leak onto the ground; such leaks indicate a fault that must be corrected immediately.
Fluids are an integral part of the lubrication, cooling, brake and windshield washer systems. Due to gradual consumption and/or contamination of fluids during normal vehicle operation, they must be replaced periodically. Read the "Types and Capacities of Lubricants and Fluids" section in the Specifications before topping up fluid in any of the listed components.
* When checking the fluid level, the vehicle must be on level ground.
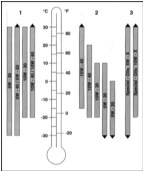
Viscosity Chart for Recommended Engine Oils
1 — Vehicles with diesel engine: BMW 525 tds
2 — Vehicles with gasoline engine: BMW 520i, 528i, 535i, 540i
3 — Vehicles with diesel or gasoline engine: BMW special-grade oils
Visual Inspection for Oil Leaks
If the engine is contaminated with oil or oil consumption is increased, check the possible oil leak points.
INSPECTION
a) Remove the oil filler cap and inspect the gasket.
b) Crankcase ventilation: for example, the ventilation hoses from the crankcase to the camshaft housing and from the camshaft housing to the air intake housing.
c) Cylinder head cover gasket.
d) Cylinder head gasket.
e) Oil filter gasket: oil filter at the flange area.
f) Drain plug sealing ring.
g) Oil pressure sensor.
h) Oil pan seal.
i) Front and rear seals of the camshaft and crankshaft.
When there is a leak, oil is usually spread over a large area of the engine, which makes it difficult to locate the source. Locate the leak as follows:
PROCEDURE
1. Clean the engine. Spray the engine with engine degreaser, then rinse with water after a short time. Cover the alternator with polyethylene beforehand.
2. Dust the joints and seals on the engine with chalk or talcum powder.
3. Check the oil level. Top up if necessary.
4. Drive the vehicle. The oil warms up and becomes more fluid. Drive the vehicle for approximately 30 km at a fairly high speed.
5. Then stop the vehicle and inspect the engine with an inspection lamp. Repair the leaks found.
Engine Oil Level Check

Oil level dipstick

Oil filler cap
Located on the cylinder head cover. Each time before opening, make sure the area around the filler opening is clean.
The engine oil level must be checked every 1000 km of mileage. Top up the oil if necessary.
Oil consumption must not exceed 1 L per 1000 km. Higher consumption indicates wear of the oil control caps.
PROCEDURE INSPECTION REMOVAL INSTALLATION
1. When checking the oil level, the vehicle must be parked on a level, horizontal surface.
2. After stopping the engine, wait at least 3 minutes so the oil drains into the oil pan.
3. Remove the dipstick and wipe it with a clean cloth.
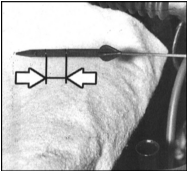
4. Insert the dipstick fully into its tube and remove it again. The oil level must be between the two marks, preferably at or near the upper mark. If it is not, top up the oil to the upper mark.
5. Raising the oil level from the minimum mark to the maximum mark on the dipstick requires one liter of oil. Do not let the level fall below the minimum mark, as oil starvation may damage the engine. On the other hand, overfilling the engine with oil (adding above the maximum mark) may cause spark plug fouling, oil leaks, or seal failure.
6. Add oil through the filler opening on the cylinder head cover. Make sure the correct oil grade is used; refer to Specifications.
Checking the oil level is an important preventive procedure. A constant drop in oil level indicates either oil leaks through damaged seals or loose connections, or oil burning (internal loss through worn piston rings or valve guides). Also pay attention to the condition of the oil itself. If the oil is milky or water droplets are visible in it, this indicates possible head gasket leakage or a crack in the cylinder head or block. In this case, the engine must be repaired immediately. Each time the oil level is checked, before wiping the dipstick blade, run it between your thumb and forefinger. If dirt particles or metal particles are found sticking to the dipstick, the oil must be changed (refer to Engine Oil and Oil Filter Replacement).
* Do not fill the oil above the upper mark. This will increase oil consumption and may damage the engine and catalytic converter.
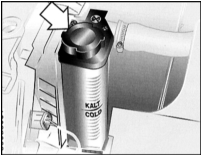
On 520i, 523i, 528i models the expansion tank (coolant reservoir) is mounted on the radiator. Make sure the coolant level is at or near the “MAX” mark.
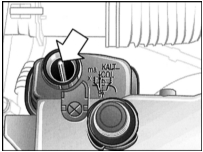
On 525tds models the expansion tank (coolant reservoir) is located on the side of the engine compartment. Remove the cap and add coolant.
Engine Coolant
* Do not allow antifreeze to contact your skin or the painted surfaces of the vehicle. If contact occurs, immediately flush the area with plenty of water. Antifreeze is extremely toxic if swallowed. Never leave it unattended in an open container or spilled on the floor. Children or animals may be attracted by its sweet smell and drink it. Arrange with local authorities for the disposal of used antifreeze.
All vehicles covered in this Manual are equipped with a pressurized, recovery-type cooling system. The coolant reservoir is located in the engine compartment and is connected to the radiator by a hose. As the engine warms up during operation, expanding coolant fills the reservoir. When the engine cools, coolant automatically returns to the cooling system, keeping the coolant level constant.
Check the coolant level in the reservoir regularly. Add a 40%/60% ethylene glycol antifreeze mixture with clean, lime-free water.
* Do not remove the reservoir filler cap or the radiator cap to check the coolant level until the engine has completely cooled! The reservoir level fluctuates depending on engine temperature. When the engine is cold, the coolant level should be above the "LOW" mark on the reservoir. As the engine warms up, the level should rise toward the "FULL" mark. If it does not, allow the engine to cool, then remove the reservoir cap.
Drive the vehicle and recheck the coolant level. If only a small amount of coolant is needed to reach the proper level, clean water may be used. However, frequent addition of water will dilute the antifreeze. To maintain the correct antifreeze-to-water ratio, always top up to the proper level with the specified mixture.
If the coolant level drops regularly, the system may be leaking. Inspect the radiator, hoses, filler cap, drain plugs and water pump (refer to Engine Coolant Replacement. Coolant Freeze Protection Check. Cooling System Visual Inspection). If no leaks are found, have the radiator cap and reservoir cap pressure tested at a BMW dealer service department.
If you need to remove the cap, wait until the engine has completely cooled, then wrap thick cloth around the cap and turn it to the first stop. If steam or coolant escapes from under the cap, allow the engine to cool further, and only then remove the cap.
The condition of the coolant must also be checked. It should be relatively clean. If the coolant is brown or rusty, it must be drained, the system flushed, and refilled with new mixture. Even if the coolant looks normal, its corrosion inhibitors lose effectiveness over time, so it must be replaced at specified intervals.
If the coolant level drops quickly, check for leaks. Refer to Cooling System Inspection.
Brake and Clutch Fluid
* Brake fluid can damage your eyes and the painted surfaces of the vehicle, so handle it with extreme care. Do not use brake fluid that has been left open for a long time or that is more than one year old. Brake fluid absorbs moisture from the air, which can cause a dangerous loss of braking effectiveness. Use only the recommended type of brake fluid. Mixing different fluid types (such as DOT 3 or 4 and DOT 5) may cause brake system failure.
The brake fluid/clutch hydraulic fluid reservoir is located in the engine compartment. It has two chambers, one for each brake circuit. The threaded cap has a vent hole. Make sure it does not become clogged.
The reservoir is translucent, allowing the fluid level to be observed. A drop in level below the MIN mark is indicated to the driver by the warning lamp. However, it is recommended to check the reservoir visually from time to time.
BRAKE FLUID LEVEL CHECK
1. Remove the driver's side cabin microfilter box. Refer to Cabin Air Filter Replacement.
BRAKE FLUID LEVEL CHECK
1. Remove the driver's side cabin microfilter box. Refer to Cabin Air Filter Replacement.
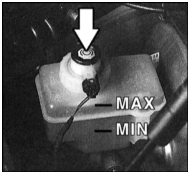
2. With the cap closed, the fluid level should not be above the MAX mark or below the "MIN" mark on the translucent reservoir. If the level is low, remove the cap and add fluid. To check the warning lamp, press the contact indicated by the arrow.
3. Fill the system only with the brake fluid specified in the Specifications.
4. Due to disc brake wear, a slight drop in brake fluid level may occur. This is normal.
5. If the fluid level drops noticeably over a short period, this indicates a leak.
6. In this case, locate the fluid leak immediately. This is best done at a service station.
Brake Warning Lamp Check
PROCEDURE
1. Turn the ignition on. Release the parking brake.

2. Press the contact in the reservoir cap with your finger, as shown by the arrow in the illustration.
3. An assistant should watch whether the warning lamp illuminates in the instrument cluster. If the lamp does not illuminate, check the electrical circuit.
4. Reinstall the cabin microfilter box (refer to Cabin Air Filter Replacement).
Windshield Washer Fluid
Windshield washer fluid is stored in the plastic reservoir on the right side of the engine compartment.
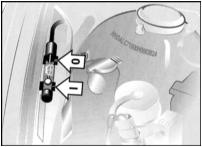
The float position in the tube corresponds to the fluid level in the reservoir. 0 - empty, I - full
In moderate climates the system can be filled with plain water, but the reservoir should not be filled more than two-thirds full to leave room for water expansion when it freezes. In cold climates, use a special windshield washer antifreeze that lowers the fluid freezing point, which can be purchased at any automotive accessories store. It is usually sold in concentrated or ready-to-use form. If you have purchased concentrated antifreeze, mix it with water in accordance with the manufacturer's instructions on the package.
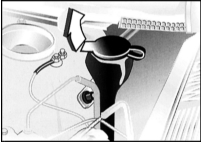
The windshield and headlight washer reservoir is located in the right side of the engine compartment
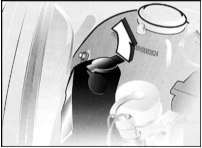
The intensive windshield washer reservoir is located in the right side of the engine compartment. Fill with undiluted antifreeze washer fluid.
* Do not use engine coolant antifreeze, as it will damage the painted surfaces of the vehicle.
Test yourself
A quick BMW 1 quiz: every answer comes with an explanation and a link to the manual page.