Replacing the Engine Oil and Oil Filter
ONCE A YEAR OR EVERY 15,000 KM (WHICHEVER COMES FIRST)
(For diesel engine every 10,000 km)
Under severe operating conditions, perform this work twice as often.
* Prolonged skin contact with used engine oil is quite hazardous. Use a protective cream and wear gloves during this procedure. Change oil-soaked clothing immediately.
* Frequent engine oil changes are the main preventive maintenance procedure available to the home mechanic. Over time, engine oil becomes diluted and contaminated, which leads to premature engine wear.
PROCEDURE
1. Before starting work, make sure you have all the necessary tools. You should also have a sufficient supply of rags or old newspapers to collect spilled oil. The following equipment is required for the oil change:
a) Inspection pit or vehicle hoist and stands, oil suction syringe.
b) Depending on filter version, a 13 or 36 mm socket for loosening the filter housing center bolt.
c) A 17 mm or 19 mm socket for loosening the oil drain plug, and an oil drain pan with a capacity of 8 L.
2. The following parts are required:
a) If oil cannot be suctioned out: Aluminum sealing washer A12ґ15.5 for the drain plug seal. The washer may be supplied with the oil filter.
b) Filter element.
c) Sealing ring for the filter housing and, depending on version, one or two sealing rings for the center bolt. Two different filter versions may be supplied for the same engine model. Keep this in mind when purchasing parts.
d) Depending on engine, from 6.5 to 7.5 L of engine oil. Use only the oil recommended in the Specifications. Excess engine oil can be removed with a syringe through the oil level dipstick hole.
3. Start the engine and warm it up to normal operating temperature. Warm oil and sediment drain out of the engine better. If you need to buy new oil, a filter or any tools, drive the vehicle to get them, which will also warm up the engine oil.
4. Park the vehicle on a level surface and turn off the engine once it is sufficiently warm. Remove the oil filler cap from the cylinder head cover.
5. To access the drain plug and oil filter, raise the vehicle with a jack and securely support it on stands.
* Never work under a vehicle supported only by a hydraulic or scissor jack. Always use stands!
6. Using a Phillips screwdriver, remove the cover in the lower engine undershield below the oil pan.
7. Carefully avoiding contact with hot components, place a drain pan under the drain plug at the bottom of the engine.
9. As the oil flow weakens during draining, it may be necessary to reposition the drain pan under the oil pan. Check the old oil for metal particles, which can serve as an early warning of engine wear. To prevent further damage after repair, thoroughly clean the oil passages and hoses. Also, if installed, replace the oil cooler.
10. After draining the old oil, wipe the drain plug clean with a clean rag. Even the smallest metal particles stuck to the plug will immediately contaminate the new oil.
Oil Filter Replacement, Center Bolt Version
PROCEDURE
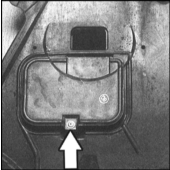
7. Carefully avoiding contact with hot components, place a drain pan under the drain plug at the bottom of the engine.
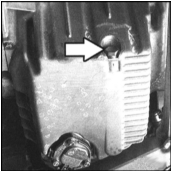
9. As the oil flow weakens during draining, it may be necessary to reposition the drain pan under the oil pan. Check the old oil for metal particles, which can serve as an early warning of engine wear. To prevent further damage after repair, thoroughly clean the oil passages and hoses. Also, if installed, replace the oil cooler.
10. After draining the old oil, wipe the drain plug clean with a clean rag. Even the smallest metal particles stuck to the plug will immediately contaminate the new oil.
Oil Filter Replacement, Center Bolt Version
PROCEDURE
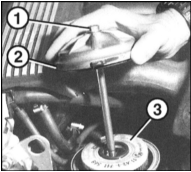
1. Unscrew the center bolt (1) in the oil filter cover. Center bolt version.
2. Remove the cover (2) with the center bolt (1).
3. Wait until the oil drains from the filter housing. Then remove the filter element (3). Wipe up the draining oil with a rag.
4. Insert a new filter element into the filter housing.
* Follow the instructions printed on the filter.
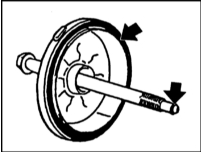
5. Clean the oil filter cover. Replace the sealing rings (arrows in the accompanying illustration) on the center bolt and cover, lubricating them with engine oil.
6. Place the cover with the center bolt on top and press it down. The center bolt must enter the hole in the bottom of the housing.
7. Tighten the center bolt to a torque of 25 N·m.
Oil Filter Replacement, Screw-On Cover Version
PROCEDURE
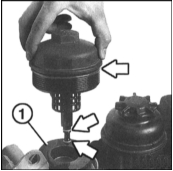
1. Unscrew the cover using a 36 mm socket. BMW service centers use a special tool that fits on the outer diameter of the cover. See the accompanying illustration.
2. Wait until the oil drains from the filter housing. Then remove the filter element (1). Wipe up the draining oil with a rag.
3. Insert a new filter element into the filter housing.
* Follow the instructions printed on the filter.
4. Replace the rubber sealing rings (arrows) on the oil line and cover. Lubricate them with engine oil.
5. Place the oil filter cover with the oil line on top and press down. The oil line must enter the hole in the bottom of the housing.
6. Tighten the oil filter cover to a torque of 25 N·m.
Filling the System
PROCEDURE
1. Install the drain plug with a new sealing washer and tighten it securely, but without applying excessive force. Drain plug torque, 17 mm bolt: 30 N·m, 19 mm bolt: 60 N·m.
2. Fill the system with new oil of the required quality and viscosity through the oil filler opening on the cylinder head cover. Refer to Specifications for the oil capacity.
3. Start the engine and run it at increased speed (approximately 2500 rpm) until the warning lamp goes out (approximately 5 s). Stop the engine.
4. Wait 5 minutes and check the oil level using the dipstick.
5. Close the cover in the lower panel of the engine compartment under the oil pan and, using a Phillips screwdriver, turn the clip a quarter turn to close the cover.
6. Drive the vehicle and check the drain plug and oil filter for leaks. If necessary, carefully retighten them.
7. Stop the warm engine and wait 2 minutes, then check the oil level again. If necessary, add oil to the system.
8. If necessary, reset the service interval indicator to its initial position. This requires a special tool available from BMW. If necessary, this operation is performed free of charge at a service station.
9. For better monitoring of the engine's operating condition, use oil of the same type and, if possible, the same brand. For this purpose, it is recommended to attach a tag indicating the brand and viscosity of the oil when changing the oil in the engine.
10. Arbitrarily changing the oil type is not recommended. Engine oils of the same type and brand but different viscosities may be added to the system if necessary during the seasonal transition period.
Test yourself
A quick BMW 1 quiz: every answer comes with an explanation and a link to the manual page.