Coolant Replacement. Coolant Antifreeze Protection Check. Visual Inspection of the Cooling System
EVERY 3 YEARS, REGARDLESS OF MILEAGE
* Do not allow antifreeze to contact your skin or painted surfaces of the vehicle. If contact occurs, rinse immediately with plenty of water. Antifreeze is extremely toxic and potentially fatal if swallowed. Do not leave antifreeze in an open container or spilled on the floor; its sweet smell can easily attract children or pets. Check local regulations for disposal of used antifreeze. Many areas have collection centers that accept it.
The cooling system must be drained, flushed and refilled at regular intervals of every three years as part of scheduled maintenance. This procedure is performed to maintain the quality of the coolant and to prevent corrosion, which reduces cooling system efficiency and may cause engine failure. When servicing the cooling system, also check the condition of all hoses and the radiator cap, and replace any defective components as necessary.
You will need the following tools to perform this work:
a) Jack and stands.
b) Large flat-blade screwdriver or coin.
c) Open-end wrench or socket set.
d) Drain container.
To fill the system, including during warm weather, use a mixture of antifreeze and clean, lime-free water. Distilled water is preferred to prevent deposits. The antifreeze must be approved by BMW and must not contain nitrites or amines (this must be stated on the packaging).
* To continue driving the vehicle, especially in summer, clean water may be added to the system. Antifreeze can be added later, but as soon as possible.
An aluminum sealing washer A 14 x 18 is used as the seal for the cylinder block drain plug.
Draining the system
PROCEDURE
1. If the vehicle has just been driven, wait several hours for the engine to cool completely before starting this procedure.
3. Set the cabin heater to maximum output.
4. After the engine has cooled, remove the radiator cap. If the cap must be opened while the engine is not fully cool, do so slowly and carefully to avoid scalding, and release the system pressure. Then turn the cap fully counterclockwise and remove it.
* The cooling system is under pressure. Remove the cap only when the coolant temperature is below +60°C. Place a thick cloth over the cap before removing it.
5. Raise the front of the vehicle and support it on stands. Remove the engine undertray. Refer to Cooling System Inspection.
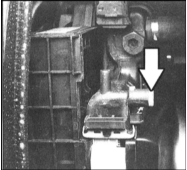
6. Place a clean container under the radiator and loosen the radiator drain plug. The plug is loosened with a large flat-blade screwdriver or coin. Refer to the accompanying illustration.
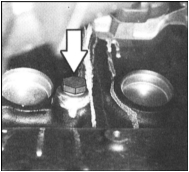
7. Place a container under the engine and remove the drain plug (arrow in the accompanying illustration) on the cylinder block. The plug is located under the exhaust manifold.
8. Drain the coolant completely. While the coolant drains, inspect the condition of the radiator and heater hoses and clamps (if necessary, refer to Suspension and Steering Component Inspection).
9. Replace any defective hoses and clamps.
* Coolant is poisonous. Do not dispose of it with household waste. Information on the locations of collection points must be provided by local authorities.
10. Install the drain plug with a new gasket into the cylinder block and tighten it to 40 N·m.
11. Tighten the radiator drain plug lightly. A coin inserted into the slot of the plug can be used for this purpose.
Flushing
PROCEDURE
1. After the system has been completely drained, flush the radiator with clean water from a garden hose until clean water flows from the drain opening or lower hose. If the radiator is heavily corroded, damaged or leaking, remove it and take it to a radiator repair specialist.
2. The flushing described above will remove various deposits from the radiator but will not remove rust and scale from engine surfaces and coolant passages. These can be removed using a chemical cleaner. Follow the cleaner manufacturer's instructions for this procedure. Before flushing the engine, open the cylinder block drain plug.
3. On equipped models, disconnect the overflow hose from the expansion tank. Drain the tank, rinse it with clean water and reconnect the hose.
Filling the system with coolant
PROCEDURE
1. Fill the expansion tank to the MAX mark with new coolant.
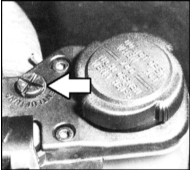
2. Open the bleed screw (arrow in the accompanying illustration) at the top of the radiator, next to the expansion tank, until coolant without air bubbles flows out.
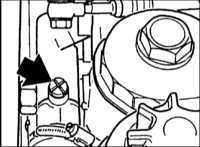
3. Open the plug (arrow in the accompanying illustration) on the coolant tube in the area of the oil filter until coolant without air bubbles flows out.
4. Close the bleed screws and top up the coolant in the expansion tank.
5. 525tds: On this model, air is bled from the system automatically through the upper hose of the separate expansion tank. There are no bleed screws on this model.
6. Close the expansion tank cap. Do not run the engine with the cap open, as this may cause damage.
7. Start the engine. Set the heater to the "WARM" position and warm up the engine. Press the accelerator pedal in short bursts to keep engine speed at no less than 2500 rpm. During air bleeding, the coolant level will drop to the Max mark on the expansion tank.
8. Switch off the ignition.
* Top up the system with coolant only after the engine has cooled down. Otherwise, there is a risk of scalding when the cap is removed!
9. With the engine cold, fill the coolant to the Max mark on the expansion tank. Refer to the illustrations in the section "Checking the Coolant Level".
10. Open the bleed screws again and check that coolant flows out without air bubbles. Close the radiator cap and the bleed screws.
11. Visually check the cooling system for leaks, in particular the hose connections and the drain plug.
Checking Antifreeze Frost Protection
The following tool is required:
Coolant hydrometer, commercially available or available at filling stations.
Check the antifreeze concentration before the start of the winter season, especially if only plain water has been added to the system during previous operation.
PROCEDURE
1. Start and warm up the engine until the upper hose leading to the radiator is warm.
2. Carefully open the expansion tank cap.
* Do not open the cap on a hot engine. Refer to the instructions in the section "Checking the Coolant Level".
3. Draw coolant into the hydrometer and read the density from the float. Refer to the accompanying illustration. In our climate, the antifreeze must protect the system down to -35°C. This corresponds to a volume ratio of water to antifreeze of 1:1.
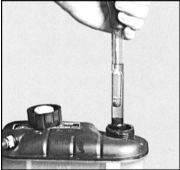
3. Draw coolant into the hydrometer and read the density from the float. Refer to the accompanying illustration. In our climate, the antifreeze must protect the system down to -35°C. This corresponds to a volume ratio of water to antifreeze of 1:1.
Adding BMW Coolant Concentrate to the System
* The radiator and heater core of the cooling system are made of aluminum. For this reason, only anti-freeze and corrosion inhibitors approved by BMW may be used.
When adding antifreeze concentrate, refer to the Specifications.
For example: The antifreeze concentration measurement shows frost protection down to -10°C. In this case, 3 L of coolant must be drained from the system and 3 L of pure concentrate added. This will provide cooling system protection down to -35°C. Refer to the Specifications.
PROCEDURE
1. Close the radiator cap, drive the vehicle and then check the antifreeze again.
Visual Inspection of the Cooling System for Leaks
2. Check the cooling system hoses for porosity. To do this, squeeze and bend them. If a hose has become hard or brittle, replace it.
3. Hoses must be pushed fully onto the connections. Check that the hose clamps are secure. Replace the clamps if necessary.
4. Check the seal of the expansion tank cap.
* A low coolant level may be the result of the expansion tank cap not being installed correctly.
5. If the coolant level drops frequently without any obvious leak, check the system with the engine warm. If coolant escapes from the opening under the coolant pump when the engine is warm, the coolant pump seal is damaged. Replace the pump.
6. Significant coolant loss and/or oil in the coolant, as well as white exhaust smoke with the engine warm, indicate a damaged cylinder head gasket.
* Locating a coolant leak can be quite difficult. It is recommended to carry out a pressure test of the system. It is also recommended to check the cap pressure relief valve. Refer to the section Checking the Cooling System.
Test yourself
A quick BMW 1 quiz: every answer comes with an explanation and a link to the manual page.