Wheels and Tires. Rotation, Replacement, Balancing and Care. Snow Chains. Wheel Locks. Eliminating Steering Wheel Vibration.
Tire rotation may be performed for economy reasons at intervals of not more than 5000 km, or when signs of uneven tread wear appear. However, remember that if all four tires are rotated, you will eventually have to replace all tires at the same time.
Although rotation is not recommended in the interest of maintaining optimal handling characteristics,
since this procedure requires raising the vehicle and removing the wheels, also check the brake components (refer to Brake System Inspection).
* Even if you do not plan to rotate the tires, at least check that the wheel bolts are tightened securely.
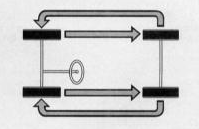
Rotation must be performed according to a specific pattern so that the direction of rotation does not change.
Refer to the information in the Jacking and Towing section of the Introduction for correct vehicle lifting and wheel changing.
Raise the vehicle with a hoist or place it on supports so that all four wheels are off the ground. Make sure the vehicle is securely supported!
After completing rotation, check and adjust the tire pressure and be sure to check that the wheel bolts are tightened securely.
Wheel Replacement and Balancing
When replacing wheels, it is recommended to keep the original direction of rotation, since changing the direction leads to increased tire wear. It is also not recommended to move front wheels to the rear and vice versa.
When tightening wheel bolts, always use a torque wrench. This ensures that all bolts are tightened evenly.
* When replacing or removing tubeless tires, for safety reasons always replace the rubber valve.
PROCEDURE
1. Loosen the wheel bolts while the vehicle is on the ground. To do this, apply the parking brake or engage first gear so that the vehicle cannot roll.
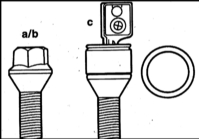
2. Remove the cap from the locking wheel bolts using a screwdriver. Insert the key fully into the lock. The slot must be parallel to the oval recess. Turn the key 90° and remove together with the sleeve. Installation is performed in reverse order. When removing the key, the sleeve must press against the wheel bolt. Install the cap. a/b - wheel bolt, galvanized/chrome-plated, c - locking bolt, chrome-plated. Refer to the accompanying illustration.

3. If anti-theft wheel bolts are fitted, remove the wheel as follows: turn the cover (1) slightly counterclockwise with the key and remove it. Then insert the adapter (3) into the bolt (2) and unscrew it. Refer to the accompanying illustration.
* Always carry the adapter (3) in the tool kit.

4. Raise the vehicle and place it on stands.
5. Turn the wheel so that the valve (lower arrow in the accompanying illustration) is at the bottom.
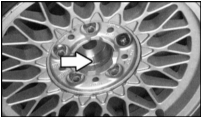
6. Before removing the wheel, mark the position of the wheel disc relative to the hub with a marker so that the balanced wheel returns to its original position. Refer to the accompanying illustration.
* Depending on the wheel type, different wheel bolts are used. Only bolts approved by BMW may be used.
7. When installing non-original light alloy wheels, use the corresponding wheel bolts instead of the original ones. It is recommended to keep the appropriate wheel bolts with you for a previously fitted BMW spare wheel.
8. Light alloy wheels have a clear lacquer coating to protect against corrosion. When changing the wheel, take care not to damage the coating. If damaged, repair the defect with lacquer.
9. Before installing the wheel, clean the centering collar on the hub and the mating surface of the wheel of dirt and grease residue, and lightly lubricate the centering collar with bearing grease.
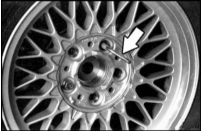
10. Clean the wheel bolts of dirt. If the bolts are damaged or corroded, replace them. Do not lubricate the bolt threads with oil or grease. Refer to the accompanying illustration.
11. Before installing the wheel, insert the installation guide pin into the upper threaded hole. This guide pin is included in the on-board tool kit. After several bolts are installed, remove the guide pin.
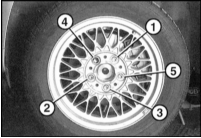
12. Tighten the wheel bolts in a crisscross pattern in several stages. The tightening torque for all bolts is 100 N·m. Refer to the accompanying illustration.
* Tightening the wheel bolts unevenly or with different torques may cause the wheel and/or hub to be distorted. When new wheels are installed, retighten the wheel bolts to the specified torque after 1000 km (620 miles) of driving.
* If the vehicle is equipped with a navigation system, the system must be calibrated after replacing a wheel or tire.
Wheel Balancing
Production wheels are balanced at the factory. Balancing is necessary to eliminate uneven mass distribution and manufacturing inaccuracies of components.
While driving, unbalanced wheels cause vibration. At high speed, the steering wheel begins to shake.
As a rule, the vibration occurs within a certain speed range and disappears when speed is decreased or increased.
Over time, such vibration leads to damage to suspension joints, the steering mechanism and the shock absorbers.
Wheels must be balanced every 20,000 km (12,000 miles) and after any repair that changes the mass distribution on the wheels.
Tire Care Recommendations
Tires have a "memory." This means that improper handling, in particular frequent contact with curbs or crossing railway tracks, leads to tire damage after some time.
Cleaning Tires
Cleaning tires with a steam jet is not recommended. If the nozzle of the device is held too close to the tire, the rubber layer will be destroyed within a few seconds, even when cold water is used. A tire that has been cleaned in this way must be replaced to ensure safe operation of the vehicle.
A tire that has been in prolonged contact with oil or grease must also be replaced. In such areas the tire swells, then returns to its normal shape and does not appear damaged externally. However, the load-carrying capacity of the tire is reduced afterward.
Storing Tires
Tires must be stored in a dark, dry and cool place. Avoid contact of tires with oil or grease.
Wheels must be stored in a horizontal position or hung by the rims in a garage or basement.
Before removing the wheels, increase the air pressure in them (by 0.3 - 0.5 bar).
Winter tires should be mounted on their own rims.
Break-In of Tires
Tires have a very smooth outer surface. Therefore, new tires must be broken in (this also applies to the spare wheel). After break-in, the tire surface becomes rough.
During the first 300 km (190 miles), drive with new tires especially carefully, particularly on wet roads.
Snow Chains
Snow chains may be installed only on the driving wheels (rear axle). Snow chains cannot be installed on wheels of 17-inch size.
When snow chains are installed, vehicle speed must not exceed 50 km/h (30 mph). Remove the snow chains on roads that are no longer covered with snow or ice.
Only chains approved by BMW should be used.
Additional Installation of Wheel Locking Bolts
PROCEDURE
1. Loosen the wheel bolts.
2. Raise the vehicle and place it on stands so that the wheel rotates freely.
3. Unscrew the wheel bolts so that the wheel can move freely on the hub.
4. Turn the wheel so that the valve is at the bottom.
5. Turn the upper wheel bolt and install a locking bolt in its place (upper arrow).
6. Unscrew the wheel bolt and install a locking bolt in its place (upper arrow).
7. In this position (locking bolt at top/valve at bottom), hand-tighten the wheel bolts in a crisscross pattern.
8. Tighten the wheel bolts in a crisscross pattern to a torque of 100 N·m.
* This method of installing the locking bolt minimizes the imbalance caused by installing a heavier locking bolt.
Eliminating Steering Wheel Vibration
Steering wheel vibration at a certain vehicle speed is, as a rule, the result of wheel imbalance.
Inspection
PROCEDURE
1. Check the tire air pressure. Inflate the tires if necessary.
2. Perform a test drive. Determine the cause of the malfunction as precisely as possible: occurrence at a certain speed, road condition, moment of entering and exiting a curve.
3. Raise the vehicle and place it on stands.
4. Check the wheel disc centering. The hub or brake drum must protrude above the wheel rim edges or, at a minimum, be flush with them. Otherwise, the disc must be replaced.
5. Inspect the suspension. To do this, check the rubber-metal mounts, joints, shock absorbers and discs.
6. Remove the wheels and clean them. If necessary, remove small stones from the tread of the tire.
7. Check the tread depth of the tires and compare them with each other. If the front and/or rear tires show uneven wear, check the wheel alignment and adjust it. The toe deviations must not exceed the upper tolerance limit.
* Measuring wheel geometry requires special equipment, which is available only at a service station.
8. Perform a test drive and check whether the malfunctions have been eliminated.
Inspection of Wheel Radial and Lateral Runout
PROCEDURE
1. Raise the vehicle and place it on stands. Position the dial indicator plunger against the outer, then the sidewall of the tire. Slowly rotate the wheel by hand and read the dial indicator. Mark the point of maximum runout with chalk.
2. If the runout exceeds the value specified in the Specifications, balance the wheels off the vehicle. When mounted on the balancing machine, the wheels must be centered in the same way as on the vehicle. Centering the wheels by the center bore in the conical clamping device is not performed. The permissible imbalance in both planes is 5 g.
Correcting Radial Runout
PROCEDURE
1. Deflate the tire and press the tire bead into the well of the rim.
2. Rotate the tire 120° on the rim.
3. Inflate the tire and recheck the radial runout.
4. If the maximum value is still exceeded, rotate the tire 120° on the rim and check the radial runout.
5. If the runout does not exceed the permissible value, balance the wheel.
Inspection of Wheel Disc Radial and Lateral Runout
PROCEDURE INSPECTION REMOVAL INSTALLATION
1. Install the wheel disc without the tire on the balancing machine or on the vehicle. Install the dial indicator.
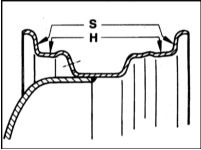
2. Check the wheel radial runout H and lateral runout S. Measure radial runout on the outer side surfaces of the rim and lateral runout on the inner side surfaces of the rim. Ignore local dial indicator deviations caused by surface irregularities.
3. If the values exceed those specified in the Specifications, replace the wheel.
Wheel Installation on Vehicle
PROCEDURE
1. With the vehicle raised on stands, install the wheels so that the point of maximum radial runout is at the top. In this position, tighten the wheel bolts to the torque specified in the Specifications using a torque wrench.
* If the tire wear difference is insignificant, install wheels with minimal radial runout and maximum imbalance on the front axle.
2. Perform a test drive. If the front of the vehicle still vibrates and the steering wheel shakes, the cause is residual imbalance, which must be corrected by additional balancing.
Wheel Balancing on Vehicle
PROCEDURE
1. When balancing drive wheels, be sure to place both tires of the same axle on the rollers.
2. The wheels must be driven by the vehicle engine so that they rotate synchronously.
3. Perform a test drive.
If the malfunctions are not completely eliminated, this indicates radial runout or a manufacturing defect in one or more tires. They cannot be detected by service station equipment. They can only be eliminated by replacing the front and/or rear tires. Tires must be replaced only in pairs on the same axle.
Test yourself
A quick BMW 1 quiz: every answer comes with an explanation and a link to the manual page.