Battery Condition Check, Care and Charging. Replacing the Remote Control Key Fob Battery
Inspection and Care
Observe safety precautions when working with the battery. The battery cells always contain highly flammable hydrogen gas, so never bring a lit cigarette or any open flame near the battery. The battery electrolyte is a sulfuric acid solution, which causes serious injury if it contacts the eyes or exposed skin. In addition, the acid damages clothing and paint. When disconnecting the battery, always disconnect the negative cable first, and connect it last!
Battery care is a very important procedure that helps prevent breakdowns caused by battery discharge. Several tools are required to perform the maintenance procedure.
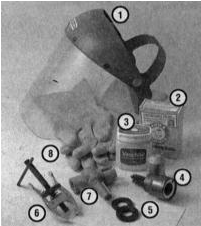
Tools and materials required for battery care
1 — Face shield/safety goggles: when removing corrosion with a brush, crystallized acid particles can easily get into the eyes
2 — Baking soda: an aqueous baking soda solution can be used to neutralize corrosion
3 — Acid-free petroleum jelly: a layer of petroleum jelly applied to the battery terminals helps prevent corrosion
4 — Battery terminal/cable end cleaning tool: this wire-brush tool removes all corrosion from battery terminals and cable ends
5 — Impregnated felt washers: installing these washers on each battery terminal directly under the cable ends helps prevent corrosion
6 — Puller: sometimes cable ends are very difficult to remove from battery terminals, even after the nuts/bolts are fully loosened. This tool allows the cable ends to be pulled straight up without damage
7 — Battery terminal/cable end cleaning tool: another type of cleaning tool, a slightly modified version of item 4 that performs the same function
8 — Rubber gloves: additional protection when working with the battery; remember that the battery contains acid!
PROCEDURE
1. Before starting the maintenance procedure, always first turn off the engine and switch off all electrical accessories, then disconnect the negative cable from the battery.
* If your vehicle's radio is equipped with a theft protection system, make sure you enter the correct code before disconnecting the battery.
2. BMW vehicles are usually equipped with maintenance-free batteries. Cell caps can be removed and distilled water added. Recent models may be fitted with fully sealed, maintenance-free batteries.
3. The battery is located in the luggage compartment under the right side trim panel. Pull the trim panel back by its handle.
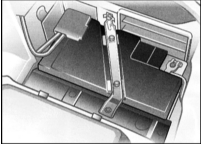
4. Remove the battery cover. To do this, disconnect the clamp.
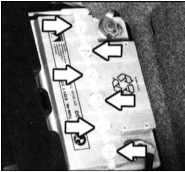
5. Remove the caps and check the electrolyte level in each battery cell. It should be approximately 5 mm above the plates, i.e. approximately to the lower edge of the filler hole. If the level is low, top up with distilled water. To do this, unscrew the plugs (arrows in the accompanying illustration) and fill each cell with liquid up to the marks visible in the openings.
Then close the battery cell caps.
* Overfilling the cells may cause electrolyte to overflow during quick charging, resulting in corrosion and damage to components near the battery.
4. If the positive terminal and battery cable clamp are equipped with a rubber protector, make sure it is not torn or damaged. It must fully cover the terminal.
8 Periodically inspect the battery externally for damage such as cracks in the case.
9 Check that the battery cable clamps are tightened securely to ensure a good electrical connection. Inspect each cable along its entire length for cracks and worn insulation.
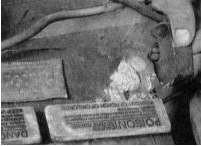
- Disconnecting the cable from the battery terminal with a wrench. Sometimes, when corrosion has damaged the nut, special pliers are required for this procedure. (Always disconnect the ground cable first and connect it last!)
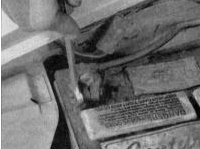
- Regardless of the type of cleaning tool used, the result must always be a clean, shiny terminal surface.

- When cleaning cable terminals, remove all traces of corrosion. The inside of the terminal is tapered to match the battery post shape, so do not remove too much material.
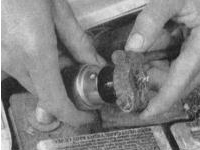
4. Make sure the battery tray is in satisfactory condition and the hold-down clamp bolt is securely tightened. If the battery was removed from the tray (refer to the Battery Removal and Installation section), make sure no parts or other foreign objects are left on the tray during installation. Do not overtighten the hold-down clamp bolt.
5. Corrosion on the tray, battery case and surrounding surfaces can be removed with a solution of baking soda and water. Apply the mixture with a small brush, let it stand, then rinse thoroughly with plenty of clean water.
6. Corroded metal surfaces of the vehicle should be coated with zinc-based primer and then painted.
Charging
* Manufacturers recommend removing the battery from the vehicle for charging, as gas released during this procedure may damage painted surfaces or the vehicle interior, depending on battery location. Rapid charging with the battery cables connected may cause damage to the vehicle electrical system.
PROCEDURE
1. Remove all battery cell caps (if equipped) and cover the openings with clean rags to prevent electrolyte splashing. Disconnect the negative battery cable and connect the charger leads to the battery terminals (positive to positive, negative to negative), then plug in the charger. If the charger has a selector switch, make sure it is set to “12 volts”.
* If your radio is equipped with an anti-theft system, make sure you have entered the correct code before disconnecting the battery.
2. If you use a charger with a current above 2 amperes, check the battery regularly during charging to make sure it is not overheating. When using a slow charger, the battery may be left charging overnight after regular checks during the first two hours. Charging maintenance-free batteries may require certain precautions (for example, using a very low-amperage charger). Such a battery may have a warning label; if not, consult a BMW dealer or an automotive electrician.
3. If the battery cells have removable caps, check electrolyte specific gravity with a hydrometer every hour during the last few hours of the charging cycle. Inexpensive hydrometers are sold at auto parts stores; follow the included instructions. The battery can be considered charged if the specific gravity readings do not change over two hours and the electrolyte in the cells bubbles freely. Specific gravity in individual cells should be almost the same. If not, one or more cells have failed and the battery should be replaced.
4. Some maintenance-free batteries have a built-in hydrometer with an indicator window on top, a color charge indicator. Typically a bright color in the window means the battery is fully charged, and a dark color indicates that additional charging is needed. See the battery manufacturer's instructions for more precise guidance.
5. If the battery is sealed and has no built-in hydrometer, check the state of charge with a digital voltmeter connected to the battery terminals. A fully charged battery will show 12.6 volts or more.
For more complete information on the battery and jump starting, refer to the Engine Electrical System section and the Introduction.
Remote Control Key Fob Battery Replacement
PROCEDURE
1. Replace the battery if the self-diagnosis display shows the message “Funkschluessel-Batt.” (Remote key battery).
* The remote control must be initialized if battery replacement took more than one minute. Refer to the information below.
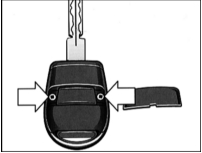
2. Carefully pry off the cover with a small screwdriver. Refer to the accompanying illustration.
3. Remove the two screws and remove the cover.
4. Replace the battery with one of the same type (type CR1220). Observe the polarity. Install the battery in the same position as the old one.
5. Secure the cover with the screws and snap the housing shut.
6. If necessary, initialize the remote control.
Transmitter Initialization
After replacing the batteries, the remote transmitter must be re-initialized (this is not necessary, however, if the replacement took no more than one minute and no buttons were pressed). This applies to a new transmitter (for example, if the old one breaks).
Perform the operation in the following sequence.
PROCEDURE
1. Sit in the driver's seat and close the door.
2. With the key inserted in the ignition lock, briefly (for no more than 5 seconds) turn it to position 1, then turn it back to position 0.
3. Remove the key from the lock, press and hold button 1 on the transmitter. Within 10 seconds, press button 2 three times in succession with short presses, while continuing to hold button 1.
4. Release button 1.
5. The signal of successful transmitter initialization is the central locking system locking, followed immediately by unlocking.
If the central locking system does not respond, repeat the initialization procedure.
If you have several transmitters, all of them (no more than four) must also be initialized, within 30 seconds each. Do not operate the key in the ignition lock during this process.
If problems occur, contact a BMW service station, where spare transmitters can be purchased.
Do not allow unauthorized use of the remote control, for example by handing it to a parking attendant at a hotel. For this purpose, use only the door and ignition key 3 or a spare key.
Test yourself
A quick BMW 1 quiz: every answer comes with an explanation and a link to the manual page.