Wechsel des Motoröls und des Ölfilters
ONCE A YEAR OR EVERY 15,000 KM (WHICHEVER COMES FIRST)
(For diesel engines, every 10,000 km)
Under severe operating conditions, perform this service twice as often.
* Prolonged skin contact with used engine oil is hazardous. Use a protective cream and wear gloves when performing this procedure. Change oil-soaked clothing immediately.
* Frequent engine oil changes are the most important preventive maintenance procedure that the do-it-yourself mechanic can perform. Over time, the oil becomes diluted and contaminated, which leads to premature engine wear.
PROCEDURE
1. Before starting work, make sure that all necessary tools are available. Also keep a sufficient quantity of rags or old newspapers at hand to collect spilled oil. The following equipment is required for the oil change:
a) Inspection pit or hydraulic lift and stands, oil suction syringe.
b) Depending on the filter version, a 13 mm or 36 mm socket to remove the center bolt of the filter housing.
c) A 17 mm or 19 mm socket to remove the oil drain plug, and a container with a capacity of 8 L to collect the oil.
2. The following parts are required:
a) If the oil is not drawn off by suction: aluminum sealing ring A12x15.5 for sealing the drain plug. The ring may be supplied with the oil filter.
b) Filter element.
c) Sealing ring for the filter housing and, depending on the version, one or two sealing rings for the center bolt. Two different filter versions may be supplied for the same engine model. Keep this in mind when purchasing parts.
d) Depending on the engine, 6.5 to 7.5 L of engine oil. Use only the oil recommended in the Specifications. Excess engine oil can be removed with a syringe through the dipstick opening.
3. Start the engine and warm it up to normal operating temperature. Warm oil and sludge drain better from the engine. If new oil, a filter or any tools must be purchased, drive the vehicle to get them, so that the engine oil is warmed up at the same time.
4. Park the vehicle on a level surface and switch off the engine once it is sufficiently warm. Remove the oil filler cap from the cylinder head cover.
5. To gain access to the drain plug and the oil filter, raise the vehicle and support it securely on stands.
* Never work under a vehicle that is supported only by a hydraulic or scissor-type jack. Always use stands!
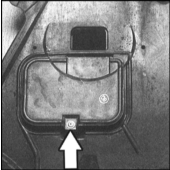
6. Using a Phillips screwdriver, open the cover in the lower engine compartment shield below the oil pan.
Using a Phillips screwdriver, release the cover in the lower engine compartment shield below the oil pan.
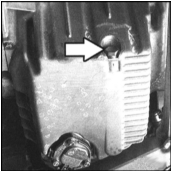
7. Taking care not to touch hot components, position the drain container under the drain plug at the bottom of the engine.
9. As the oil flow decreases, it may be necessary to reposition the container under the oil pan. Check the old oil for metal particles; this can give you advance warning of engine wear. To eliminate the causes of further damage after repair, thoroughly clean the oil passages and hoses. In addition, if equipped, replace the oil cooler.
10. After the old oil has drained, wipe the drain plug with a clean rag. Even the smallest metal particles adhering to the plug will immediately contaminate the new oil.
Oil Filter Replacement, Center Bolt Version
PROCEDURE
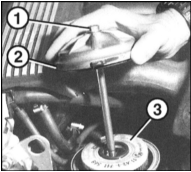
1. Loosen the center bolt (1) in the oil filter cap. Center bolt version.
2. Remove the cap (2) together with the center bolt (1).
3. Allow the oil to drain from the filter housing. Then remove the filter element (3). Wipe up the draining oil with a rag.
4. Install a new filter element into the filter housing.
* Observe the instructions printed on the filter.
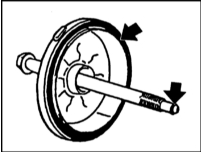
5. Clean the oil filter cap. Replace the sealing rings (arrows in the accompanying illustration) on the center bolt and the cap, and lubricate them with engine oil.
6. Install the cap with the center bolt on top and press it down. The center bolt must enter the hole in the bottom of the housing.
7. Tighten the center bolt to 25 N·m.
Oil Filter Replacement, Screw Cap Version
PROCEDURE
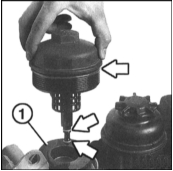
1. Remove the cap using a 36 mm socket. BMW dealerships use a special tool for this purpose, which is installed on the outer diameter of the cap. Refer to the accompanying illustration.
2. Allow the oil to drain from the filter housing. Then remove the filter element (1). Wipe up the draining oil with a rag.
3. Install a new filter element into the filter housing.
* Observe the instructions printed on the filter.
4. Replace the rubber sealing rings (arrows) on the oil line and the cap. Lubricate them with engine oil.
5. Install the oil filter cap with the oil line on top and press it down. The oil line must enter the hole in the bottom of the housing.
6. Tighten the oil filter cap to 25 N·m.
Befüllen des Systems
VORGEHENSWEISE
1. Schrauben Sie die Ablassschraube mit einem neuen Dichtring ein und ziehen Sie sie fest, aber ohne übermäßige Kraft aufzuwenden. Anzugsdrehmoment der Schraube SW 17 mm: 30 N·m, der Schraube SW 19 mm: 60 N·m.
2. Füllen Sie durch die Öleinfüllöffnung am Zylinderkopfdeckel neues Öl der vorgeschriebenen Qualität und Viskosität ein. Die einzufüllende Ölmenge ist den Spezifikationen zu entnehmen.
3. Starten Sie den Motor und lassen Sie ihn mit erhöhter Drehzahl (etwa 2500 1/min) laufen, bis die Kontrollleuchte erlischt (etwa 5 s). Schalten Sie den Motor aus.
4. Warten Sie 5 min und messen Sie den Ölstand mit dem Ölmessstab.
5. Schließen Sie die Abdeckung im unteren Schutzblech des Motorraums unter der Ölwanne und drehen Sie die Klammer mit einem Kreuzschlitzschraubendreher um eine Viertelumdrehung, um die Abdeckung zu schließen.
6. Fahren Sie das Fahrzeug und prüfen Sie die Dichtheit der Ablassschraube und des Ölfilters. Ziehen Sie diese bei Bedarf vorsichtig nach.
7. Stellen Sie den warmen Motor ab und kontrollieren Sie nach 2 min erneut den Ölstand. Füllen Sie bei Bedarf Öl nach.
8. Stellen Sie bei Bedarf die Serviceintervallanzeige zurück. Dafür ist ein Spezialgerät erforderlich, das von BMW vertrieben wird. Bei Bedarf führt die Servicestation diesen Vorgang kostenlos durch.
9. Für eine bessere Kontrolle des Motorzustands sollten Sie möglichst Öl desselben Typs und, wenn möglich, derselben Marke verwenden. Dazu wird empfohlen, beim Ölwechsel am Motor ein Schild mit Angabe der Ölmarke und Viskosität anzubringen.
10. Ein willkürlicher Wechsel des Öltyps wird nicht empfohlen. Motoröle desselben Typs und derselben Marke, aber mit unterschiedlicher Viskosität, dürfen bei Bedarf in der Übergangszeit des Jahres eingefüllt werden.
Testen Sie sich
Ein kurzes Quiz zum BMW 1: Zu jeder Antwort gibt es eine Erklärung und einen Link zur Handbuchseite.