Fuel Tank Removal and Installation
PROCEDURE
See the warnings at the beginning of the Fuel System Pressure Relief section.
The procedure is greatly simplified if the fuel tank is emptied in advance. Some tanks are equipped with a drain plug; on others, fuel must be pumped out or run out by running the engine beforehand. NEVER siphon fuel by mouth!
1. To relieve excess pressure, remove the fuel filler cap.
2. Relieve the fuel system pressure (see Fuel System Pressure Relief section).
3. Disconnect the negative battery cable.
If the vehicle is equipped with an audio system with an anti-theft code, make sure you have the correct code to reactivate the audio system before disconnecting the battery!
4. If equipped, remove the drain plug and drain the remaining fuel into a suitable container of adequate capacity. If no drain plug is provided, pump out the fuel using a special fuel transfer kit, available from almost any automotive accessories store.
NEVER siphon gasoline by mouth!
5. Disconnect the wiring from the fuel level sender and fuel pump (see Fuel Pump Removal and Installation and Fuel Line Inspection and Replacement sections). Also disconnect the fuel hoses from the pump (see Fuel Line Inspection and Replacement section).
6. Loosen the rear wheel lug nuts, raise the rear of the vehicle and support it on jack stands. Remove the rear wheels.
7. Remove the catalytic converter (see Engine Controls chapter).
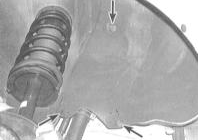
8. Remove the attaching bolts and detach the fuel line cover from the body.
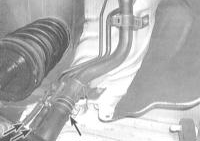
9. Mark and disconnect the fuel supply and return hoses from their metal lines. Also disconnect the rubber filler neck and vent hoses from the tank.
10. If equipped, disconnect the wiring from the ABS wheel speed sensors.
11. Remove the stabilizer bar (see Suspension and Steering chapter), the parking brake cable bracket (see Brakes chapter) and the rear suspension heat shield.
12. Remove the rear brake assemblies (see Brakes chapter):
a) On models with rear disc brakes, disconnect the parking brake cables, remove the mounting bolts, remove the brake calipers and tie them with wire to suspension components. Make sure the brake lines are not twisted or otherwise deformed.
b) On models with rear drum brakes, remove the drums and brake shoes. It will also be necessary to disconnect the brake lines from the wheel cylinders at the rear of the backing plates. Disconnect the parking brake cables from the backing plates (see Brakes chapter) and unbolt the backing plates from the hub assemblies.
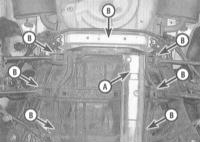
13. Remove the bolt from the lower end of each shock absorber (see Suspension and Steering chapter). Position a floor jack under the rear suspension subframe and remove its mounting bolts. Models with 4-cylinder engines have four mounting bolts; V6 models have twelve. Lower the subframe.
14. Support the fuel tank with a floor jack. To distribute the load, place a sturdy wooden block between the jack head and the bottom of the tank.
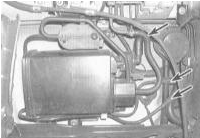
15. The vehicles in question are equipped with an ORVR venting system that works together with the Evaporative Emission (EVAP) control system. Release the clamps and disconnect the corresponding lines from the tank and its filler neck. Disconnect the hoses from the EVAP charcoal canister.
16. Remove the heat shield.
17. Disconnect both mounting straps and lower them to provide sufficient clearance for fuel tank removal.
18. Remove the tank from under the vehicle.
19. Installation is the reverse of removal.
Test yourself
A quick Honda Accord quiz: every answer comes with an explanation and a link to the manual page.