Injectors
Essential special tools |
|
| Mot.1566 | High-pressure pump pipe removal tool |
Essential equipment |
| diagnostic tool |
| "low torque" torque wrench |
| high-pressure pipe spanner (DM19 spanner) |
| crowfoot pipe attachment for tightening the injector-to-rail high-pressure pipes ("Crowfoot 18-17" spanner) |
| pipe union tool for tightening the high-pressure pump-to-rail pipe ("Crowfoot 19-17" spanner) |
Tightening torques |
|
| injector clamp | 2,8 daN.m |
| rail nuts | 2.8 +/- 0.3 daN.m |
| nut on the injector side | 3.8 daN.m |
| nut on rail side | 3.8 daN.m |

Before any work on the injection circuit, check with the diagnostic tool:
- that the injection rail is no longer under pressure,
- that the fuel temperature is not too high.
- Strictly observe the safety and cleanliness instructions given in this document during every operation.
- Never loosen a high-pressure pipe connection while the engine is running.
- Use the special plug kit for the high-pressure injection circuit.
- Always replace any high-pressure pipe and high-pressure pipe clips that have been removed.
- Do not work on the injectors.
- Do not remove the injector filter.
- Always replace any injector that has been opened.
The injectors can be replaced individually.
Only remove the high-pressure pipe concerned.
REMOVAL
- Remove the engine covers.
- Disconnect the battery.
- Remove the high-pressure fuel pipes, rail to injectors (Chapter Diesel Injection, High-Pressure Pipe: Replacement, page 13B-80).
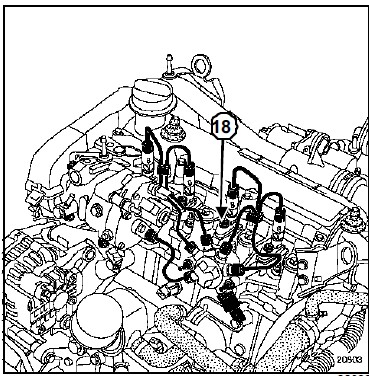
- Disconnect the diesel return pipe from the injector.
- Fit protective caps to the openings.
- Loosen the injector clamp (18).
- Remove the injector.
- Remove the heat shield washer.
INSTALLATION
I - INJECTOR CLEANING
WARNINGIt is strictly forbidden to clean the injectors using:
- a wire brush,
- emery cloth,
- an ultrasonic cleaner.
- Soak the injectors in degreaser.
- Wipe with new wipes, part number 77 11 211 707.
II - INJECTOR REFITTING
CAUTION: Remove the caps only at the last moment for each component.
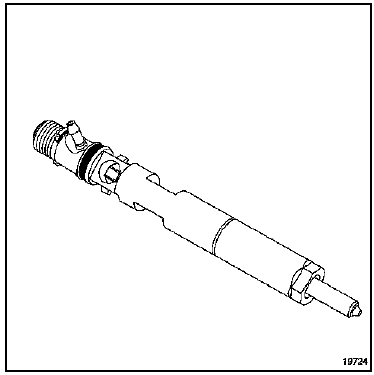
- Program the 16-character code (C2I) (19) of the injector into the injection ECU before refitting, using the diagnostic tool (Chapter Diesel Injection, Diesel Injector Adjustment Value, page 13B-73).
- Clean using wipes, part number 77 11 211 707, soaked in new solvent:
- the injector wells,
- the injector bodies,
- the injector clamps.
- Dry the cleaned parts with a new wipe.
- Replace the heat shield washer with a new one.
- Fit the injector.
- Tighten the injector clamp to torque (2.8 daN.m).
CAUTION Always replace any high-pressure pipe that has been removed.
- Lightly lubricate the nut threads with the oil contained in the sachet supplied in the new parts kit, before fitting the new high-pressure pipe.
- Some pipes are supplied with a sachet of oil and some are supplied without one.
- Pipes supplied without a sachet are self-lubricating pipes. The torque is unchanged: 3.8 daN.m.
- Fit the high-pressure pipe:
- remove the protective plugs,
- insert the high-pressure pipe olive into the cone at the injector inlet,
- insert the high-pressure pipe olive into the cone at the rail outlet.
- Start the nut by hand, first on the injector side, then on the rail side.
- Pre-tighten lightly.
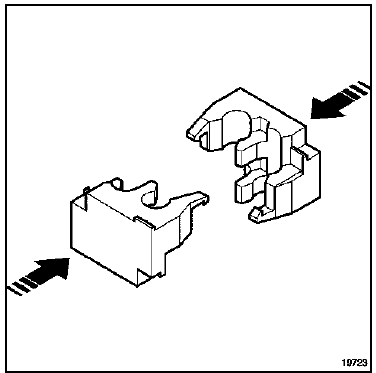
- Fit a new clip supplied with the new pipe onto the high-pressure pipes:
- insert the first half-shell using multi-grip pliers.
- insert the second half-shell using multi-grip pliers.
Observe the fitting direction of the second shell. The lugs at the centre of the clip can only engage in one position.
- Tighten the rail nuts to torque (2.8 +/- 0.3 daN.m).
- Do not hold the pipes with the spanner when tightening to torque.
- When tightening the high-pressure pipes, it is essential to hold the injector intermediate fitting.
- Tighten in sequence and to torque:
- the nut on the injector side (3.8 daN.m),
- the nut on the rail side (3.8 daN.m),
using tool (Mot.1566), possibly fitted with one of the following tools:
- "low torque" torque wrench,
- spanner for high-pressure pipes (spanner DM19),
- crowfoot socket for tightening the injector-to-rail high-pressure pipes ("Crowfoot 18-17" spanner),
- crowfoot socket for tightening the pump-to-rail high-pressure pipe ("Crowfoot 19-17" spanner).
- Refit in the reverse order of removal.
- Prime the diesel circuit using the priming pump.
Connect the battery; carry out the necessary re-learns (see Electrical Equipment chapter).
WARNINGCheck for diesel leaks:
- Run the engine at idle until the cooling fan starts.
- Rev the engine several times without load.
- Carry out a road test.
- Switch off the ignition.
- Check that there is no diesel leakage.
F9Q
Essential special tools |
|
| Mot.1566 | High-pressure pump pipe removal tool |
Essential equipment |
| diagnostic tool |
Tightening torques |
|
| injector clamp bolt | 2.5 daN.m |
| rail mounting bolts | 2.2 daN.m |
| high-pressure pipe nuts | 2.5 daN.m |

Before any work on the injection system, use the diagnostic tool to check:
- that the injection rail is no longer under pressure,
- that the fuel temperature is not high.
- Always observe the safety and cleanliness instructions given in this document during every operation.
- Never loosen a high-pressure pipe connection while the engine is running.
- Use the special plug kit for the high-pressure injection circuit.
- Always replace any high-pressure pipe and high-pressure pipe clips that have been removed.
- Do not work on the injectors.
- Do not remove the injector filter.
- Always replace any injector that has been opened.
- It is forbidden to separate the injector holder from the nozzle.
The injectors can be replaced individually.
Only remove the high-pressure pipe concerned.
REMOVAL
- Remove the engine covers.
- Disconnect the battery.
- To remove the injector on the flywheel side, remove the air intake duct (see Chapter Mixture, page ).
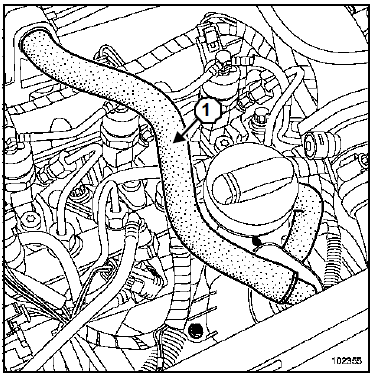
- Disconnect and move aside the oil vapour return pipe (1).
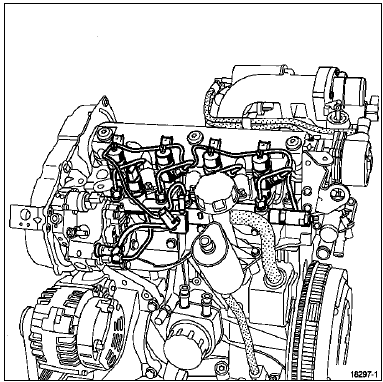
- Remove the high-pressure pipe using tool (Mot.1566).
- Fit the cleanliness plugs.
- Remove:
- the engine covers,
- the injector clamp,
- the injector,
- the heat shield washer.
INSTALLATION
I - INJECTOR CLEANING
WARNINGIt is strictly forbidden to clean the injectors using:
- a wire brush,
- emery cloth,
- an ultrasonic cleaner.
- Soak the injectors in degreaser.
- Wipe with new wipes, part number 77 11 211 707.
II - INJECTOR REFITTING
WARNINGOnly remove the protective caps at the last moment for each component.
- Program the six-character alphanumeric code (IMA) of the injector into the injection ECU before refitting, using the diagnostic tool (Chapter Diesel Injection, Diesel Injector Adjustment Value, page 13B-73).
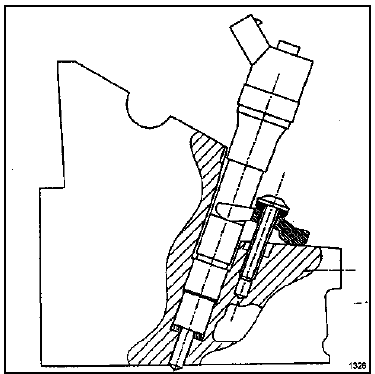
- Replace the heat shield washer.
- Refit the injector.
- Tighten the injector clamp bolts to torque (2.5 daN.m).
CAUTION Do not fit the high-pressure pipes under stress.
- Loosen the injection rail (the rail must be free-floating).
CAUTION Always replace all high-pressure pipes that have been removed.
- Lightly lubricate the high-pressure pipe nut threads with the oil in the sachet supplied in the new parts kit.
- Position the high-pressure pipe olive in the cone at the high-pressure pump outlet.
- Position the high-pressure pipe olive in the cone at the rail inlet.
- Start the high-pressure pipe nuts by hand, beginning with the rail-side nut.
- Pre-tighten the high-pressure pipe nuts lightly.
- Tighten the rail mounting bolts to torque (2.2 daN.m).
- Do not put the spanner on the high-pressure pipes when tightening to torque.
- Always hold the injector intermediate fitting when tightening.
- Tighten the high-pressure pipe nuts to torque (2.5 daN.m) in sequence, on the pump side and the rail side.
- Refit in the reverse order of removal.
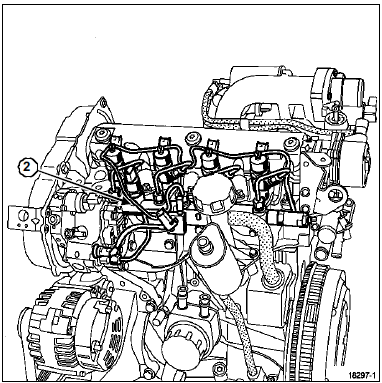
CAUTION Always replace the fuel return pipe (2).
- Prime the diesel circuit using the priming bulb.
Connect the battery; carry out the necessary re-learns (see Electrical Equipment chapter).
WARNINGCheck for diesel leaks:
- Run the engine at idle until the cooling fan starts.
- Rev the engine several times without load.
- Carry out a road test.
- Switch off the ignition.
- Check that there is no diesel leakage.
Test yourself
A quick Renault Megane quiz: every answer comes with an explanation and a link to the manual page.