Engine and peripherals
Venturi
In this manual: Engine and peripherals
~2min read
K9K
Essential equipment |
| diagnostic tool |
| "low torque" torque wrench |
Tightening torques |
|
| venturi mounting bolt | 0.55 daN.m +/- 0.06 |

Before any work on the injection system, use the diagnostic tool to check:
- that the injection rail is no longer under pressure,
- that the fuel temperature is not too high.
- Always observe the safety and cleanliness instructions during every operation.
- Never loosen a high-pressure pipe connection while the engine is running.
- Use the special plug kit for the high-pressure injection circuit.
- Always replace any high-pressure pipe and the high-pressure pipe clips that were removed.
REMOVAL
- Remove the engine covers.
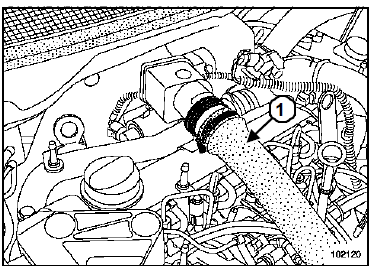
- Disconnect:
- the battery,
- the air intake duct (1).
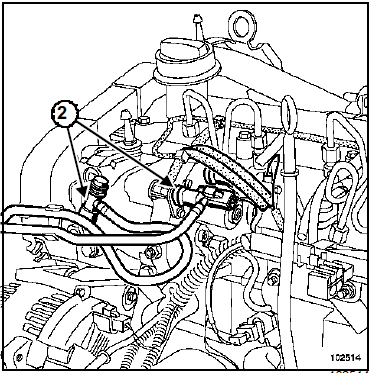
- Disconnect the return and supply pipes (2).
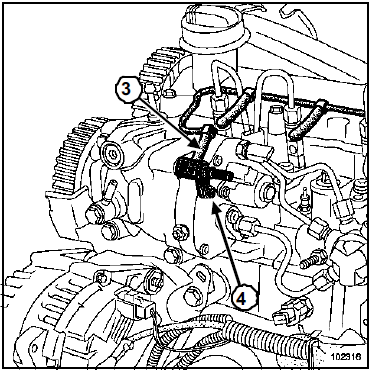
- Disconnect the return pipe (3) connecting the injector to the pump.
- Remove:
- the venturi mounting bolt (4),
- the venturi
INSTALLATION
WARNINGRemove the protective plugs only at the last moment, for each component.
- Lubricate the O-ring with the lubricant contained in the sachet supplied with the new part.
- Do not damage the O-ring when fitting the venturi.
- Install the venturi.
- Tighten the venturi mounting bolt to torque (0.55 daN.m +/- 0.06) using the "low torque" torque wrench tool.
- Reconnect the various pipes.
Connect the battery; carry out the necessary re-learns (see Electrical Equipment chapter).
WARNINGCheck for diesel leaks:
- check the seal after the repair (Diesel Injection chapter, High-pressure pipe: Sealing check, page 13B-48),
- run the engine at idle until the radiator fan starts,
- rev the engine several times with no load,
- carry out a road test,
- switch off the ignition,
- check that no diesel is leaking.
Test yourself
A quick Renault Megane quiz: every answer comes with an explanation and a link to the manual page.
Was this page helpful?