Engine Control System/Fuel System
Engine Control Module (ECM) Repair Procedures
In this manual: Engine Control System/Fuel System
13steps
~78min
3/5difficulty
Done 0 of 13
Removal
|

- Turn the ignition switch OFF and disconnect the negative (-) battery cable.
- Disconnect the ECM connector (A).
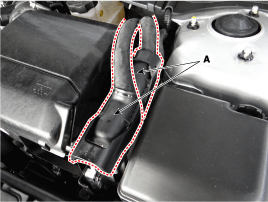
- Remove the air cleaner assembly. (Refer to Engine Mechanical System - "Air Cleaner")
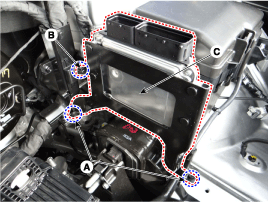
- Remove the mounting bolts (A) and nut (B), then remove the ECM (C).
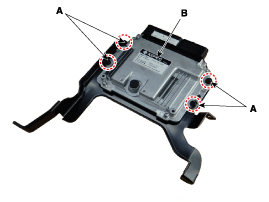
- Remove the ECM (B) by loosening the 4 nuts (A) from the bracket.
Installation
|
- Install in the reverse order of removal. ECM mounting nut: 9.8 ~ 11.8 N·m ECM bracket mounting nut/bolt: 9.8 ~ 11.8 N·m
ECM Circuit Inspection Procedure
- ECM GROUND CIRCUIT INSPECTION: Measure the resistance between the ECM and chassis ground using the rear side of the ECM harness connector as the ECM-side checkpoint. If a problem is found, repair it.
Specification: Below 1 Ω
- ECM CONNECTOR INSPECTION: Disconnect the ECM connector and visually inspect the ground terminals on the ECM side and harness side for bent pins or poor contact tension. If a problem is found, repair it.
- If no problem is found in steps 1 and 2, the ECM may be faulty. If so, before replacing the ECM, make sure there are no DTCs, then recheck the vehicle. If DTCs were detected, inspect them first before replacing the ECM.
- RECHECK ORIGINAL ECM: Install the original ECM (may be faulty) in a known-good vehicle and check the vehicle. If the problem recurs, replace the original ECM with a new one. If the problem does not occur, the problem is intermittent (refer to Intermittent Problem Check Procedure in Basic Inspection Procedure).
Test yourself
A quick Hyundai Sonata LF quiz: every answer comes with an explanation and a link to the manual page.
Was this page helpful?