Error in Matching of ECUs (C1288). Skid Control ECU Malfunction (C1300). Open Circuit in Right Front Speed Sensor Circuit (C1330-C1467)
Error in Matching of ECUs (C1288)
DESCRIPTION
The skid control ECU (brake actuator assembly) stores this DTC when the previously learned values in the VSC system and engine information sent from the ECM are inconsistent, or when the learning has not completed after the skid control ECU (brake actuator assembly) is replaced with a new one.
DTC No. | Detection Item | DTC Detection Condition | Trouble Area |
|---|---|---|---|
C1288 |
Error in Matching of ECUs |
ECM does not match. |
ECM |
PROCEDURE
CHECK CAN COMMUNICATION SYSTEM
(a) Check if CAN communication system DTCs are output.
Click here 
Result | Proceed to |
|---|---|
DTCs are not output |
A |
DTCs are output |
B |
| B |  |
INSPECT CAN COMMUNICATION SYSTEM |
|

PERFORM SYSTEM VARIANT LEARNING
(a) Perform system variant learning.
Click here
HINT:
- System variant learning is automatically performed immediately after Test Mode is entered.
- If learning has not yet been performed, the slip indicator light will remain on and DTC C1288 will be stored.
- If system variant learning is not successful, the warning lights will not blink in the Test Mode pattern and DTC C1288 will not be cleared.
|
RECONFIRM DTC
(a) Clear the DTCs.
Chassis > ABS/VSC/TRAC/EPB > Clear DTCs(b) Turn the engine switch off.
(c) Start the engine.
(d) Check if the same DTC is output.
Chassis > ABS/VSC/TRAC/EPB > Trouble CodesResult | Proceed to |
|---|---|
C1288 is not output |
A |
C1288 is output |
B |
| A | |
END |
| B | |
REPLACE ECM |
Skid Control ECU Malfunction (C1300)
DESCRIPTION
The skid control ECU (brake actuator assembly) stores this DTC if malfunctions are found in a circuit inside the ECU by self diagnosis.
DTC No. | Detection Item | DTC Detection Condition | Trouble Area |
|---|---|---|---|
C1300 |
Skid Control ECU Malfunction |
Internal failure of the skid control ECU (brake actuator assembly). |
Skid control ECU (brake actuator assembly) |
PROCEDURE
REPLACE BRAKE ACTUATOR ASSEMBLY
(a) Replace the skid control ECU (brake actuator assembly).
Click here 
HINT:
This DTC is output when the skid control ECU (brake actuator assembly) detects a malfunction in an internal circuit.
(b) Enter the following menus: Chassis / ABS/VSC/TRAC/EPB / Utility / Test Mode.
(c) Perform system variant learning and acceleration sensor zero point calibration.
Click here
Test Mode
(d) Enter the following menus: Chassis / ABS/VSC/TRAC/EPB / Utility / Signal Check.
(e) Perform the sensor check using the Test Mode (Signal Check) procedure.
Click here
Signal Check
| NEXT |  |
END |
Open Circuit in Right Front Speed Sensor Circuit (C1330-C1467)
DESCRIPTION
Each speed sensor detects wheel speed and sends signals to the skid control ECU (brake actuator assembly). These signals are used by the ABS control.
HINT:
The output voltage values shown below are for when the vehicle wire harnesses are connected to the skid control ECU (brake actuator assembly) and the speed sensors.
for Front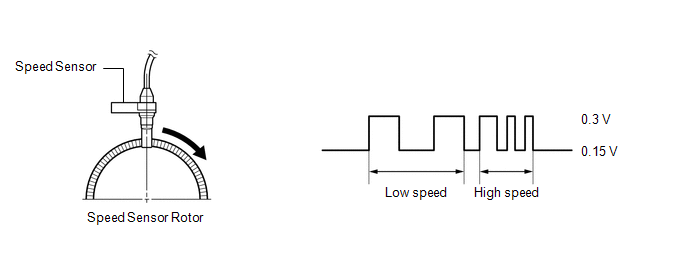 for Rear
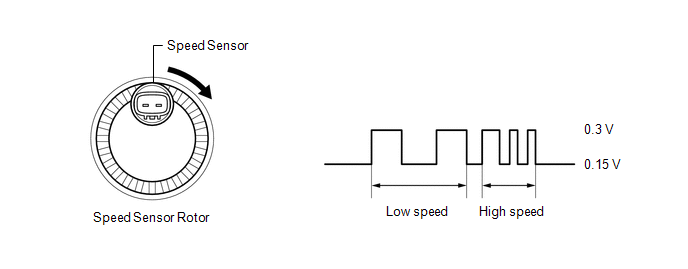
DTC No. | Detection Item | DTC Detection Condition | Trouble Area |
|---|---|---|---|
C1330 |
Open Circuit in Right Front Speed Sensor Circuit |
An open or short in the speed sensor signal circuit. |
|
C1331 |
Open Circuit in Left Front Speed Sensor Circuit |
An open or short in the speed sensor signal circuit. |
|
C1332 |
Open Circuit in Right Rear Speed Sensor Circuit |
An open or short in the speed sensor signal circuit. |
|
C1333 |
Open Circuit in Left Rear Speed Sensor Circuit |
An open or short in the speed sensor signal circuit. |
|
C1464 |
Front Speed Sensor RH Circuit |
Any of the following is detected:
|
|
C1465 |
Front Speed Sensor LH Circuit |
Any of the following is detected:
|
|
C1466 |
Rear Speed Sensor RH Circuit |
Any of the following is detected:
|
|
C1467 |
Rear Speed Sensor LH Circuit |
Any of the following is detected:
|
|
- *: w/ AVS
HINT:
- DTCs C1330 and C1464 are for the front speed sensor RH.
- DTCs C1331 and C1465 are for the front speed sensor LH.
- DTCs C1332 and C1466 are for the rear speed sensor RH.
- DTCs C1333 and C1467 are for the rear speed sensor LH.
Vehicle Condition |
|||||
|---|---|---|---|---|---|
Pattern 1 | Pattern 2 | Pattern 3 | Pattern 4 |
||
Diagnosis Condition |
The vehicle speed is more than 50 km/h. |
○ |
- |
- |
- |
After the initial start or restart and when the vehicle speed has reached 12 km/h. |
- |
○ |
- |
- |
|
After the initial start or restart and when the vehicle speed has reached 20 km/h. |
- |
- |
○ |
- |
|
Malfunction Status |
Pulses are not detected. |
○ |
- |
- |
- |
A wheel speed of 0 km/h is detected. |
- |
○ |
- |
- |
|
A front wheel speed of 0 km/h is detected. |
- |
- |
○ |
- |
|
The difference between the speed of the fastest wheel and the speed of the slowest wheel is 5% or more of the vehicle speed. (If the speed of any wheel is less than 5 km/h, a speed difference of up to 15% is allowable.) |
- |
- |
- |
○ |
|
Detection Time |
0.4 seconds |
- |
- |
9 to 72 seconds or more (varies depending on the driving conditions) |
|
Number of Trips |
1 trip |
1 trip |
1 trip |
1 trip |
|
HINT:
DTC will be output when conditions for either of the patterns in the table above are met.
DTC Detection Conditions: C1464Vehicle Condition |
|||||
|---|---|---|---|---|---|
Pattern 5 | Pattern 6 | Pattern 7 | Pattern 8 |
||
Diagnosis Condition |
The vehicle speed is less than 100 km/h. |
○ |
- |
- |
- |
The vehicle speed is 100 km/h or more. |
- |
○ |
- |
- |
|
Malfunction Status |
The difference between the speed of the fastest wheel and the speed of the slowest wheel is 5 km/h or more. (If the speed of any wheel is less than 5 km/h, a speed difference of up to 16 km/h is allowable.) |
○ |
- |
- |
- |
The difference between the speed of the fastest wheel and the speed of the slowest wheel is 6% or more of the vehicle speed. (If the speed of any wheel is less than 5 km/h, a speed difference of up to 15% is allowable.) |
- |
○ |
- |
- |
|
Wheel speed sensor signal fluctuation is equivalent to 98 G or more, or alternates between 50 G or more and -50 G or less. |
- |
- |
○ |
- |
|
An abnormal signal is received from a wheel speed sensor. |
- |
- |
- |
○ |
|
Detection Time |
9 to 72 seconds or more (varies depending on the driving conditions) |
9 to 72 seconds or more (varies depending on the driving conditions) |
- |
- |
|
Number of Trips |
1 trip |
1 trip |
1 trip |
1 trip |
|
HINT:
DTC will be output when conditions for either of the patterns in the table above are met.
DTC Detection Conditions: C1465Vehicle Condition |
|||||
|---|---|---|---|---|---|
Pattern 1 | Pattern 2 | Pattern 3 | Pattern 4 |
||
Diagnosis Condition |
The vehicle speed is more than 50 km/h. |
○ |
- |
- |
- |
After the initial start or restart and when the vehicle speed has reached 12 km/h. |
- |
○ |
- |
- |
|
After the initial start or restart and when the vehicle speed has reached 20 km/h. |
- |
- |
○ |
- |
|
Malfunction Status |
Pulses are not detected. |
○ |
- |
- |
- |
A wheel speed of 0 km/h is detected. |
- |
○ |
- |
- |
|
A front wheel speed of 0 km/h is detected. |
- |
- |
○ |
- |
|
The difference between the speed of the fastest wheel and the speed of the slowest wheel is 5% or more of the vehicle speed. (If the speed of any wheel is less than 5 km/h, a speed difference of up to 15% is allowable.) |
- |
- |
- |
○ |
|
Detection Time |
0.4 seconds |
- |
- |
9 to 72 seconds or more (varies depending on the driving conditions) |
|
Number of Trips |
1 trip |
1 trip |
1 trip |
1 trip |
|
HINT:
DTC will be output when conditions for either of the patterns in the table above are met.
DTC Detection Conditions: C1465Vehicle Condition |
|||||
|---|---|---|---|---|---|
Pattern 5 | Pattern 6 | Pattern 7 | Pattern 8 |
||
Diagnosis Condition |
The vehicle speed is less than 100 km/h. |
○ |
- |
- |
- |
The vehicle speed is 100 km/h or more. |
- |
○ |
- |
- |
|
Malfunction Status |
The difference between the speed of the fastest wheel and the speed of the slowest wheel is 5 km/h or more. (If the speed of any wheel is less than 5 km/h, a speed difference of up to 16 km/h is allowable.) |
○ |
- |
- |
- |
The difference between the speed of the fastest wheel and the speed of the slowest wheel is 6% or more of the vehicle speed. (If the speed of any wheel is less than 5 km/h, a speed difference of up to 15% is allowable.) |
- |
○ |
- |
- |
|
Wheel speed sensor signal fluctuation is equivalent to 98 G or more, or alternates between 50 G or more and -50 G or less. |
- |
- |
○ |
- |
|
An abnormal signal is received from a wheel speed sensor. |
- |
- |
- |
○ |
|
Detection Time |
9 to 72 seconds or more (varies depending on the driving conditions) |
9 to 72 seconds or more (varies depending on the driving conditions) |
- |
- |
|
Number of Trips |
1 trip |
1 trip |
1 trip |
1 trip |
|
HINT:
DTC will be output when conditions for either of the patterns in the table above are met.
DTC Detection Conditions: C1466Vehicle Condition |
|||||
|---|---|---|---|---|---|
Pattern 1 | Pattern 2 | Pattern 3 | Pattern 4 |
||
Diagnosis Condition |
The vehicle speed is more than 50 km/h. |
○ |
- |
- |
- |
After the initial start or restart and when the vehicle speed has reached 12 km/h. |
- |
○ |
- |
- |
|
After the initial start or restart and when the vehicle speed has reached 20 km/h. |
- |
- |
○ |
- |
|
Malfunction Status |
Pulses are not detected. |
○ |
- |
- |
- |
A wheel speed of 0 km/h is detected. |
- |
○ |
- |
- |
|
A rear wheel speed of 0 km/h is detected. |
- |
- |
○ |
- |
|
The difference between the speed of the fastest wheel and the speed of the slowest wheel is 5% or more of the vehicle speed. (If the speed of any wheel is less than 5 km/h, a speed difference of up to 15% is allowable.) |
- |
- |
- |
○ |
|
Detection Time |
0.4 seconds |
- |
- |
9 to 72 seconds or more (varies depending on the driving conditions) |
|
Number of Trips |
1 trip |
1 trip |
1 trip |
1 trip |
|
HINT:
DTC will be output when conditions for either of the patterns in the table above are met.
DTC Detection Conditions: C1466Vehicle Condition |
|||||
|---|---|---|---|---|---|
Pattern 5 | Pattern 6 | Pattern 7 | Pattern 8 |
||
Diagnosis Condition |
The vehicle speed is less than 100 km/h. |
○ |
- |
- |
- |
The vehicle speed is 100 km/h or more. |
- |
○ |
- |
- |
|
Malfunction Status |
The difference between the speed of the fastest wheel and the speed of the slowest wheel is 5 km/h or more. (If the speed of any wheel is less than 5 km/h, a speed difference of up to 16 km/h is allowable.) |
○ |
- |
- |
- |
The difference between the speed of the fastest wheel and the speed of the slowest wheel is 6% or more of the vehicle speed. (If the speed of any wheel is less than 5 km/h, a speed difference of up to 15% is allowable.) |
- |
○ |
- |
- |
|
Wheel speed sensor signal fluctuation is equivalent to 98 G or more, or alternates between 50 G or more and -50 G or less. |
- |
- |
○ |
- |
|
An abnormal signal is received from a wheel speed sensor. |
- |
- |
- |
○ |
|
Detection Time |
9 to 72 seconds or more (varies depending on the driving conditions) |
9 to 72 seconds or more (varies depending on the driving conditions) |
- |
- |
|
Number of Trips |
1 trip |
1 trip |
1 trip |
1 trip |
|
HINT:
DTC will be output when conditions for either of the patterns in the table above are met.
DTC Detection Conditions: C1467Vehicle Condition |
|||||
|---|---|---|---|---|---|
Pattern 1 | Pattern 2 | Pattern 3 | Pattern 4 |
||
Diagnosis Condition |
The vehicle speed is more than 50 km/h. |
○ |
- |
- |
- |
After the initial start or restart and when the vehicle speed has reached 12 km/h. |
- |
○ |
- |
- |
|
After the initial start or restart and when the vehicle speed has reached 20 km/h. |
- |
- |
○ |
- |
|
Malfunction Status |
Pulses are not detected. |
○ |
- |
- |
- |
A wheel speed of 0 km/h is detected. |
- |
○ |
- |
- |
|
A rear wheel speed of 0 km/h is detected. |
- |
- |
○ |
- |
|
The difference between the speed of the fastest wheel and the speed of the slowest wheel is 5% or more of the vehicle speed. (If the speed of any wheel is less than 5 km/h, a speed difference of up to 15% is allowable.) |
- |
- |
- |
○ |
|
Detection Time |
0.4 seconds |
- |
- |
9 to 72 seconds or more (varies depending on the driving conditions) |
|
Number of Trips |
1 trip |
1 trip |
1 trip |
1 trip |
|
HINT:
DTC will be output when conditions for either of the patterns in the table above are met.
DTC Detection Conditions: C1467Vehicle Condition |
|||||
|---|---|---|---|---|---|
Pattern 5 | Pattern 6 | Pattern 7 | Pattern 8 |
||
Diagnosis Condition |
The vehicle speed is less than 100 km/h. |
○ |
- |
- |
- |
The vehicle speed is 100 km/h or more. |
- |
○ |
- |
- |
|
Malfunction Status |
The difference between the speed of the fastest wheel and the speed of the slowest wheel is 5 km/h or more. (If the speed of any wheel is less than 5 km/h, a speed difference of up to 16 km/h is allowable.) |
○ |
- |
- |
- |
The difference between the speed of the fastest wheel and the speed of the slowest wheel is 6% or more of the vehicle speed. (If the speed of any wheel is less than 5 km/h, a speed difference of up to 15% is allowable.) |
- |
○ |
- |
- |
|
Wheel speed sensor signal fluctuation is equivalent to 98 G or more, or alternates between 50 G or more and -50 G or less. |
- |
- |
○ |
- |
|
An abnormal signal is received from a wheel speed sensor. |
- |
- |
- |
○ |
|
Detection Time |
9 to 72 seconds or more (varies depending on the driving conditions) |
9 to 72 seconds or more (varies depending on the driving conditions) |
- |
- |
|
Number of Trips |
1 trip |
1 trip |
1 trip |
1 trip |
|
HINT:
DTC will be output when conditions for either of the patterns in the table above are met.
WIRING DIAGRAM
for Front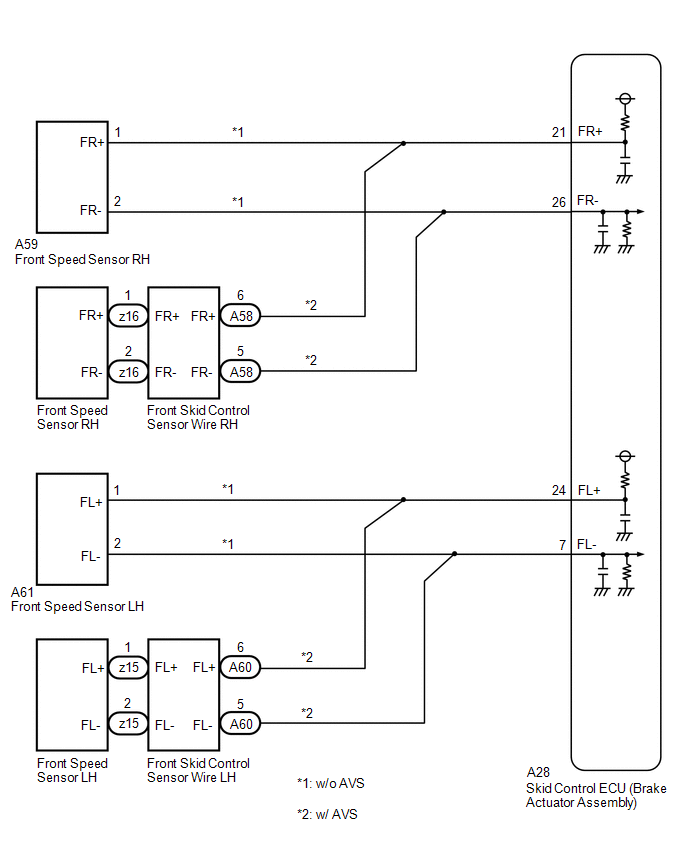 for Rear
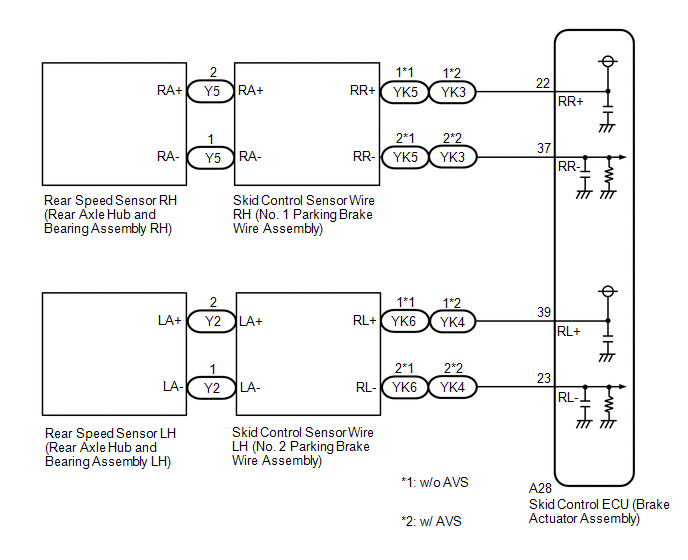
NOTICE:
When replacing the skid control ECU (brake actuator assembly), perform system variant learning and acceleration sensor zero point calibration.
Click here 
PROCEDURE
RECONFIRM DTC
(a) Clear the DTCs.
Chassis > ABS/VSC/TRAC/EPB > Clear DTCs(b) Turn the engine switch off.
(c) Start the engine.
(d) Drive the vehicle at a speed of 54 km/h or more for at least 120 seconds.
(e) Check if the same DTC is output.
Chassis > ABS/VSC/TRAC/EPB > Trouble CodesResult | Proceed to |
|---|---|
C1330 or C1464 is output |
A |
C1331 or C1465 is output |
B |
C1332 or C1466 is output |
C |
C1333 or C1467 is output |
D |
| B |  |
GO TO STEP 16 |
| C | |
GO TO STEP 30 |
| D | |
GO TO STEP 41 |
|

CHECK FRONT SPEED SENSOR RH INSTALLATION
(a) Turn the engine switch off. |
|
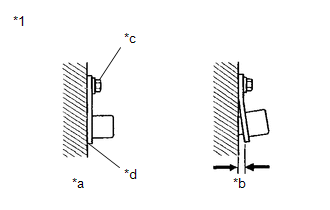
(b) Check the front speed sensor RH installation.
OK:
There is no clearance between the front speed sensor RH and the front steering knuckle RH.
The installation bolt is tightened properly.
Torque
8.5 N*m (87 kgf*cm, 75 in.*lbf)
| NG | |
REINSTALL OR REPLACE FRONT SPEED SENSOR RH |
|
CHECK FRONT SPEED SENSOR RH (CHECK FOR FOREIGN MATTER)
(a) Remove the front speed sensor RH.
Click here
(b) Check the front speed sensor RH tip.
OK:
The front speed sensor RH tip is free of scratches, oil, and foreign matter.
NOTICE:
- If there is oil or foreign matter on the front speed sensor RH, clean the front speed sensor RH.
- If the front speed sensor RH is damaged, replace the front speed sensor RH with a new one.
- Check the front speed sensor RH signal after cleaning or replacement.
Click here
Result | Proceed to |
|---|---|
OK (w/o AVS) |
A |
OK (w/ AVS) |
B |
NG |
C |
| B | |
GO TO STEP 9 |
| C | |
CLEAN OR REPLACE FRONT SPEED SENSOR RH |
|
INSPECT BRAKE ACTUATOR ASSEMBLY (POWER SOURCE CIRCUIT)
(a) Make sure that there is no looseness at the locking part and the connecting part of the connectors. OK: The connector is securely connected. |
|
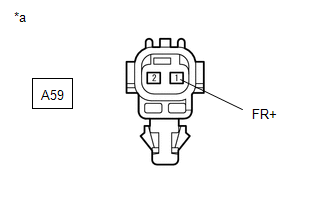
(b) Disconnect the A59 front speed sensor RH connector.
(c) Check both the connector case and the terminals for deformation and corrosion.
OK:
No deformation or corrosion.
(d) Turn the engine switch on (IG).
(e) Measure the voltage according to the value(s) in the table below.
Standard Voltage:
Tester Connection | Condition | Specified Condition |
|---|---|---|
A59-1 (FR+) - Body ground |
Engine switch on (IG) |
11 to 14 V |
| NG | |
GO TO STEP 8 |
|
INSPECT BRAKE ACTUATOR ASSEMBLY (GROUND CIRCUIT)
(a) Measure the voltage according to the value(s) in the table below. Standard Voltage:
|
|
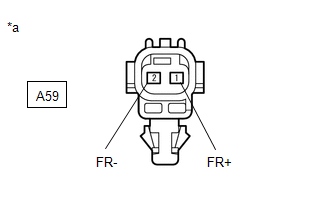
| NG | |
GO TO STEP 7 |
|
CHECK FRONT SPEED SENSOR ROTOR RH (CHECK FOR FOREIGN MATTER)
(a) Remove the front speed sensor rotor RH (front axle hub sub-assembly RH).
Click here
(b) Check the front speed sensor rotor RH.
OK:
The front speed sensor rotor RH is free of scratches, oil, and foreign matter.
NOTICE:
- If there is oil or foreign matter on the front speed sensor rotor RH, clean the front speed sensor rotor RH.
- If the front speed sensor rotor RH is damaged, replace the front speed sensor rotor RH with a new one.
- Check the front speed sensor RH signal after cleaning or replacement.
Click here
HINT:
- The front speed sensor rotor RH is incorporated into the front axle hub sub-assembly RH.
- If the front speed sensor rotor RH needs to be replaced, replace it together with the front axle hub sub-assembly RH.
Result | Proceed to |
|---|---|
OK |
A |
NG (The front speed sensor rotor RH is damaged.) |
B |
NG (There is foreign matter on the front speed sensor rotor RH.) |
C |
| A | |
REPLACE FRONT SPEED SENSOR RH |
| B | |
REPLACE FRONT AXLE HUB SUB-ASSEMBLY RH |
| C | |
CLEAN FRONT SPEED SENSOR ROTOR RH |
CHECK HARNESS AND CONNECTOR (BRAKE ACTUATOR ASSEMBLY - FRONT SPEED SENSOR RH)
(a) Turn the engine switch off.
(b) Make sure that there is no looseness at the locking part and the connecting part of the connectors.
OK:
The connector is securely connected.
(c) Disconnect the A28 skid control ECU (brake actuator assembly) connector.
(d) Check both the connector case and the terminals for deformation and corrosion.
OK:
No deformation or corrosion.
(e) Measure the resistance according to the value(s) in the table below.
Standard Resistance:
Tester Connection | Condition | Specified Condition |
|---|---|---|
A28-26 (FR-) - A59-2 (FR-) |
Always |
Below 1 Ω |
A28-26 (FR-) or A59-2 (FR-) - Body ground |
Always |
10 kΩ or higher |
| OK | |
REPLACE BRAKE ACTUATOR ASSEMBLY |
| NG | |
REPAIR OR REPLACE HARNESS OR CONNECTOR |
CHECK HARNESS AND CONNECTOR (BRAKE ACTUATOR ASSEMBLY - FRONT SPEED SENSOR RH)
(a) Turn the engine switch off.
(b) Make sure that there is no looseness at the locking part and the connecting part of the connectors.
OK:
The connector is securely connected.
(c) Disconnect the A28 skid control ECU (brake actuator assembly) connector.
(d) Check both the connector case and the terminals for deformation and corrosion.
OK:
No deformation or corrosion.
(e) Measure the resistance according to the value(s) in the table below.
Standard Resistance:
Tester Connection | Condition | Specified Condition |
|---|---|---|
A28-21 (FR+) - A59-1 (FR+) |
Always |
Below 1 Ω |
A28-21 (FR+) or A59-1 (FR+) - Body ground |
Always |
10 kΩ or higher |
| OK | |
REPLACE BRAKE ACTUATOR ASSEMBLY |
| NG | |
REPAIR OR REPLACE HARNESS OR CONNECTOR |
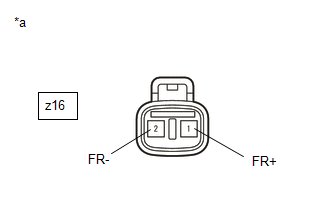
INSPECT BRAKE ACTUATOR ASSEMBLY (POWER SOURCE CIRCUIT)
(a) Make sure that there is no looseness at the locking part and the connecting part of the connectors. OK: The connector is securely connected. |
|
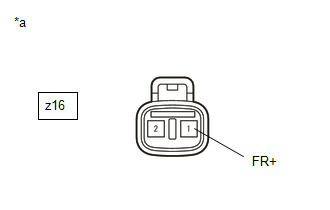
(b) Disconnect the z16 front speed sensor RH connector.
(c) Check both the connector case and the terminals for deformation and corrosion.
OK:
No deformation or corrosion.
(d) Turn the engine switch on (IG).
(e) Measure the voltage according to the value(s) in the table below.
Standard Voltage:
Tester Connection | Condition | Specified Condition |
|---|---|---|
z16-1 (FR+) - Body ground |
Engine switch on (IG) |
11 to 14 V |
| NG | |
GO TO STEP 14 |
|
INSPECT BRAKE ACTUATOR ASSEMBLY (GROUND CIRCUIT)
(a) Measure the voltage according to the value(s) in the table below. Standard Voltage:
|
|
| NG | |
GO TO STEP 12 |
|
CHECK FRONT SPEED SENSOR ROTOR RH (CHECK FOR FOREIGN MATTER)
(a) Remove the front speed sensor rotor RH (front axle hub sub-assembly RH).
Click here
(b) Check the front speed sensor rotor RH.
OK:
The front speed sensor rotor RH is free of scratches, oil, and foreign matter.
NOTICE:
- If there is oil or foreign matter on the front speed sensor rotor RH, clean the front speed sensor rotor RH.
- If the front speed sensor rotor RH is damaged, replace the front speed sensor rotor RH with a new one.
- Check the front speed sensor RH signal after cleaning or replacement.
Click here
HINT:
- The front speed sensor rotor RH is incorporated into the front axle hub sub-assembly RH.
- If the front speed sensor rotor RH needs to be replaced, replace it together with the front axle hub sub-assembly RH.
Result | Proceed to |
|---|---|
OK |
A |
NG (The front speed sensor rotor RH is damaged.) |
B |
NG (There is foreign matter on the front speed sensor rotor RH.) |
C |
| A | |
REPLACE FRONT SPEED SENSOR RH |
| B | |
REPLACE FRONT AXLE HUB SUB-ASSEMBLY RH |
| C | |
CLEAN FRONT SPEED SENSOR ROTOR RH |
INSPECT FRONT SKID CONTROL SENSOR WIRE RH
(a) Turn the engine switch off. |
|
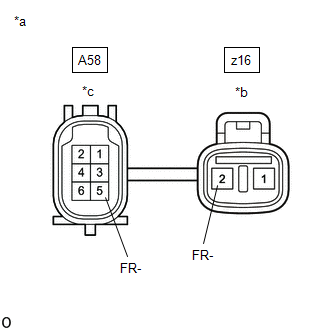
(b) Make sure that there is no looseness at the locking part and the connecting part of the connectors.
OK:
The connector is securely connected.
(c) Disconnect the A58 and z16 front skid control sensor wire RH connectors.
(d) Check both the connector case and the terminals for deformation and corrosion.
OK:
No deformation or corrosion.
(e) Measure the resistance according to the value(s) in the table below.
Standard Resistance:
Tester Connection | Condition | Specified Condition |
|---|---|---|
z16-2 (FR-) - A58-5 (FR-) |
Always |
Below 1 Ω |
z16-2 (FR-) or A58-5 (FR-) - Body ground and other terminals |
Always |
10 kΩ or higher |
NOTICE:
Check the front speed sensor RH signal after replacement.
Click here
| NG | |
REPLACE FRONT SKID CONTROL SENSOR WIRE RH |
|
CHECK HARNESS AND CONNECTOR (BRAKE ACTUATOR ASSEMBLY - FRONT SKID CONTROL SENSOR WIRE RH)
(a) Make sure that there is no looseness at the locking part and the connecting part of the connectors.
OK:
The connector is securely connected.
(b) Disconnect the A28 skid control ECU (brake actuator assembly) connector.
(c) Check both the connector case and the terminals for deformation and corrosion.
OK:
No deformation or corrosion.
(d) Measure the resistance according to the value(s) in the table below.
Standard Resistance:
Tester Connection | Condition | Specified Condition |
|---|---|---|
A28-26 (FR-) - A58-5 (FR-) |
Always |
Below 1 Ω |
A28-26 (FR-) or A58-5 (FR-) - Body ground |
Always |
10 kΩ or higher |
| OK | |
REPLACE BRAKE ACTUATOR ASSEMBLY |
| NG | |
REPAIR OR REPLACE HARNESS OR CONNECTOR |
INSPECT FRONT SKID CONTROL SENSOR WIRE RH
(a) Turn the engine switch off. |
|
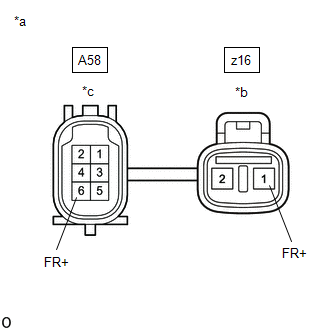
(b) Make sure that there is no looseness at the locking part and the connecting part of the connectors.
OK:
The connector is securely connected.
(c) Disconnect the A58 and z16 front skid control sensor wire RH connectors.
(d) Check both the connector case and the terminals for deformation and corrosion.
OK:
No deformation or corrosion.
(e) Measure the resistance according to the value(s) in the table below.
Standard Resistance:
Tester Connection | Condition | Specified Condition |
|---|---|---|
z16-1 (FR+) - A58-6 (FR+) |
Always |
Below 1 Ω |
z16-1 (FR+) or A58-6 (FR+) - Body ground and other terminals |
Always |
10 kΩ or higher |
NOTICE:
Check the front speed sensor RH signal after replacement.
Click here
| NG | |
REPLACE FRONT SKID CONTROL SENSOR WIRE RH |
|
CHECK HARNESS AND CONNECTOR (BRAKE ACTUATOR ASSEMBLY - FRONT SKID CONTROL SENSOR WIRE RH)
(a) Make sure that there is no looseness at the locking part and the connecting part of the connectors.
OK:
The connector is securely connected.
(b) Disconnect the A28 skid control ECU (brake actuator assembly) connector.
(c) Check both the connector case and the terminals for deformation and corrosion.
OK:
No deformation or corrosion.
(d) Measure the resistance according to the value(s) in the table below.
Standard Resistance:
Tester Connection | Condition | Specified Condition |
|---|---|---|
A28-21 (FR+) - A58-6 (FR+) |
Always |
Below 1 Ω |
A28-21 (FR+) or A58-6 (FR+) - Body ground |
Always |
10 kΩ or higher |
| OK | |
REPLACE BRAKE ACTUATOR ASSEMBLY |
| NG | |
REPAIR OR REPLACE HARNESS OR CONNECTOR |
CHECK FRONT SPEED SENSOR LH INSTALLATION
(a) Turn the engine switch off. |
|
(b) Check the front speed sensor LH installation.
OK:
There is no clearance between the front speed sensor LH and the front steering knuckle LH.
The installation bolt is tightened properly.
Torque
8.5 N*m (87 kgf*cm, 75 in.*lbf)
| NG | |
REINSTALL OR REPLACE FRONT SPEED SENSOR LH |
|
CHECK FRONT SPEED SENSOR LH (CHECK FOR FOREIGN MATTER)
(a) Remove the front speed sensor LH.
Click here
(b) Check the front speed sensor LH tip.
OK:
The front speed sensor LH tip is free of scratches, oil, and foreign matter.
NOTICE:
- If there is oil or foreign matter on the front speed sensor LH, clean the front speed sensor LH.
- If the front speed sensor LH is damaged, replace the front speed sensor LH with a new one.
- Check the front speed sensor LH signal after cleaning or replacement.
Click here
Result | Proceed to |
|---|---|
OK (w/o AVS) |
A |
OK (w/ AVS) |
B |
NG |
C |
| B | |
GO TO STEP 23 |
| C | |
CLEAN OR REPLACE FRONT SPEED SENSOR LH |
|
INSPECT BRAKE ACTUATOR ASSEMBLY (POWER SOURCE CIRCUIT)
(a) Make sure that there is no looseness at the locking part and the connecting part of the connectors. OK: The connector is securely connected. |
|
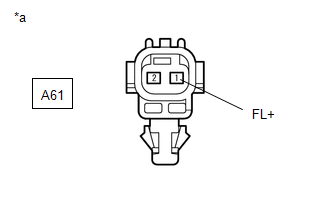
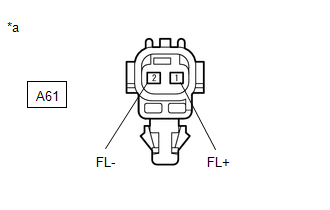
(b) Disconnect the A61 front speed sensor LH connector.
(c) Check both the connector case and the terminals for deformation and corrosion.
OK:
No deformation or corrosion.
(d) Turn the engine switch on (IG).
(e) Measure the voltage according to the value(s) in the table below.
Standard Voltage:
Tester Connection | Condition | Specified Condition |
|---|---|---|
A61-1 (FL+) - Body ground |
Engine switch on (IG) |
11 to 14 V |
| NG | |
GO TO STEP 22 |
|
INSPECT BRAKE ACTUATOR ASSEMBLY (GROUND CIRCUIT)
(a) Measure the voltage according to the value(s) in the table below. Standard Voltage:
|
|
| NG | |
GO TO STEP 21 |
|
CHECK FRONT SPEED SENSOR ROTOR LH (CHECK FOR FOREIGN MATTER)
(a) Remove the front speed sensor rotor LH (front axle hub sub-assembly LH).
Click here
(b) Check the front speed sensor rotor LH.
OK:
The front speed sensor rotor LH is free of scratches, oil, and foreign matter.
NOTICE:
- If there is oil or foreign matter on the front speed sensor rotor LH, clean the front speed sensor rotor LH.
- If the front speed sensor rotor LH is damaged, replace the front speed sensor rotor LH with a new one.
- Check the front speed sensor LH signal after cleaning or replacement.
Click here
HINT:
- The front speed sensor rotor LH is incorporated into the front axle hub sub-assembly LH.
- If the front speed sensor rotor LH needs to be replaced, replace it together with the front axle hub sub-assembly LH.
Result | Proceed to |
|---|---|
OK |
A |
NG (The front speed sensor rotor LH is damaged.) |
B |
NG (There is foreign matter on the front speed sensor rotor LH.) |
C |
| A | |
REPLACE FRONT SPEED SENSOR LH |
| B | |
REPLACE FRONT AXLE HUB SUB-ASSEMBLY LH |
| C | |
CLEAN FRONT SPEED SENSOR ROTOR LH |
CHECK HARNESS AND CONNECTOR (BRAKE ACTUATOR ASSEMBLY - FRONT SPEED SENSOR LH)
(a) Turn the engine switch off.
(b) Make sure that there is no looseness at the locking part and the connecting part of the connectors.
OK:
The connector is securely connected.
(c) Disconnect the A28 skid control ECU (brake actuator assembly) connector.
(d) Check both the connector case and the terminals for deformation and corrosion.
OK:
No deformation or corrosion.
(e) Measure the resistance according to the value(s) in the table below.
Standard Resistance:
Tester Connection | Condition | Specified Condition |
|---|---|---|
A28-7 (FL-) - A61-2 (FL-) |
Always |
Below 1 Ω |
A28-7 (FL-) or A61-2 (FL-) - Body ground |
Always |
10 kΩ or higher |
| OK | |
REPLACE BRAKE ACTUATOR ASSEMBLY |
| NG | |
REPAIR OR REPLACE HARNESS OR CONNECTOR |
CHECK HARNESS AND CONNECTOR (BRAKE ACTUATOR ASSEMBLY - FRONT SPEED SENSOR LH)
(a) Turn the engine switch off.
(b) Make sure that there is no looseness at the locking part and the connecting part of the connectors.
OK:
The connector is securely connected.
(c) Disconnect the A28 skid control ECU (brake actuator assembly) connector.
(d) Check both the connector case and the terminals for deformation and corrosion.
OK:
No deformation or corrosion.
(e) Measure the resistance according to the value(s) in the table below.
Standard Resistance:
Tester Connection | Condition | Specified Condition |
|---|---|---|
A28-24 (FL+) - A61-1 (FL+) |
Always |
Below 1 Ω |
A28-24 (FL+) or A61-1 (FL+) - Body ground |
Always |
10 kΩ or higher |
| OK | |
REPLACE BRAKE ACTUATOR ASSEMBLY |
| NG | |
REPAIR OR REPLACE HARNESS OR CONNECTOR |
INSPECT BRAKE ACTUATOR ASSEMBLY (POWER SOURCE CIRCUIT)
(a) Make sure that there is no looseness at the locking part and the connecting part of the connectors. OK: The connector is securely connected. |
|
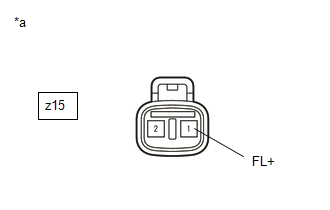
(b) Disconnect the z15 front speed sensor LH connector.
(c) Check both the connector case and the terminals for deformation and corrosion.
OK:
No deformation or corrosion.
(d) Turn the engine switch on (IG).
(e) Measure the voltage according to the value(s) in the table below.
Standard Voltage:
Tester Connection | Condition | Specified Condition |
|---|---|---|
z15-1 (FL+) - Body ground |
Engine switch on (IG) |
11 to 14 V |
| NG | |
GO TO STEP 28 |
|
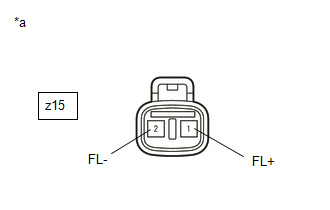
INSPECT BRAKE ACTUATOR ASSEMBLY (GROUND CIRCUIT)
(a) Measure the voltage according to the value(s) in the table below. Standard Voltage:
|
|
| NG | |
GO TO STEP 26 |
|
CHECK FRONT SPEED SENSOR ROTOR LH (CHECK FOR FOREIGN MATTER)
(a) Remove the front speed sensor rotor LH (front axle hub sub-assembly LH).
Click here
(b) Check the front speed sensor rotor LH.
OK:
The front speed sensor rotor LH is free of scratches, oil, and foreign matter.
NOTICE:
- If there is oil or foreign matter on the front speed sensor rotor LH, clean the front speed sensor rotor LH.
- If the front speed sensor rotor LH is damaged, replace the front speed sensor rotor LH with a new one.
- Check the front speed sensor LH signal after cleaning or replacement.
Click here
HINT:
- The front speed sensor rotor LH is incorporated into the front axle hub sub-assembly LH.
- If the front speed sensor rotor LH needs to be replaced, replace it together with the front axle hub sub-assembly LH.
Result | Proceed to |
|---|---|
OK |
A |
NG (The front speed sensor rotor LH is damaged.) |
B |
NG (There is foreign matter on the front speed sensor rotor LH.) |
C |
| A | |
REPLACE FRONT SPEED SENSOR LH |
| B | |
REPLACE FRONT AXLE HUB SUB-ASSEMBLY LH |
| C | |
CLEAN FRONT SPEED SENSOR ROTOR LH |
INSPECT FRONT SKID CONTROL SENSOR WIRE LH
(a) Turn the engine switch off. |
|
(b) Make sure that there is no looseness at the locking part and the connecting part of the connectors.
OK:
The connector is securely connected.
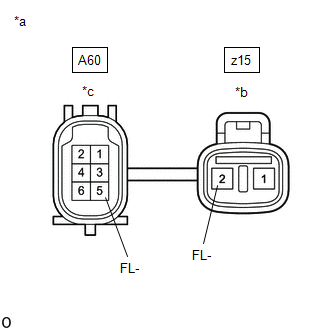
(c) Disconnect the A60 and z15 front skid control sensor wire LH connectors.
(d) Check both the connector case and the terminals for deformation and corrosion.
OK:
No deformation or corrosion.
(e) Measure the resistance according to the value(s) in the table below.
Standard Resistance:
Tester Connection | Condition | Specified Condition |
|---|---|---|
z15-2 (FL-) - A60-5 (FL-) |
Always |
Below 1 Ω |
z15-2 (FL-) or A60-5 (FL-) - Body ground and other terminals |
Always |
10 kΩ or higher |
NOTICE:
Check the front speed sensor LH signal after replacement.
Click here
| NG | |
REPLACE FRONT SKID CONTROL SENSOR WIRE LH |
|
CHECK HARNESS AND CONNECTOR (BRAKE ACTUATOR ASSEMBLY - FRONT SKID CONTROL SENSOR WIRE LH)
(a) Make sure that there is no looseness at the locking part and the connecting part of the connectors.
OK:
The connector is securely connected.
(b) Disconnect the A28 skid control ECU (brake actuator assembly) connector.
(c) Check both the connector case and the terminals for deformation and corrosion.
OK:
No deformation or corrosion.
(d) Measure the resistance according to the value(s) in the table below.
Standard Resistance:
Tester Connection | Condition | Specified Condition |
|---|---|---|
A28-7 (FL-) - A60-5 (FL-) |
Always |
Below 1 Ω |
A28-7 (FL-) or A60-5 (FL-) - Body ground |
Always |
10 kΩ or higher |
| OK | |
REPLACE BRAKE ACTUATOR ASSEMBLY |
| NG | |
REPAIR OR REPLACE HARNESS OR CONNECTOR |
INSPECT FRONT SKID CONTROL SENSOR WIRE LH
(a) Turn the engine switch off. |
|
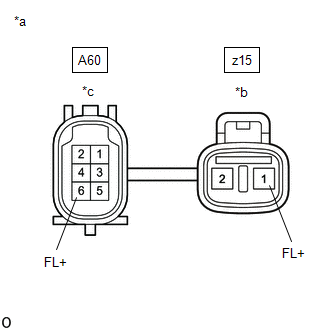
(b) Make sure that there is no looseness at the locking part and the connecting part of the connectors.
OK:
The connector is securely connected.
(c) Disconnect the A60 and z15 front skid control sensor wire LH connectors.
(d) Check both the connector case and the terminals for deformation and corrosion.
OK:
No deformation or corrosion.
(e) Measure the resistance according to the value(s) in the table below.
Standard Resistance:
Tester Connection | Condition | Specified Condition |
|---|---|---|
z15-1 (FL+) - A60-6 (FL+) |
Always |
Below 1 Ω |
z15-1 (FL+) or A60-6 (FL+) - Body ground and other terminals |
Always |
10 kΩ or higher |
NOTICE:
Check the front speed sensor LH signal after replacement.
Click here
| NG | |
REPLACE FRONT SKID CONTROL SENSOR WIRE LH |
|
CHECK HARNESS AND CONNECTOR (BRAKE ACTUATOR ASSEMBLY - FRONT SKID CONTROL SENSOR WIRE LH)
(a) Make sure that there is no looseness at the locking part and the connecting part of the connectors.
OK:
The connector is securely connected.
(b) Disconnect the A28 skid control ECU (brake actuator assembly) connector.
(c) Check both the connector case and the terminals for deformation and corrosion.
OK:
No deformation or corrosion.
(d) Measure the resistance according to the value(s) in the table below.
Standard Resistance:
Tester Connection | Condition | Specified Condition |
|---|---|---|
A28-24 (FL+) - A60-6 (FL+) |
Always |
Below 1 Ω |
A28-24 (FL+) or A60-6 (FL+) - Body ground |
Always |
10 kΩ or higher |
| OK | |
REPLACE BRAKE ACTUATOR ASSEMBLY |
| NG | |
REPAIR OR REPLACE HARNESS OR CONNECTOR |
CHECK REAR SPEED SENSOR RH INSTALLATION
(a) Turn the engine switch off. |
|
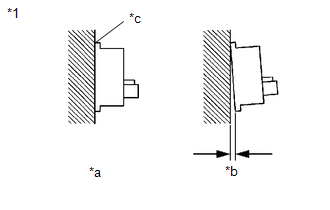
(b) Check the rear speed sensor RH installation.
OK:
There is no clearance between the rear speed sensor RH and the rear axle hub RH.
HINT:
Because the rear axle hub and bearing assembly RH cannot be disassembled, if the rear speed sensor RH needs replacement, replace the rear axle hub and bearing assembly RH.
| NG | |
REPLACE REAR AXLE HUB AND BEARING ASSEMBLY RH |
|
INSPECT BRAKE ACTUATOR ASSEMBLY (POWER SOURCE CIRCUIT)
(a) Make sure that there is no looseness at the locking part and the connecting part of the connectors. OK: The connector is securely connected. |
|
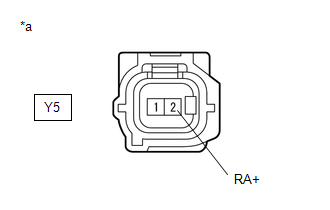
(b) Disconnect the Y5 rear speed sensor RH (rear axle hub and bearing assembly) connector.
(c) Check both the connector case and the terminals for deformation and corrosion.
OK:
No deformation or corrosion.
(d) Turn the engine switch on (IG).
(e) Measure the voltage according to the value(s) in the table below.
Standard Voltage:
Tester Connection | Condition | Specified Condition |
|---|---|---|
Y5-2 (RA+) - Body ground |
Engine switch on (IG) |
11 to 14 V |
Result | Proceed to |
|---|---|
OK |
A |
NG (w/o AVS) |
B |
NG (w/ AVS) |
C |
| B | |
GO TO STEP 37 |
| C | |
GO TO STEP 39 |
|
INSPECT BRAKE ACTUATOR ASSEMBLY (GROUND CIRCUIT)
(a) Measure the voltage according to the value(s) in the table below. Standard Voltage:
|
|
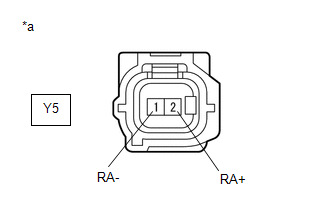
Result | Proceed to |
|---|---|
OK |
A |
NG (w/o AVS) |
B |
NG (w/ AVS) |
C |
| A | |
REPLACE REAR AXLE HUB AND BEARING ASSEMBLY RH |
| C | |
GO TO STEP 35 |
|
INSPECT NO. 1 PARKING BRAKE WIRE ASSEMBLY
(a) Turn the engine switch off. |
|
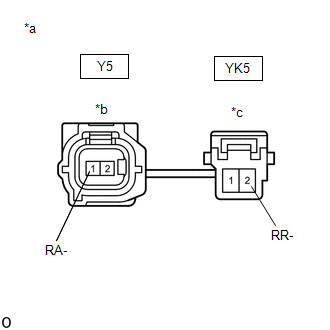
(b) Make sure that there is no looseness at the locking part and the connecting part of the connectors.
OK:
The connector is securely connected.
(c) Disconnect the Y5 and YK5 skid control sensor wire RH (No. 1 parking brake wire assembly) connectors.
(d) Check both the connector case and the terminals for deformation and corrosion.
OK:
No deformation or corrosion.
(e) Measure the resistance according to the value(s) in the table below.
Standard Resistance:
Tester Connection | Condition | Specified Condition |
|---|---|---|
Y5-1 (RA-) - YK5-2 (RR-) |
Always |
Below 1 Ω |
Y5-1 (RA-) or YK5-2 (RR-) - Body ground and other terminals |
Always |
10 kΩ or higher |
NOTICE:
Check the rear speed sensor RH signal after replacement.
Click here
| NG | |
REPLACE NO. 1 PARKING BRAKE WIRE ASSEMBLY |
|
CHECK HARNESS AND CONNECTOR (BRAKE ACTUATOR ASSEMBLY - NO. 1 PARKING BRAKE WIRE ASSEMBLY)
(a) Make sure that there is no looseness at the locking part and the connecting part of the connector.
OK:
The connector is securely connected.
(b) Disconnect the A28 skid control ECU (brake actuator assembly) connector.
(c) Check both the connector case and the terminals for deformation and corrosion.
OK:
No deformation or corrosion.
(d) Measure the resistance according to the value(s) in the table below.
Standard Resistance:
Tester Connection | Condition | Specified Condition |
|---|---|---|
A28-37 (RR-) - YK5-2 (RR-) |
Always |
Below 1 Ω |
A28-37 (RR-) or YK5-2 (RR-) - Body ground |
Always |
10 kΩ or higher |
| OK | |
REPLACE BRAKE ACTUATOR ASSEMBLY |
| NG | |
REPAIR OR REPLACE HARNESS OR CONNECTOR |
INSPECT NO. 1 PARKING BRAKE WIRE ASSEMBLY
(a) Turn the engine switch off. |
|
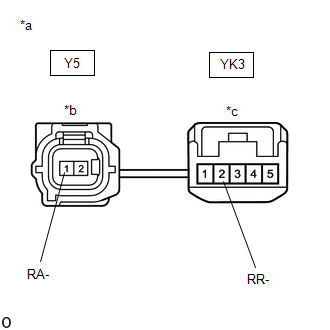
(b) Make sure that there is no looseness at the locking part and the connecting part of the connectors.
OK:
The connector is securely connected.
(c) Disconnect the Y5 and YK3 skid control sensor wire RH (No. 1 parking brake wire assembly) connectors.
(d) Check both the connector case and the terminals for deformation and corrosion.
OK:
No deformation or corrosion.
(e) Measure the resistance according to the value(s) in the table below.
Standard Resistance:
Tester Connection | Condition | Specified Condition |
|---|---|---|
Y5-1 (RA-) - YK3-2 (RR-) |
Always |
Below 1 Ω |
Y5-1 (RA-) or YK3-2 (RR-) - Body ground and other terminals |
Always |
10 kΩ or higher |
NOTICE:
Check the rear speed sensor RH signal after replacement.
Click here
| NG | |
REPLACE NO. 1 PARKING BRAKE WIRE ASSEMBLY |
|
CHECK HARNESS AND CONNECTOR (BRAKE ACTUATOR ASSEMBLY - NO. 1 PARKING BRAKE WIRE ASSEMBLY)
(a) Make sure that there is no looseness at the locking part and the connecting part of the connector.
OK:
The connector is securely connected.
(b) Disconnect the A28 skid control ECU (brake actuator assembly) connector.
(c) Check both the connector case and the terminals for deformation and corrosion.
OK:
No deformation or corrosion.
(d) Measure the resistance according to the value(s) in the table below.
Standard Resistance:
Tester Connection | Condition | Specified Condition |
|---|---|---|
A28-37 (RR-) - YK3-2 (RR-) |
Always |
Below 1 Ω |
A28-37 (RR-) or YK3-2 (RR-) - Body ground |
Always |
10 kΩ or higher |
| OK | |
REPLACE BRAKE ACTUATOR ASSEMBLY |
| NG | |
REPAIR OR REPLACE HARNESS OR CONNECTOR |
INSPECT NO. 1 PARKING BRAKE WIRE ASSEMBLY
(a) Turn the engine switch off. |
|
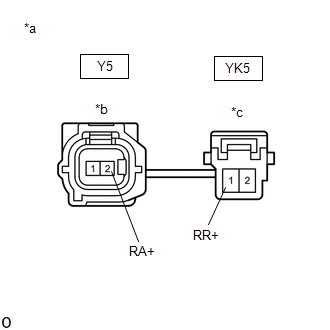
(b) Make sure that there is no looseness at the locking part and the connecting part of the connectors.
OK:
The connector is securely connected.
(c) Disconnect the Y5 and YK5 skid control sensor wire RH (No. 1 parking brake wire assembly) connectors.
(d) Check both the connector case and the terminals for deformation and corrosion.
OK:
No deformation or corrosion.
(e) Measure the resistance according to the value(s) in the table below.
Standard Resistance:
Tester Connection | Condition | Specified Condition |
|---|---|---|
Y5-2 (RA+) - YK5-1 (RR+) |
Always |
Below 1 Ω |
Y5-2 (RA+) or YK5-1 (RR+) - Body ground and other terminals |
Always |
10 kΩ or higher |
NOTICE:
Check the rear speed sensor RH signal after replacement.
Click here
| NG | |
REPLACE NO. 1 PARKING BRAKE WIRE ASSEMBLY |
|
CHECK HARNESS AND CONNECTOR (BRAKE ACTUATOR ASSEMBLY - NO. 1 PARKING BRAKE WIRE ASSEMBLY)
(a) Make sure that there is no looseness at the locking part and the connecting part of the connector.
OK:
The connector is securely connected.
(b) Disconnect the A28 skid control ECU (brake actuator assembly) connector.
(c) Check both the connector case and the terminals for deformation and corrosion.
OK:
No deformation or corrosion.
(d) Measure the resistance according to the value(s) in the table below.
Standard Resistance:
Tester Connection | Condition | Specified Condition |
|---|---|---|
A28-22 (RR+) - YK5-1 (RR+) |
Always |
Below 1 Ω |
A28-22 (RR+) or YK5-1 (RR+) - Body ground |
Always |
10 kΩ or higher |
| OK | |
REPLACE BRAKE ACTUATOR ASSEMBLY |
| NG | |
REPAIR OR REPLACE HARNESS OR CONNECTOR |
INSPECT NO. 1 PARKING BRAKE WIRE ASSEMBLY
(a) Turn the engine switch off. |
|
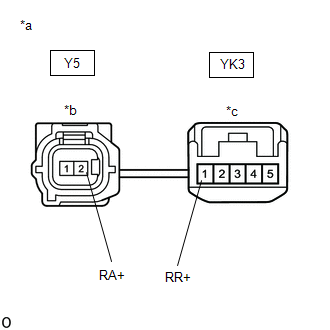
(b) Make sure that there is no looseness at the locking part and the connecting part of the connectors.
OK:
The connector is securely connected.
(c) Disconnect the Y5 and YK3 skid control sensor wire RH (No. 1 parking brake wire assembly) connectors.
(d) Check both the connector case and the terminals for deformation and corrosion.
OK:
No deformation or corrosion.
(e) Measure the resistance according to the value(s) in the table below.
Standard Resistance:
Tester Connection | Condition | Specified Condition |
|---|---|---|
Y5-2 (RA+) - YK3-1 (RR+) |
Always |
Below 1 Ω |
Y5-2 (RA+) or YK3-1 (RR+) - Body ground and other terminals |
Always |
10 kΩ or higher |
NOTICE:
Check the rear speed sensor RH signal after replacement.
Click here
| NG | |
REPLACE NO. 1 PARKING BRAKE WIRE ASSEMBLY |
|
CHECK HARNESS AND CONNECTOR (BRAKE ACTUATOR ASSEMBLY - NO. 1 PARKING BRAKE WIRE ASSEMBLY)
(a) Make sure that there is no looseness at the locking part and the connecting part of the connector.
OK:
The connector is securely connected.
(b) Disconnect the A28 skid control ECU (brake actuator assembly) connector.
(c) Check both the connector case and the terminals for deformation and corrosion.
OK:
No deformation or corrosion.
(d) Measure the resistance according to the value(s) in the table below.
Standard Resistance:
Tester Connection | Condition | Specified Condition |
|---|---|---|
A28-22 (RR+) - YK3-1 (RR+) |
Always |
Below 1 Ω |
A28-22 (RR+) or YK3-1 (RR+) - Body ground |
Always |
10 kΩ or higher |
| OK | |
REPLACE BRAKE ACTUATOR ASSEMBLY |
| NG | |
REPAIR OR REPLACE HARNESS OR CONNECTOR |
CHECK REAR SPEED SENSOR LH INSTALLATION
(a) Turn the engine switch off. |
|
(b) Check the rear speed sensor LH installation.
OK:
There is no clearance between the rear speed sensor LH and the rear axle hub LH.
HINT:
Because the rear axle hub and bearing assembly LH cannot be disassembled, if the rear speed sensor LH needs replacement, replace the rear axle hub and bearing assembly LH.
| NG | |
REPLACE REAR AXLE HUB AND BEARING ASSEMBLY LH |
|
INSPECT BRAKE ACTUATOR ASSEMBLY (POWER SOURCE CIRCUIT)
(a) Make sure that there is no looseness at the locking part and the connecting part of the connectors. OK: The connector is securely connected. |
|
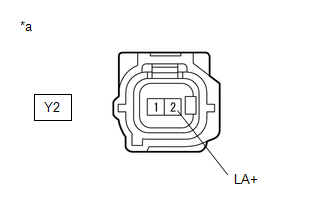
(b) Disconnect the Y2 rear speed sensor LH (rear axle hub and bearing assembly) connector.
(c) Check both the connector case and the terminals for deformation and corrosion.
OK:
No deformation or corrosion.
(d) Turn the engine switch on (IG).
(e) Measure the voltage according to the value(s) in the table below.
Standard Voltage:
Tester Connection | Condition | Specified Condition |
|---|---|---|
Y2-2 (LA+) - Body ground |
Engine switch on (IG) |
11 to 14 V |
Result | Proceed to |
|---|---|
OK |
A |
NG (w/o AVS) |
B |
NG (w/ AVS) |
C |
| B | |
GO TO STEP 48 |
| C | |
GO TO STEP 50 |
|
INSPECT BRAKE ACTUATOR ASSEMBLY (GROUND CIRCUIT)
(a) Measure the voltage according to the value(s) in the table below. Standard Voltage:
|
|
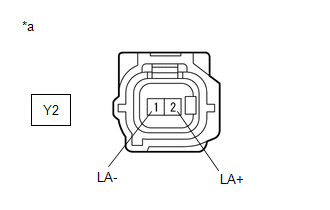
Result | Proceed to |
|---|---|
OK |
A |
NG (w/o AVS) |
B |
NG (w/ AVS) |
C |
| A | |
REPLACE REAR AXLE HUB AND BEARING ASSEMBLY LH |
| C | |
GO TO STEP 46 |
|
INSPECT NO. 2 PARKING BRAKE WIRE ASSEMBLY
(a) Turn the engine switch off. |
|
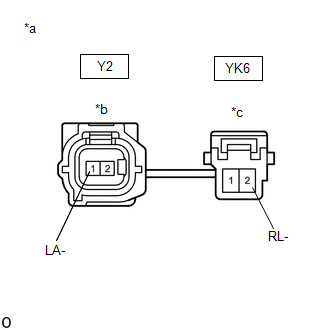
(b) Make sure that there is no looseness at the locking part and the connecting part of the connectors.
OK:
The connector is securely connected.
(c) Disconnect the Y2 and YK6 skid control sensor wire LH (No. 2 parking brake wire assembly) connectors.
(d) Check both the connector case and the terminals for deformation and corrosion.
OK:
No deformation or corrosion.
(e) Measure the resistance according to the value(s) in the table below.
Standard Resistance:
Tester Connection | Condition | Specified Condition |
|---|---|---|
Y2-1 (LA-) - YK6-2 (RL-) |
Always |
Below 1 Ω |
Y2-1 (LA-) or YK6-2 (RL-) - Body ground and other terminals |
Always |
10 kΩ or higher |
NOTICE:
Check the rear speed sensor LH signal after replacement.
Click here
| NG | |
REPLACE NO. 2 PARKING BRAKE WIRE ASSEMBLY |
|
CHECK HARNESS AND CONNECTOR (BRAKE ACTUATOR ASSEMBLY - NO. 2 PARKING BRAKE WIRE ASSEMBLY)
(a) Make sure that there is no looseness at the locking part and the connecting part of the connector.
OK:
The connector is securely connected.
(b) Disconnect the A28 skid control ECU (brake actuator assembly) connector.
(c) Check both the connector case and the terminals for deformation and corrosion.
OK:
No deformation or corrosion.
(d) Measure the resistance according to the value(s) in the table below.
Standard Resistance:
Tester Connection | Condition | Specified Condition |
|---|---|---|
A28-23 (RL-) - YK6-2 (RL-) |
Always |
Below 1 Ω |
A28-23 (RL-) or YK6-2 (RL-) - Body ground |
Always |
10 kΩ or higher |
| OK | |
REPLACE BRAKE ACTUATOR ASSEMBLY |
| NG | |
REPAIR OR REPLACE HARNESS OR CONNECTOR |
INSPECT NO. 2 PARKING BRAKE WIRE ASSEMBLY
(a) Turn the engine switch off. |
|
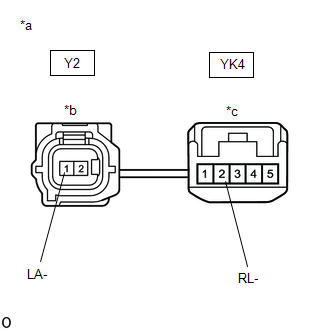
(b) Make sure that there is no looseness at the locking part and the connecting part of the connectors.
OK:
The connector is securely connected.
(c) Disconnect the Y2 and YK4 skid control sensor wire LH (No. 2 parking brake wire assembly) connectors.
(d) Check both the connector case and the terminals for deformation and corrosion.
OK:
No deformation or corrosion.
(e) Measure the resistance according to the value(s) in the table below.
Standard Resistance:
Tester Connection | Condition | Specified Condition |
|---|---|---|
Y2-1 (LA-) - YK4-2 (RL-) |
Always |
Below 1 Ω |
Y2-1 (LA-) or YK4-2 (RL-) - Body ground and other terminals |
Always |
10 kΩ or higher |
NOTICE:
Check the rear speed sensor LH signal after replacement.
Click here
| NG | |
REPLACE NO. 2 PARKING BRAKE WIRE ASSEMBLY |
|
CHECK HARNESS AND CONNECTOR (BRAKE ACTUATOR ASSEMBLY - NO. 2 PARKING BRAKE WIRE ASSEMBLY)
(a) Make sure that there is no looseness at the locking part and the connecting part of the connector.
OK:
The connector is securely connected.
(b) Disconnect the A28 skid control ECU (brake actuator assembly) connector.
(c) Check both the connector case and the terminals for deformation and corrosion.
OK:
No deformation or corrosion.
(d) Measure the resistance according to the value(s) in the table below.
Standard Resistance:
Tester Connection | Condition | Specified Condition |
|---|---|---|
A28-23 (RL-) - YK4-2 (RL-) |
Always |
Below 1 Ω |
A28-23 (RL-) or YK4-2 (RL-) - Body ground |
Always |
10 kΩ or higher |
| OK | |
REPLACE BRAKE ACTUATOR ASSEMBLY |
| NG | |
REPAIR OR REPLACE HARNESS OR CONNECTOR |
INSPECT NO. 2 PARKING BRAKE WIRE ASSEMBLY
(a) Turn the engine switch off. |
|
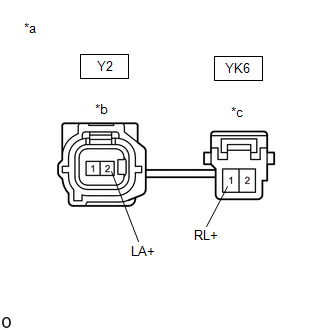
(b) Make sure that there is no looseness at the locking part and the connecting part of the connectors.
OK:
The connector is securely connected.
(c) Disconnect the Y2 and YK6 skid control sensor wire LH (No. 2 parking brake wire assembly) connectors.
(d) Check both the connector case and the terminals for deformation and corrosion.
OK:
No deformation or corrosion.
(e) Measure the resistance according to the value(s) in the table below.
Standard Resistance:
Tester Connection | Condition | Specified Condition |
|---|---|---|
Y2-2 (LA+) - YK6-1 (RL+) |
Always |
Below 1 Ω |
Y2-2 (LA+) or YK6-1 (RL+) - Body ground and other terminals |
Always |
10 kΩ or higher |
NOTICE:
Check the rear speed sensor LH signal after replacement.
Click here
| NG | |
REPLACE NO. 2 PARKING BRAKE WIRE ASSEMBLY |
|
CHECK HARNESS AND CONNECTOR (BRAKE ACTUATOR ASSEMBLY - NO. 2 PARKING BRAKE WIRE ASSEMBLY)
(a) Make sure that there is no looseness at the locking part and the connecting part of the connector.
OK:
The connector is securely connected.
(b) Disconnect the A28 skid control ECU (brake actuator assembly) connector.
(c) Check both the connector case and the terminals for deformation and corrosion.
OK:
No deformation or corrosion.
(d) Measure the resistance according to the value(s) in the table below.
Standard Resistance:
Tester Connection | Condition | Specified Condition |
|---|---|---|
A28-39 (RL+) - YK6-1 (RL+) |
Always |
Below 1 Ω |
A28-39 (RL+) or YK6-1 (RL+) - Body ground |
Always |
10 kΩ or higher |
| OK | |
REPLACE BRAKE ACTUATOR ASSEMBLY |
| NG | |
REPAIR OR REPLACE HARNESS OR CONNECTOR |
INSPECT NO. 2 PARKING BRAKE WIRE ASSEMBLY
(a) Turn the engine switch off. |
|
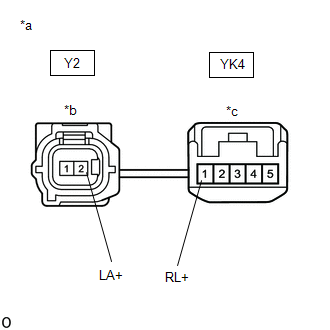
(b) Make sure that there is no looseness at the locking part and the connecting part of the connectors.
OK:
The connector is securely connected.
(c) Disconnect the Y2 and YK4 skid control sensor wire LH (No. 2 parking brake wire assembly) connectors.
(d) Check both the connector case and the terminals for deformation and corrosion.
OK:
No deformation or corrosion.
(e) Measure the resistance according to the value(s) in the table below.
Standard Resistance:
Tester Connection | Condition | Specified Condition |
|---|---|---|
Y2-2 (LA+) - YK4-1 (RL+) |
Always |
Below 1 Ω |
Y2-2 (LA+) or YK4-1 (RL+) - Body ground and other terminals |
Always |
10 kΩ or higher |
NOTICE:
Check the rear speed sensor LH signal after replacement.
Click here
| NG | |
REPLACE NO. 2 PARKING BRAKE WIRE ASSEMBLY |
|
CHECK HARNESS AND CONNECTOR (BRAKE ACTUATOR ASSEMBLY - NO. 2 PARKING BRAKE WIRE ASSEMBLY)
(a) Make sure that there is no looseness at the locking part and the connecting part of the connector.
OK:
The connector is securely connected.
(b) Disconnect the A28 skid control ECU (brake actuator assembly) connector.
(c) Check both the connector case and the terminals for deformation and corrosion.
OK:
No deformation or corrosion.
(d) Measure the resistance according to the value(s) in the table below.
Standard Resistance:
Tester Connection | Condition | Specified Condition |
|---|---|---|
A28-39 (RL+) - YK4-1 (RL+) |
Always |
Below 1 Ω |
A28-39 (RL+) or YK4-1 (RL+) - Body ground |
Always |
10 kΩ or higher |
| OK | |
REPLACE BRAKE ACTUATOR ASSEMBLY |
| NG | |
REPAIR OR REPLACE HARNESS OR CONNECTOR |