How To Proceed With Troubleshooting. Parts Location. Precaution
How To Proceed With Troubleshooting
HINT:
*: Use the Techstream.
PROCEDURE
VEHICLE BROUGHT TO WORKSHOP
|

CUSTOMER PROBLEM ANALYSIS
(a) Interview the customer and confirm the problem.
Click here 
|
CHECK DTC AND FREEZE FRAME DATA*
(a) Check and record DTCs and Freeze Frame Data.
for DTC Check / Clear: Click here
for Freeze Frame Data: Click here
(b) Clear the DTCs and Freeze Frame Data.
for DTC Check / Clear: Click here
for Freeze Frame Data: Click here
(c) Reconfirm the DTCs.
(1) Reconfirm the DTCs based on the recorded DTCs and Freeze Frame Data.
for DTC Check / Clear: Click here
for Freeze Frame Data: Click here
HINT:
- When CAN communication system DTCs are output, repair the CAN communication system first.
Click here
- If DTC U0100, U0123 and/or U0126 are among the CAN communication DTCs that are output, first use the Data List to check for a momentary open circuit.
Click here
- If the Techstream cannot communicate with the skid control ECU (brake actuator assembly), inspect the CAN communication system.
Click here
- If there is no response from the skid control ECU (brake actuator assembly), inspect the +BS circuit of the skid control ECU (brake actuator assembly).
Click here
Result | Proceed to |
|---|---|
DTCs are output. |
A |
DTCs are not output. (Problem symptom does not occur.) |
B |
DTCs are not output. (Problem symptom occurs.) |
C |
| B |  |
GO TO STEP 5 |
| C | |
GO TO STEP 6 |
|
DIAGNOSTIC TROUBLE CODE CHART
(a) Proceed to Diagnostic Trouble Code Chart.
Click here
| NEXT | |
GO TO STEP 7 |
SYMPTOM SIMULATION
(a) Proceed to How to Proceed with Troubleshooting.
Click here
|
PROBLEM SYMPTOMS TABLE
(a) Proceed to Problem Symptoms Table.
Click here
|
CIRCUIT INSPECTION*
|
IDENTIFICATION OF PROBLEM
|
REPAIR OR REPLACEMENT
|
RECONFIRM DTC*
(a) Clear the DTCs.
Click here
(b) Check if the same DTCs are output.
Click here
Result | Proceed to |
|---|---|
DTCs are not output. |
A |
DTCs are output. |
B |
| B | |
REPAIR CIRCUITS INDICATED BY OUTPUT DTCS |
|
CONFIRMATION TEST*
| NEXT | |
END |
Parts Location
PARTS LOCATION
ILLUSTRATION
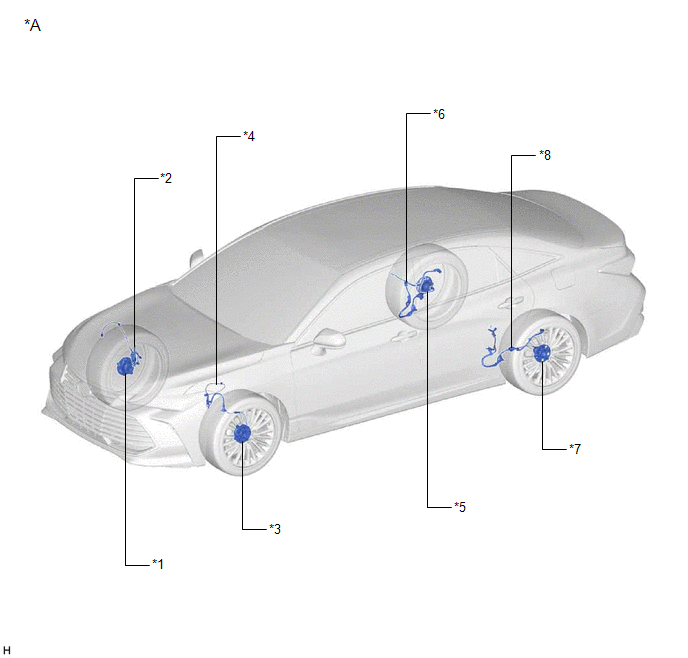
*A |
w/o AVS |
- |
- |
*1 |
FRONT AXLE HUB SUB-ASSEMBLY RH - FRONT SPEED SENSOR ROTOR RH |
*2 |
FRONT SPEED SENSOR RH |
*3 |
FRONT AXLE HUB SUB-ASSEMBLY LH - FRONT SPEED SENSOR ROTOR LH |
*4 |
FRONT SPEED SENSOR LH |
*5 |
REAR AXLE HUB AND BEARING ASSEMBLY RH - REAR SPEED SENSOR RH - REAR SPEED SENSOR ROTOR RH |
*6 |
NO. 1 PARKING BRAKE WIRE ASSEMBLY - SKID CONTROL SENSOR WIRE RH |
*7 |
REAR AXLE HUB AND BEARING ASSEMBLY LH - REAR SPEED SENSOR LH - REAR SPEED SENSOR ROTOR LH |
*8 |
NO. 2 PARKING BRAKE WIRE ASSEMBLY - SKID CONTROL SENSOR WIRE LH |
ILLUSTRATION
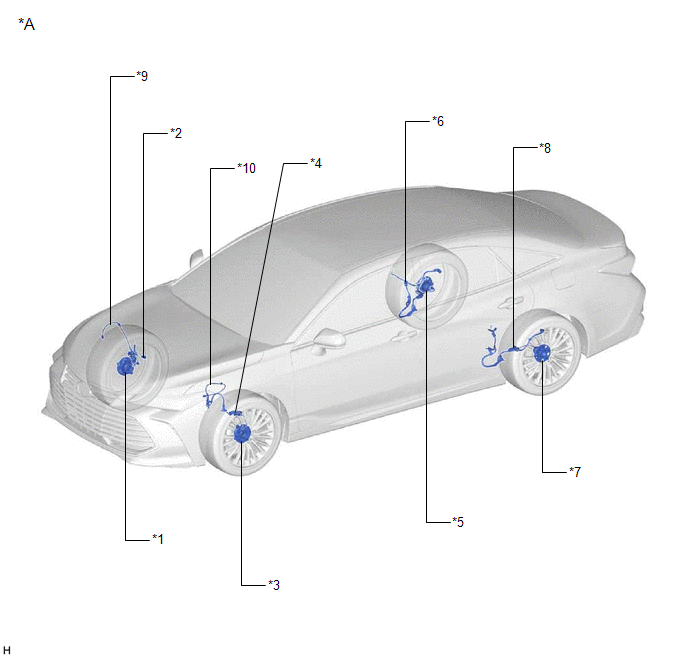
*A |
w/ AVS |
- |
- |
*1 |
FRONT AXLE HUB SUB-ASSEMBLY RH - FRONT SPEED SENSOR ROTOR RH |
*2 |
FRONT SPEED SENSOR RH |
*3 |
FRONT AXLE HUB SUB-ASSEMBLY LH - FRONT SPEED SENSOR ROTOR LH |
*4 |
FRONT SPEED SENSOR LH |
*5 |
REAR AXLE HUB AND BEARING ASSEMBLY RH - REAR SPEED SENSOR RH - REAR SPEED SENSOR ROTOR RH |
*6 |
NO. 1 PARKING BRAKE WIRE ASSEMBLY - SKID CONTROL SENSOR WIRE RH |
*7 |
REAR AXLE HUB AND BEARING ASSEMBLY LH - REAR SPEED SENSOR LH - REAR SPEED SENSOR ROTOR LH |
*8 |
NO. 2 PARKING BRAKE WIRE ASSEMBLY - SKID CONTROL SENSOR WIRE LH |
*9 |
FRONT SKID CONTROL SENSOR WIRE RH |
*10 |
FRONT SKID CONTROL SENSOR WIRE LH |
ILLUSTRATION
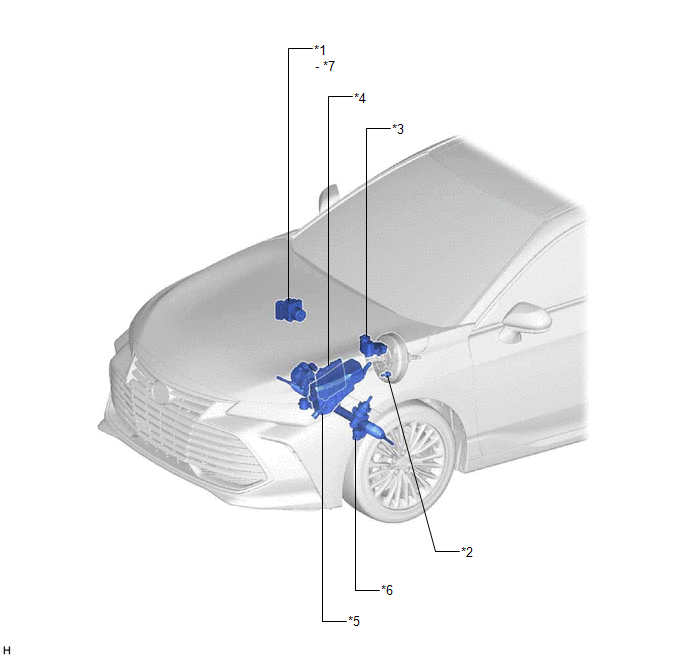
*1 |
BRAKE ACTUATOR ASSEMBLY |
*2 |
VACUUM WARNING SWITCH ASSEMBLY |
*3 |
BRAKE MASTER CYLINDER RESERVOIR ASSEMBLY - BRAKE FLUID LEVEL WARNING SWITCH |
*4 |
ECM |
*5 |
NO. 1 ENGINE ROOM RELAY BLOCK AND NO. 1 JUNCTION BLOCK ASSEMBLY - ABS NO. 1 FUSE - ABS NO. 2 FUSE |
*6 |
RACK AND PINION POWER STEERING GEAR ASSEMBLY - POWER STEERING ECU |
*7 |
SKID CONTROL ECU |
- |
- |
ILLUSTRATION
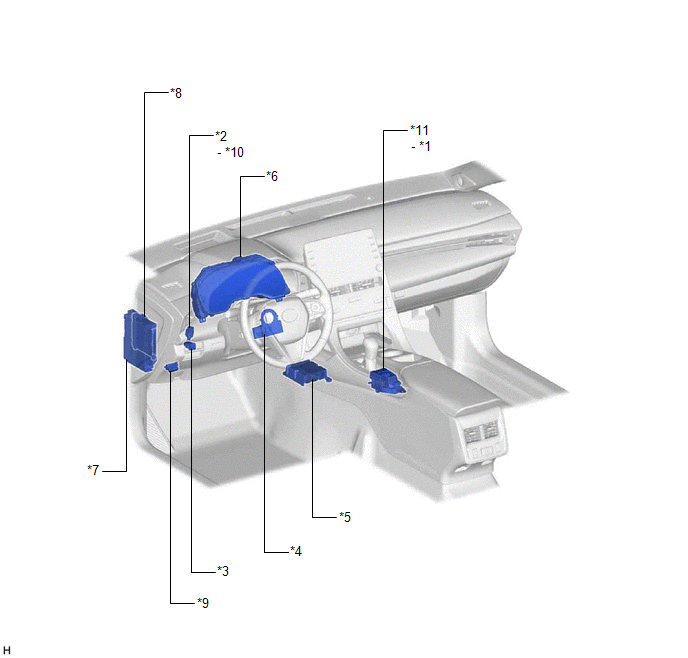
*1 |
BRAKE HOLD SWITCH |
*2 |
STOP LIGHT SWITCH ASSEMBLY |
*3 |
VSC OFF SWITCH |
*4 |
STEERING ANGLE SENSOR |
*5 |
AIRBAG SENSOR ASSEMBLY - YAW RATE AND ACCELERATION SENSOR |
*6 |
COMBINATION METER ASSEMBLY - ABS WARNING LIGHT - BRAKE SYSTEM WARNING LIGHT (RED INDICATOR) - MULTI-INFORMATION DISPLAY (TRACTION CONTROL TURNED OFF) - VSC OFF INDICATOR LIGHT - SLIP INDICATOR LIGHT - BRAKE HOLD STANDBY INDICATOR LIGHT - BRAKE HOLD OPERATED INDICATOR LIGHT |
*7 |
INSTRUMENT PANEL JUNCTION BLOCK ASSEMBLY - ECU-IG1 NO. 2 FUSE - ECU-DCC NO. 1 FUSE - A/BAG-IG2 FUSE - STOP FUSE |
*8 |
MAIN BODY ECU (MULTIPLEX NETWORK BODY ECU) |
*9 |
DLC3 |
*10 |
STOP LIGHT CONTROL RELAY |
*11 |
ELECTRIC PARKING BRAKE SWITCH ASSEMBLY |
- |
- |
Precaution
PRECAUTION
PRECAUTION FOR DISCONNECTING CABLE FROM NEGATIVE BATTERY TERMINAL
NOTICE:
When disconnecting the cable from the negative (-) battery terminal, initialize the following system(s) after the cable is reconnected:
System | See Procedure |
|---|---|
Lane Departure Alert System (w/ Steering Control) |
 |
Intelligent Clearance Sonar System |
|
Parking Assist Monitor System |
|
Panoramic View Monitor System |
|
Pre-collision System |
|
Lighting System (for Gasoline Model with Cornering Light) |
TROUBLESHOOTING PRECAUTION
(a) When there is a malfunction with terminal contact points or part installation problems, removal and installation of the suspected parts may return the system to normal either completely or temporarily.
(b) In order to determine the malfunctioning area, be sure to check the conditions at the time the malfunction occurred, such as DTC output and Freeze Frame Data, and record it before disconnecting any connector or removing and installing parts.
(c) Since the system may be influenced by malfunctions in systems other than the VSC system, be sure to check for DTCs in other systems.
HANDLING PRECAUTION
(a) Do not remove or install VSC parts such as the steering angle sensor or yaw rate and acceleration sensor (airbag sensor assembly) except when required, as they need to be adjusted correctly after removal and installation.
(b) Be sure to perform preparation before work and confirmation after work is completed by following the directions in the repair manual when working on the VSC system.
(c) Be sure to remove and install the skid control ECU (brake actuator assembly), sensors, etc. with the engine switch off unless it is otherwise specified in the inspection procedure.
(d) If the skid control ECU (brake actuator assembly) or a sensor has been removed and installed, it is necessary to check the system for problems after the parts have been reassembled. Check for DTCs using the Techstream. Also check that the system functions and signals received by the ECU are normal using Test Mode (Signal Check).
DTC PRECAUTION
(a) Warnings for some DTCs cannot be cleared only by repairing the malfunctioning parts. If the warning is displayed after repair work, the DTC should be cleared after turning the engine switch off.
NOTICE:
If a DTC for a malfunctioning part reappears after it was cleared, then it has been stored again.
(b) When 2 or more DTCs are detected, perform diagnosis for each DTC, one by one until the problem is identified.
CHASSIS DYNAMOMETER PRECAUTION
When testing with a 2-wheel drum tester such as speedometer tester, combination tester for the speedometer and brakes, or chassis dynamometer, or when jacking up the front wheels and turning the wheels, perform the following procedure to enter Inspection Mode and disable the TRAC and VSC systems.
CAUTION:
- Do not use the drum tester with any of the lock chains disconnected.
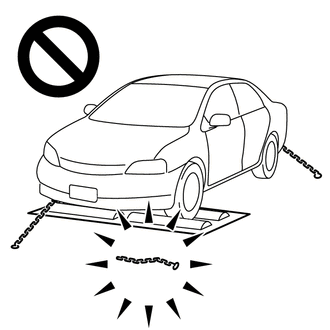
- Using the drum tester with a lock chain disconnected could cause the vehicle to begin moving unexpectedly.
- Do not use the drum tester while the TRAC or VSC is able to operate.
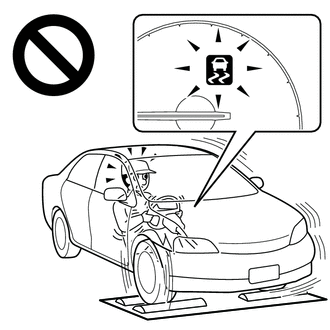
- TRAC or VSC operation could cause the vehicle to begin moving unexpectedly.
NOTICE:
Secure the vehicle with lock chains for safety.
(a) Activating Inspection Mode (When Using the Techstream)
(1) Ensure that the engine switch is off and the engine is stopped.
(2) Make sure that the shift lever is in P.
(3) Connect the Techstream to the DLC3.
(4) Start the engine.
(5) Turn the Techstream on.
(6) Enter the following menus: Chassis / ABS/VSC/TRAC/EPB / Utility / Inspection Mode.
Chassis > ABS/VSC/TRAC/EPB > UtilityInspection Mode
(7) Check that the VSC OFF indicator light comes on and "Traction Control Turned Off" is displayed on the multi-information display.
HINT:
- If the VSC OFF indicator light does not come on and "Traction Control Turned Off" is not displayed on the multi-information display repeat the previous steps.
- Turning the engine switch off ends Inspection Mode.
(b) Activating Inspection Mode (When not Using the Techstream)
HINT:
Perform steps "C" to "H" within 30 seconds.
(1) Ensure that the engine switch is off and the engine is stopped (Step "A").
(2) Make sure that the shift lever is in P (Step "B").
(3) Start the engine (Step "C").
(4) Apply the parking brake (Step "D").
(5) Depress and release the brake pedal twice (Step "E").
(6) While holding the brake pedal down, release and apply the parking brake twice (Step "F").
(7) With the parking brake applied, depress and release the brake pedal twice (Step "G").
(8) Check that the VSC OFF indicator light comes on and "Traction Control Turned Off" is displayed on the multi-information display (Step "H").
HINT:
- If the VSC OFF indicator light does not come on and "Traction Control Turned Off" is not displayed on the multi-information display in step "H", repeat steps "A" to "H".
- Turning the engine switch off ends Inspection Mode.
DISABLING AND ENABLING OF TRAC AND VSC BY OPERATION OF VSC OFF SWITCH
(a) Switching of mode
Operating the VSC OFF switch switches the system between normal mode, TRAC off mode and VSC off mode.
(1) Normal mode
If the VSC OFF switch is pressed when in TRAC off mode or VSC off mode, the system enters normal mode.
In normal mode, TRAC and VSC are enabled.
The system is set to normal mode when the engine switch is turned on (IG).
(2) TRAC off mode
If the VSC OFF switch is pressed when in normal mode, the system enters TRAC off mode. When in TRAC off mode, TRAC is disabled and the multi-information display in the combination meter assembly displays "Traction Control Turned Off".
When the vehicle reaches a certain vehicle speed when in TRAC off mode, the system automatically returns to normal mode.
(3) VSC off mode
When the VSC OFF switch is pressed and held for 3 seconds or more with the vehicle stopped, the system enters VSC off mode. When in VSC off mode, TRAC and VSC are disabled, the multi-information display in the combination meter assembly displays "Traction Control Turned Off" and the VSC OFF indicator light is illuminated.
The system does not automatically return to normal mode based on vehicle speed when in VSC off mode.
CAN COMMUNICATION SYSTEM PRECAUTION
(a) The CAN communication system is used for communication between the skid control ECU (brake actuator assembly), steering angle sensor, yaw rate and acceleration sensor (airbag sensor assembly) and other ECUs. If there is a malfunction in a CAN communication line, communication DTCs related to the affected systems will be stored.
(b) If any CAN communication DTCs are output, repair the malfunction, then troubleshoot the VSC system while communication is normal.
(c) In order to enable CAN communication, a specific type of wiring is used for the CAN communication lines. The wiring used for each communication line is a twisted pair of wires that have an equal length. A bypass wire should not be used because the data being transmitted will be corrupted.