Operation Check
OPERATION CHECK
CHECK SMART KEY SYSTEM OPERATION (for unlock function)
NOTICE:
Make sure the smart key system (for unlock function) has not been deactivated before performing this check.
(a) Check the unlock function on opening (driver's door, front passenger door).
(1) Perform a remote door lock operation to lock the door. While carrying the electronic key transmitter subassembly, touch the sensor built into the back of the front outside door handle assembly of the driver's door, and make sure the door unlocks.
(2) Check the unlock detection area when opening. Hold the electronic key transmitter subassembly at the same height as the outside door handle assembly and approximately 0.7 to 1 m (2.30 to 3.28 ft) from the vehicle, as shown in the illustration, and make sure the LED (red) on the electronic key transmitter subassembly flashes.
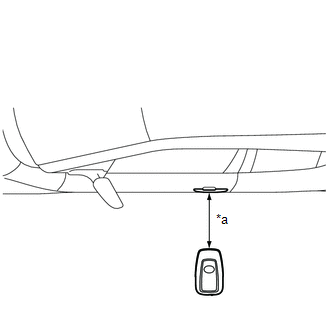
*a |
0.7 to 1 m (2.30 to 3.28 ft) |
(3) With the system in unlock standby mode, grip the front LH outside door handle assembly and check whether the door unlocks.
HINT:
- The system is in unlock standby mode when the electronic key transmitter subassembly is within the detection area and the key ID code sent by the electronic key transmitter subassembly matches the key ID code registered by the certification ECU (smart key ECU assembly).
- Communication may not be possible if the electronic key transmitter subassembly is within 0.2 m (0.656 ft) of the outside door handle assembly.
- Check the front passenger door using the same procedure.
(4) Check the unlock response sensitivity. With the system in unlock standby mode, touch the area shown in the illustration and make sure the door unlocks.
NOTICE:
If the sensor is touched too quickly or released too slowly, the sensor may not respond and the door will not unlock.
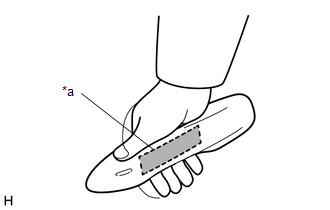
*a |
Unlock sensor (rear side) |
HINT:
Check the front passenger door using the same procedure.
(b) Check the lock-on-open function (driver door, front passenger door).
NOTICE:
If the electronic key transmitter subassembly is inside the vehicle but outside the detection area (on the instrument panel, in the glove box, on the floor) and a door lock operation is performed, the key lock-in prevention function will not operate and the electronic key transmitter subassembly will be locked inside the vehicle.
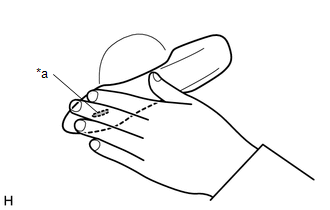
*a |
Lock sensor |
(1) With the door closed and unlocked, touch the lock sensor on the front outside door handle assembly of the driver door while carrying the electronic key transmitter subassembly, and make sure the door locks.
HINT:
- If the door does not lock even when touching the lock sensor, touch it with the palm of your hand.
- Check the front passenger door using the same procedure.
(2) Check the lock-on-open operating range. Hold the electronic key transmitter subassembly approximately 0.7 to 1 m (2.30 to 3.28 ft) below the lower edge of the door glass and approximately 0.3 m (0.984 ft) from the vehicle, as shown in the illustration, touch the lock sensor and make sure the door locks.
HINT:
- If the door does not lock even when touching the lock sensor, touch it with the palm of your hand.
- Since communication may not be possible if the electronic key transmitter subassembly is within 0.2 m (0.656 ft) of the front outside door handle assembly, the door may not lock if the lock sensor is touched with the hand holding the electronic key transmitter subassembly, etc.
- If the key lock-in prevention function buzzer sounds, radio waves from the electronic key interior antenna may leak out of the vehicle.
- Check the front passenger door using the same procedure.
- The lock-on-open function cannot be operated more than 3 times in succession.
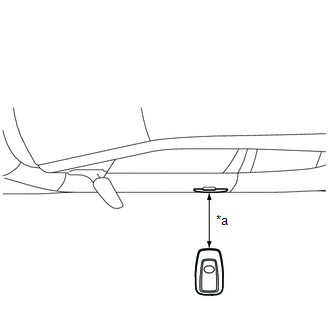
*a |
0.7 to 1 m (2.30 to 3.28 ft) |
(c) Check the trunk door opening function (trunk door opener switch).
(1) With the trunk door closed and locked, press the lock switch on the trunk door opener switch assembly while carrying the electronic key transmitter subassembly, and make sure the trunk door opens.
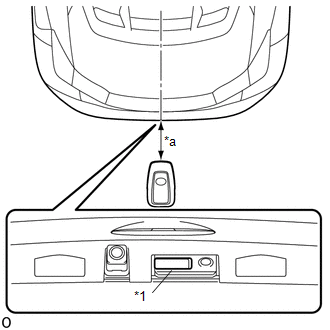
*1 |
Trunk door opener switch assembly (opener switch) |
*a |
0.7 to 1 m (2.30 to 3.28 ft) |
(2) Check the trunk door opening operating range. Hold the electronic key transmitter subassembly at the same height as the upper surface of the rear bumper and approximately 0.7 to 1 m (2.30 to 3.28 ft) from the vehicle, as shown in the illustration, press the opener switch on the trunk door opener switch assembly and make sure the trunk door opens.
(d) Check the trunk door lock-on-open function.
NOTICE:
If the electronic key transmitter subassembly is inside the vehicle but outside the detection area (on the instrument panel, in the glove box or on the floor) and a trunk door lock operation is performed, the key lock-in prevention function will not operate and the electronic key transmitter subassembly will be locked inside the vehicle.
(1) With the trunk door closed and unlocked, press the lock switch on the trunk door opener switch assembly while carrying the electronic key transmitter subassembly outside the vehicle, and make sure the trunk door locks.
(2) Check the trunk door lock-on-open operating range. Hold the electronic key transmitter subassembly at the same height as the upper surface of the rear bumper and approximately 0.7 to 1 m (2.30 to 3.28 ft) from the vehicle, as shown in the illustration, press the lock switch on the trunk door opener switch assembly and make sure the trunk door locks.
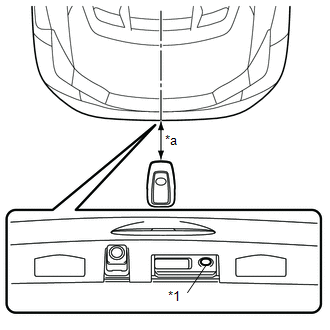
*1 |
Trunk door opener switch assembly (lock switch) |
*a |
0.7 to 1 m (2.30 to 3.28 ft) |
HINT:
- Communication may not be possible if the electronic key transmitter subassembly is within 0.2 m (0.656 ft) of the rear bumper.
- If the key lock-in prevention function buzzer sounds, radio waves from the electronic key interior antenna may leak out of the vehicle.
(e) Check the key lock-in prevention function (passenger compartment).
NOTICE:
To prevent the electronic key transmitter from being locked inside the vehicle, perform this check with a door window open.
(1) Set the engine switch to OFF.
(2) Place the electronic key transmitter on a front or rear seat.
(3) Close all doors and make sure they are unlocked.
(4) Touch the door lock sensor and check that no door locks and that the key lock prevention function (outside) buzzer sounds for approximately 5 seconds.
(f) Check the transmitter battery saver function
(1) Press the unlock switch on the electronic key transmitter twice while pressing the lock switch, and make sure the transmitter LED flashes 4 times and the transmitter enters transmitter battery saver mode.
(2) Make sure the smart key system (for open function) does not operate when the transmitter is in transmitter battery saver mode.
HINT:
To cancel transmitter battery saver mode, press a switch on the electronic key transmitter.
(g) Check the open function deactivation function.
(1) Deactivate the smart key system and make sure all smart key system (for open function) functions have stopped operating.
Click here
HINT:
While the smart key system is deactivated, the doors can be locked and unlocked using the remote control, and the engine can be started by holding the electronic key transmitter close to the engine switch.
(h) Check the automatic response function (hazard lights flash and buzzer sounds*).
Open function operation | Hazard warning lights | Remote control buzzer* |
|---|---|---|
Lock on open |
Flashes once |
Sounds once |
Unlock on open |
Flashes twice |
Sounds twice |
*: with Toyota Safety Sense P system
KEY DIAGNOSIS MODE (using Techstream)
HINT:
- Using the key diagnosis mode, it is possible to check whether the electronic key transmitter operates correctly with the selected electronic key antenna and in the selected detection area by sounding the remote control buzzer.
- If the buzzer sounds when [CH1] is displayed but not when [CH2] is displayed, the electronic key transmitter cannot be detected by channel 2 due to a malfunction, such as wave interference.
(a) Select the following menus: Body Electrical / Smart Key / Utility / Communication Check (Key Diag Mode).
Body Electrical > Smart Key > UtilityCommunication Check(Key Diag Mode)
(b) Check the appropriate item according to the following table.
Tester display | Check item |
|---|---|
[CH1/CH2] Overhead + Driver Side*1 |
Front LH door outside handle assembly (electronic key antenna) |
[CH1] Overhead + Driver Side*1 |
|
[CH2] Overhead + Driver Side*1 |
|
[CH1/CH2] Overhead + Passenger Side*2 |
Front RH door outside handle assembly (electronic key antenna) |
[CH1] Overhead + Passenger Side*2 |
|
[CH2] Overhead + Passenger Side*2 |
|
[CH1/CH2] Overhead + Front Room*3 |
No. 1 Interior Electronic Key Antenna Assembly (Front Floor) |
[CH1] Overhead + Front Room*3 |
|
[CH2] Overhead + Front Room*3 |
|
[CH1/CH2] Overhead + Back Door*4 |
Electronic Key Antenna (Outside Luggage Compartment) |
[CH1] Overhead + Back Door*4 |
|
[CH2] Overhead + Back Door*4 |
|
[CH1/CH2] Luggage + Back Door (inside)*5 |
No. 3 Interior Electronic Key Antenna Assembly (Luggage Compartment Interior) |
[CH1] Luggage + Back Door (inside)*5 |
|
[CH2] Luggage + Back Door (inside)*5 |
|
[CH1/CH2] Immobiliser Amp*6 |
Amplifier (engine switch) |
[CH1] Immobiliser Amp*6 |
|
[CH2] Immobiliser Amp*6 |
- [CH1]: Channel 1 is activated.
- [CH2]: Channel 2 is activated.
- [CH1/CH2]: Channels 1 and 2 switch automatically at a specific interval*.
*: If the electronic key transmitter is detected with channel 1 or 2, the buzzer sounds.
(c) Bring the electronic key transmitter close to the selected electronic key antenna and make sure the remote control buzzer sounds.
(1) *1: Front LH door outside handle assembly
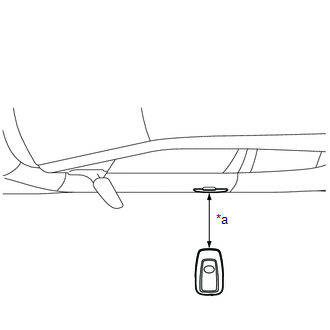
*a |
0.7 to 1 m (2.30 to 3.28 ft) |
HINT:
- Hold the electronic key transmitter at the same height as the front door outside handle assembly, in the position shown in the illustration.
- *2: Perform the same check for the front passenger door.
(d) *3: Interior electronic key antenna No. 1 (front floor)
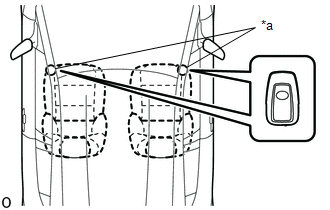
*a |
Check point |
HINT:
Place the electronic key transmitter on the front seat cushion of the driver's seat or the front passenger seat.
(e) *4: Electronic key antenna (outside luggage compartment)
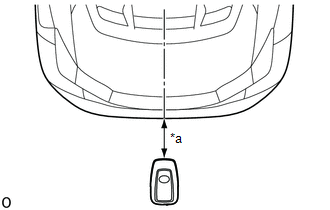
*a |
0.7 to 1 m (2.30 to 3.28 ft) |
HINT:
Hold the electronic key transmitter at the same height as the top surface of the rear bumper, aligned with the center of the rear of the vehicle as shown in the illustration.
(f) *5: Interior electronic key antenna No. 3 (inside luggage compartment)
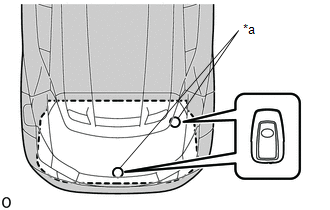
*a |
Check point |
HINT:
Place the electronic key transmitter on the luggage compartment floor.
(g) *6: Amplifier (engine switch)
HINT:
With the logo side of the electronic key transmitter facing the engine switch, hold the transmitter close to the engine switch.
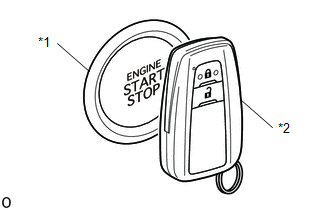
*1 |
Engine Switch |
*2 |
Electronic Key Transmitter Sub-assembly |