Front Brake Caliper

PE54 Caliper Components 1. Dust boot
2. Pad carrier
3. Anti-rattle shim
4. Inner brake pad (with wear indicator)
5. Pad retaining clips
6. Outer brake pad
7. Anti-rattle shim
8. Anti-rattle spring
9. Pad retaining clips
10. Retaining ring
11. Cylinder boot
12. Piston
13. Seal
14. Brake caliper
15. Shim
16. Bleed valve
17. Bushing
18. Pin
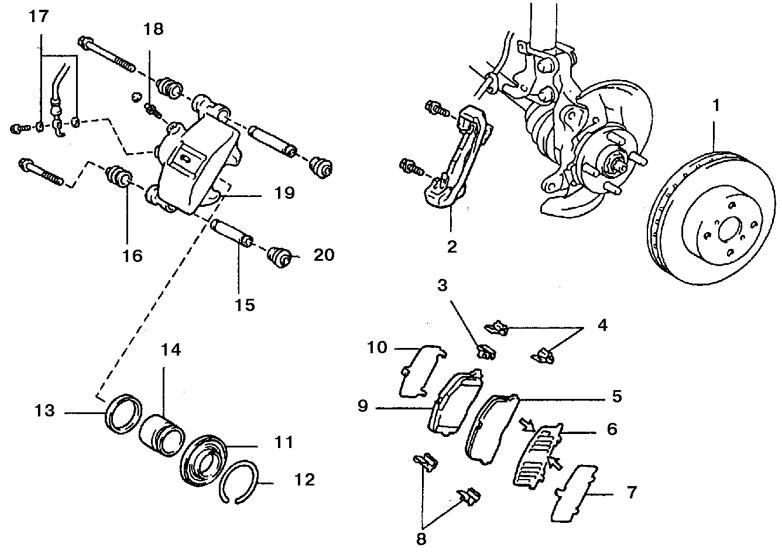
PD51 Caliper Components 1. Brake disc
2. Pad carrier
3. Brake pad wear indicator
4. Retaining clips
5. Outer brake pad
6. Inner anti-rattle shim
7. Anti-rattle shim
8. Brake pad retaining clips
9. Inner brake pad
10. Anti-rattle shim
11. Cylinder boot
12. Retaining ring
13. Seal
14. Piston
15. Bushing
16. Dust boot
17. Shim
18. Bleed valve
19. Brake caliper
20. Dust boot
* Dust produced by brake pad wear contains asbestos, which is hazardous to health. Do not blow it off with compressed air and do not inhale it.
* If caliper overhaul is required (usually due to brake fluid leakage), first check the price of spare parts or the cost of a remanufactured or new caliper. Purchase a repair kit before starting the overhaul. Always repair both calipers together – never repair only one of them.
Removal
PROCEDURE
1. Loosen the wheel nuts, raise the front of the vehicle and support it on stands. Remove the wheel.
2. Remove the bolt (indicated by the lower arrow) and disconnect the brake hose (indicated by the upper arrow) from the caliper.
3. Using a piece of rubber hose of suitable diameter, plug the hose opening to prevent dirt or moisture from entering and to minimize brake fluid loss.
4. Refer to the instructions in subsection 9.3 and remove the caliper (caliper removal is part of the brake pad replacement procedure).
Bulkhead
PROCEDURE
1. To overhaul the caliper, remove the dust boot retaining ring and dust boot. Before removing the piston, place a wooden block or several rags between the piston and the caliper to protect against damage during removal.
2. To remove the piston from the caliper, connect an air hose to the brake hose connection on the caliper and push the piston out using compressed air. Do not apply excessive pressure; it is sufficient to move the piston slightly out of the cylinder.
* Be careful and keep your fingers away from between the caliper and the piston, as the piston may pinch them.
3. Inspect the piston surface and the caliper cylinder bore. If they are scratched, show signs of corrosion or wear, replace the caliper together with the piston.
4. If these components are in good condition, remove the piston seal from the caliper cylinder using a wooden or plastic tool. Metal tools may damage the cylinder surface.
5. On the PD51 caliper, press the bushing out of the caliper and remove the dust boots from both sides.
6. Clean all components using brake cleaning fluid.
7. To assemble the caliper, you must purchase a repair kit suitable for your vehicle model.
8. Dip the new piston seal and piston in brake fluid and install them into the caliper cylinder. Do not force the piston into the cylinder; check that it is installed correctly, and push it into the cylinder with firm pressure (do not apply excessive force).
9. Install the new piston dust boot and retaining ring.
10. Lubricate the bushings with silicone grease (included in the repair kit) and insert them into the caliper holes. Install the dust boots.
Installation
PROCEDURE
1. Install the caliper in the reverse order of removal. Be sure to replace the copper sealing washers (gaskets) at the brake hose connection (new washers are usually included in the repair kit).
2. Bleed the brake system, referring to the instructions (see subsection 9.12). Check that the brake hose connections are not leaking. Test the brakes before normal vehicle operation.
Test yourself
A quick Toyota Corolla quiz: every answer comes with an explanation and a link to the manual page.