Rear Disc Brake Caliper
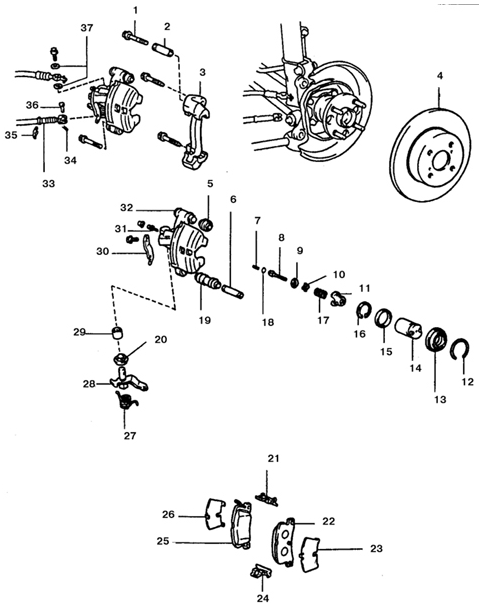
Rear Disc Brake Caliper Components 1. Bolt
2. Bushing
3. Pad Retainer
4. Brake Disc
5. Bolt Boot
6. Bushing
7. Parking Brake Spreader
8. Adjusting Bolt
9. Adjusting Bolt Travel Stopper
10. Spring Seat
11. Spring Retainer
12. Retaining Ring
13. Cylinder Boot
14. Piston
15. Piston Seal
16. Split Retaining Ring
17. Spring
18. O-Ring
19. Dust Boot
20. Parking Brake Crank Lever Boot
21. Brake Pad Retaining Plate
22. Brake Pad
23. Anti-Squeal Shim
24. Brake Pad Retaining Plate
25. Brake Pad (with Wear Indicator)
26. Anti-Squeal Shim
27. Torsion Spring
28. Parking Brake Crank Lever
29. Needle Bearing
30. Parking Brake Cable Bracket
31. Bleeder Valve
32. Brake Caliper
33. Parking Brake Cable
34. Cotter Pin
35. Clip
36. Pin
37. Gasket
* Dust produced by brake pad wear contains asbestos, which is hazardous to health. Do not blow it off with compressed air and do not inhale it.
* Do not use gasoline-based solvents to clean the brake mechanism. Use only special brake parts cleaner.
* If caliper overhaul is required (usually due to brake fluid leakage), first check the price of spare parts or the cost of a remanufactured or new caliper. Purchase a repair kit before starting the overhaul. Always repair both calipers together – never repair only one of them.
Removal
PROCEDURE
1. Loosen the wheel nuts, raise the rear of the vehicle and support it on stands. Remove the wheel.
2. Remove the bolt and disconnect the brake hose from the caliper. Plug the hose opening with a section of rubber hose of suitable diameter to prevent dirt and moisture from entering the brake system and to reduce brake fluid loss.
3. Disconnect the parking brake cable from the caliper by removing the cotter pin and pin, while pressing on the parking brake crank lever. Remove the cable clip retainer and remove the cable.
4. Remove the caliper following the instructions in Subsection 9.3 (caliper removal is part of the brake pad replacement procedure).
Bulkhead
PROCEDURE
1. To disassemble the caliper, press the bushings out of the caliper lugs and remove the dust boots and bolt boots from both sides of the caliper.
2. Using a screwdriver, remove the cylinder boot retaining ring and boot.
3. Using pliers with thin jaws inserted into the grooves on the piston surface, turn the piston counterclockwise and remove it from the caliper.
4. Inspect the piston surface and caliper cylinder walls. If they are scratched, corroded or worn, replace the caliper together with the piston.
5. If these components are in good condition, remove the piston seal from the caliper cylinder using a wooden or plastic tool. Metal tools may damage the cylinder surface.
6. Disassembly of the parking brake and self-adjusting mechanism components is not recommended, as special tools are required and many spare parts are not sold separately. Check the operation of the adjusting mechanism by pressing the parking brake crank lever by hand and verifying that the adjusting bolt moves smoothly. If any adjusting mechanism component is faulty, replace the caliper.
7. Clean all components using brake mechanism cleaning fluid.
8. A repair kit must be purchased to assemble the caliper.
9. Dip the new piston seal in brake fluid and install it in the caliper cylinder.
10. Dip the new piston in brake fluid and install it onto the adjusting bolt in the caliper cylinder. Using pliers with thin jaws inserted into the piston locating grooves, turn the piston clockwise until it rotates freely, then align the locating grooves with the tab on the caliper.
Install the new piston dust boot and retaining ring.
Lubricate the bushings with silicone grease (included in the repair kit) and install them into the caliper lugs. Install the dust boots and bolt boots.
Installation
PROCEDURE
1. Install the caliper in the reverse order of removal. Be sure to replace the copper sealing washers (gaskets) at the brake hose connection (new washers are usually included in the repair kit).
2. Bleed the brake system, referring to the instructions (see subsection 9.12). Check that the brake hose connections are not leaking. Test the brakes before normal vehicle operation.
Test yourself
A quick Toyota Corolla quiz: every answer comes with an explanation and a link to the manual page.