Brake Master Cylinder
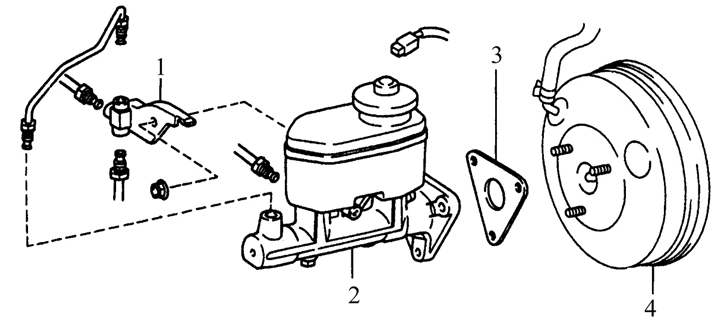
Brake Master Cylinder Mounting Components Brake system without ABS:
1. Tee fitting
2. Master cylinder
3. Gasket
4. Vacuum booster
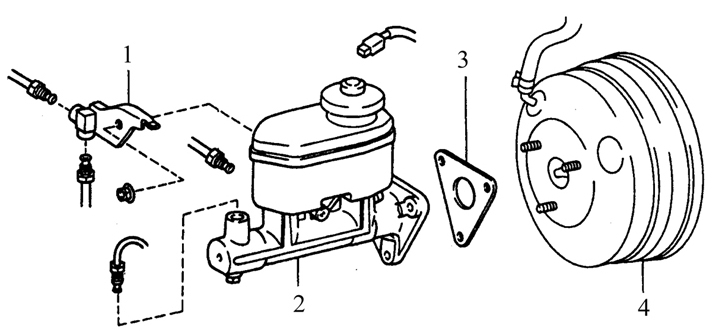
Brake Master Cylinder Mounting Components
Brake system with ABS:
1. Brake Pipe Connector
2. Master Cylinder
3. Gasket
4. Brake Booster
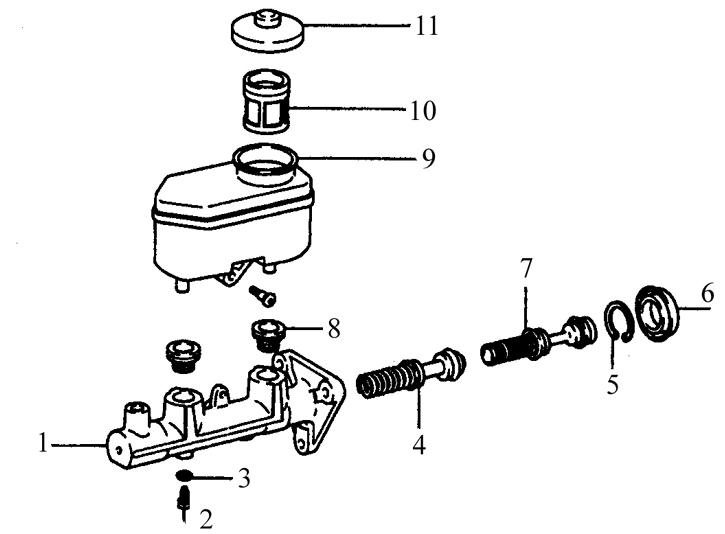
Brake Master Cylinder Components Brake system without ABS:
1. Cylinder
2. Piston Stopper Bolt
3. Gasket
4. Piston N2 and Spring
5. Split Retaining Ring
6. Boot
7. Piston N1 and Spring
8. Bushing
9. Reservoir
10. Filter
11. Cap
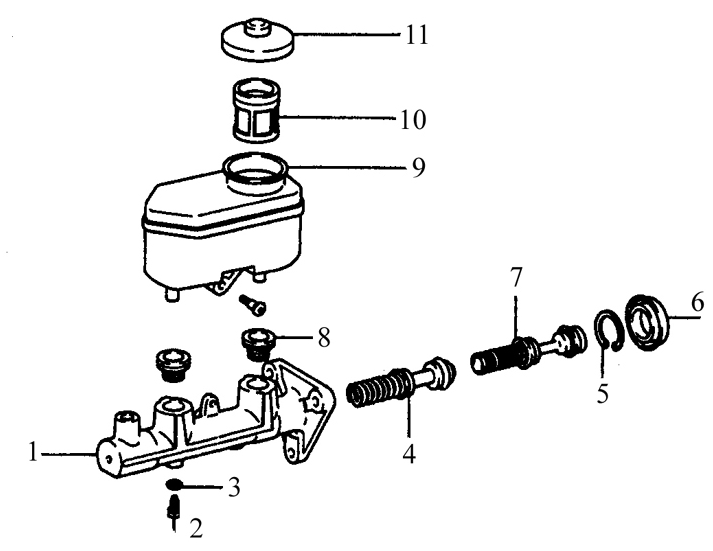
Brake Master Cylinder Components
Brake system with ABS:
1. Bushing
2. Cylinder
3. Piston Stopper Bolt
4. Gasket
5. Piston N2 and Spring
6. Split Retaining Ring
7. Boot
8. Piston N1 and Spring
9. Reservoir
10. Filter
11. Cap
* Before starting master cylinder repair, purchase a repair kit. If you decide to repair the cylinder, inspect its internal surface, referring to the instructions in step 9, before purchasing replacement parts.
Removal
PROCEDURE
1. Remove the air cleaner (refer to Subsection 5.9).
2. Disconnect the brake fluid low level warning switch connector (the arrow indicates the left master cylinder mounting nut).
3. Drain as much brake fluid as possible from the master cylinder reservoir.
* The brake fluid can best be drained using a clean syringe.
4. Place rags under the connections and prepare caps or plastic bags to plug the pipe ends after disconnection.
* Brake fluid is harmful to paint. Cover all body parts and take care not to spill brake fluid during work.
5. Loosen the brake pipe fittings at the points where they enter the master cylinder (indicated by arrows). Use a flare nut wrench to avoid rounding off the flats.
6. Move the brake pipes away from the master cylinder and plug the pipe ends to prevent dirt or moisture from entering.
7. Remove the three nuts securing the master cylinder to the brake booster (refer to the Brake Master Cylinder Mounting Components illustration). Remove the master cylinder from the booster studs. Be careful and try not to spill brake fluid. Remove and discard the old gasket between the master cylinder and the brake booster.
Bulkhead
PROCEDURE
1. Before disassembling the master cylinder, purchase a repair kit containing all necessary replacement parts and instructions that may be specific to your model.
2. Remove the reservoir mounting screw and remove the reservoir.
3. After removing the reservoir, remove the bushings from the master cylinder ports; if they are hardened, cracked, damaged, or leaking, replace them.
4. Clamp the cylinder in a vise and, using a punch or a Phillips screwdriver, push the pistons to the bottom of the cylinder. Holding the pistons in this position, remove the master cylinder stopper bolt.
5. Carefully remove the split retaining ring at the end of the master cylinder.
6. The internal components of the cylinder can now be removed (refer to the Brake Master Cylinder Components illustration). Note the installation order of the components during removal so that they can be installed correctly during assembly.
7. After removing the split retaining ring, remove the first piston (N1).
8. Remove the cylinder from the vise and tap it on a wooden surface so that the second piston (N2) comes out. Pull the piston straight out; if it is tilted to the side, the internal surface of the cylinder may be damaged.
* The two cylinder springs are different from each other, so pay special attention to their installation position.
9. Carefully inspect the internal surface of the master cylinder. If there are deep scratches or other damage, the cylinder must be replaced. Do not attempt to restore the internal surface of the cylinder.
10. Replace all components included in the repair kit, following the instructions supplied with the kit. Clean all old components with brake system cleaning fluid.
* Do not use gasoline-based solvents. During assembly, lubricate all components with clean brake fluid.
11. Install the assembled components into the cylinder and push them deep into the cylinder bore. Then install the stopper bolt.
12. Install a new snap ring, making sure it seats fully in its groove.
13. Install the reservoir bushings, the reservoir, and the mounting screw.
14. Before installing the master cylinder, it must be bled on a workbench. Since you will need to apply pressure to the master cylinder piston while monitoring brake fluid flow from the cylinder ports, clamp the master cylinder in a vise so that the vise jaws grip the cylinder mounting flange.
15. Screw the plugs into the brake line ports on the master cylinder so that they seal against air, but not so tightly that they cannot be easily loosened.
16. Fill the reservoir with brake fluid of the recommended type (see Subsection 2.1).
17. Loosen one of the plugs and push the piston into the cylinder to expel air from the cylinder. A large Phillips screwdriver can be used to push the piston into the cylinder.
18. To prevent air from re-entering the master cylinder, tighten the plug before releasing the piston.
19. Repeat this procedure until clean brake fluid without air bubbles flows from the cylinder port. Then perform the same procedure on the second brake line port. Monitor the brake fluid level in the reservoir to prevent air from re-entering the master cylinder.
20. Since preliminary bleeding of the master cylinder on a workbench does not require significant piston pressure, another method can be used that does not require loosening and tightening the plug with each piston stroke. Before pressing the piston, loosen the plug as described in step 17. Before releasing the piston, instead of tightening the plug, simply cover the port tightly with your finger to prevent air from re-entering the cylinder. Wait a few seconds for brake fluid from the reservoir to enter the master cylinder, then press the piston again, removing your finger as fluid exits. Be sure to cover the port with your finger again before releasing the piston. When bleeding is complete at one brake line port, proceed to the other port.
Installation
PROCEDURE
1. Install the master cylinder onto the brake booster studs and start the mounting nuts. Be sure to install a new gasket.
2. Connect the brake lines to the master cylinder. Since the master cylinder is not yet fully secured, it can be moved slightly so that the line fittings can be tightened correctly and without cross-threading.
3. Tighten the master cylinder mounting nuts to the torque specified in the Specifications section at the beginning of this chapter. Securely tighten the brake line fittings.
4. Fill the reservoir with brake fluid and bleed the master cylinder and the brake system (see Subsection 9.12). To bleed the master cylinder after it has been installed on the vehicle, have an assistant depress the brake pedal and hold it in this position. Loosen the brake line fitting to release brake fluid and air.
5. Tighten the fitting, then have the assistant release the brake pedal. Repeat this procedure on both fittings until brake fluid flows free of air bubbles. Thoroughly check brake system operation before returning the vehicle to normal use.
Test yourself
A quick Toyota Corolla quiz: every answer comes with an explanation and a link to the manual page.