Rear Disc Brake Pads
* Brake pads must be replaced on both wheels at the same time – never replace brake pads on only one wheel.
* Dust produced by brake pad wear contains asbestos, which is hazardous to health. Do not blow it off with compressed air and do not inhale it.
* Do not use gasoline-based solvents to clean the brake mechanism. Use only special brake parts cleaner.
PROCEDURE
1. Remove the cap from the brake fluid reservoir.
2. Loosen the wheel nuts, raise the rear of the vehicle and support it on stands. Chock the front wheels.
3. Remove the wheel and release the parking brake. All four rear brake pads must be replaced at the same time. To avoid mixing them up, work on one wheel at a time.
4. Remove the upper and lower bolts and separate the caliper from the brake pads and pad carrier (see figure Rear Disc Brake Caliper Components).
5. Suspend the caliper from the suspension spring using a piece of wire; do not allow the caliper to hang by the brake hose or parking brake cable.
6. Remove the outer shim and outer brake pad, then the inner shim and inner brake pad.
7. Remove the two pad retaining clips; inspect them for damage and replace if necessary (good clips should snap into the pad carrier when installed; if they are loose or deformed, replace them).
8. Thoroughly inspect the brake disc, referring to the instructions in subsection 9.7. If the surface requires machining, remove the disc referring to the instructions in the same section. When removing the disc, the brake pads may also be removed.
9. Install the pad retaining clips, new brake pads and shims. Make sure the pad ends are correctly seated in the retaining clips, and install the inner brake pad so that the wear indicator is at the top.
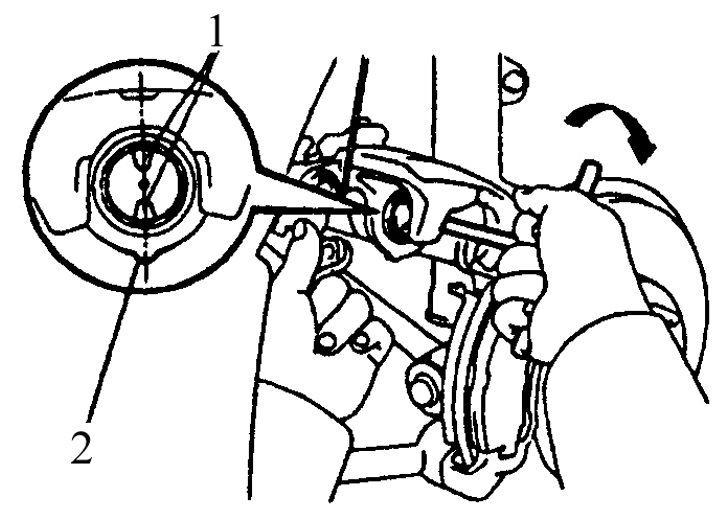
10. Before installing the caliper over the new (thicker) brake pads, retract the self-adjusting mechanism. To do this, turn the caliper piston clockwise using pliers with their jaws fitted into the locating grooves (1) on the piston surface. Continue turning the piston until it rotates freely, then align the locating grooves with the tab (2) on the caliper.
11. Install the caliper over the brake pads, inserting the tab on the rear side of the inner brake pad into the locating groove on the caliper piston.
12. Install the upper and lower bolts and tighten them to the specified torque (refer to Threaded Connections Torque Specifications table).
13. Install the wheel, then lower the vehicle to the ground. Tighten the wheel nuts to the specified torque (refer to Threaded Connections Torque Specifications table).
14. After completing the work, depress the brake pedal several times to automatically adjust the rear brakes. Check the brake fluid level and top up if necessary. Check brake operation before normal vehicle use.
Test yourself
A quick Toyota Corolla quiz: every answer comes with an explanation and a link to the manual page.