Brake Booster
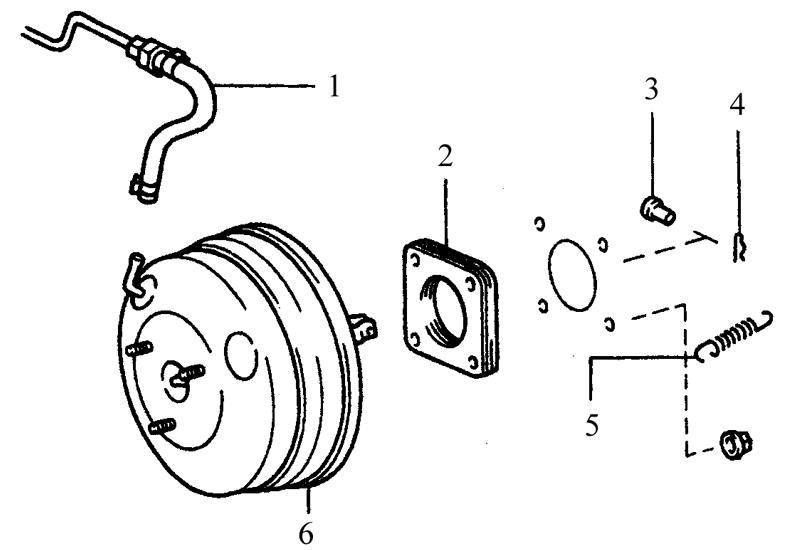
Brake Booster Components 1. Vacuum hose
2. Gasket
3. Pin
4. Clip
5. Return spring
6. Brake booster
Operation Check
PROCEDURE
1. With the engine off, depress the brake pedal several times and check that it stops at the same distance from the floor each time.
2. Depress the brake pedal and start the engine. If the pedal drops slightly, the brake booster is operating normally.
Leak Check
PROCEDURE
1. Start the engine and stop it after one to two minutes of operation. Slowly depress the brake pedal several times. If the pedal feels harder with each depression, the brake booster is airtight.
2. With the engine running, depress the brake pedal, stop the engine, and keep the pedal depressed. If the pedal does not rise within thirty seconds, the brake booster is airtight.
Removal
The brake booster cannot be disassembled. Repair requires special tools that are not available in every workshop. Because it has a significant effect on brake operation, the booster must be replaced if it fails.
PROCEDURE
1. Disconnect the hose running from the engine to the brake booster. Be careful not to damage the hose when disconnecting it from the brake booster.
2. Remove the brake master cylinder (refer to Subsection 9.10).
3. Remove the lower steering column trim panel (refer to Subsection 11.23).
4. Remove the brake pedal return spring.
5. Locate the clevis connecting the booster pushrod and the brake pedal. Using pliers, remove the clip and pull out the pin (indicated by the middle arrow).
6. Loosen and remove the four nuts and washers securing the brake booster to the dash panel (indicated by arrows; the upper right nut is not visible in the illustration). A flashlight may be needed to see them.
7. Remove the brake booster from the dash panel.
Installation
PROCEDURE
1. Installation is the reverse of removal. Tighten the brake booster mounting nuts to the torque specified in the Specifications section at the beginning of this chapter. Use a new clip if the old clip is loose.
2. When installing a new brake booster, measure the clearance between the master cylinder piston and the brake booster pushrod and adjust if necessary.

3. Using a depth micrometer or vernier caliper, measure the distance from the recess in the master cylinder to the master cylinder mounting flange. Then measure the distance from the end of the brake booster pushrod to the booster surface (including the gasket) on which the master cylinder mounting flange seats. The two values must be equal.

4. If the values are not equal, turn the adjusting screw on the end of the brake booster pushrod until the required clearance is obtained.
5. After installing the master cylinder and connecting the pipes and hoses, adjust the brake pedal height and free play, and bleed the brake system. These operations are described in the corresponding sections of this chapter.
Test yourself
A quick Toyota Corolla quiz: every answer comes with an explanation and a link to the manual page.