Engine Control Module (ECM)
Circuit Diagrams
ECM Terminal and Input/Output Signal
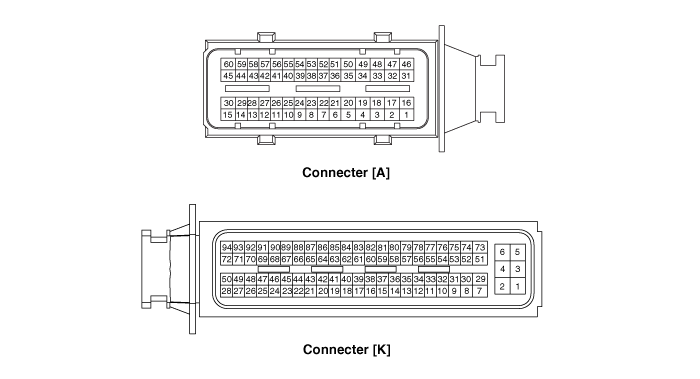
ECM Terminal Function
Connector [A]
| Pin No. | Description | Connected To |
| 1 | Ignition Coil Control Output (Cylinder No. 4) | Ignition Coil (Cylinder No. 4) |
| 2 | Ignition Coil Control Output (Cylinder #3) | Ignition Coil (Cylinder No. 3) |
| 3 | - | |
| 4 | - | |
| 5 | Injector (Cylinder No. 3) [Low] Control Output | Injector (Cylinder #3) |
| 6 | - | |
| 7 | Engine Coolant Temperature Sensor (ECTS) Signal Input | Engine Coolant Temperature Sensor (ECTS) |
| 8 | - | |
| 9 | Boost Pressure Sensor (BPS) Input Signal | Boost Pressure Sensor (BPS) |
| 10 | - | |
| 11 | - | |
| 12 | - | |
| 13 | Throttle Position Sensor (TPS) 1 Signal Input | Throttle Position Sensor (TPS) No. 1 [ETC Module] |
| 14 | Accelerator Pedal Position Sensor (APS) 1 Signal Input | Accelerator Pedal Position Sensor (APS) |
| 15 | - | |
| 16 | Ignition Coil Control Output (Cylinder #2) | Ignition Coil (Cylinder No. 2) |
| 17 | Ignition Coil Control Output (Cylinder No. 1) | Ignition Coil (Cylinder No. 1) |
| 18 | ETC Motor [+] Control Output | ETC Module |
| 19 | - | |
| 20 | Injector (Cylinder No. 2) [Low] Control Output | Injector (Cylinder #2) |
| 21 | Wiper Switch Signal Input | Wiper relay |
| 22 | - | |
| 23 | - | |
| 24 | Camshaft Position Sensor (CMPS) [Bank 1/Exhaust] Signal Input | Camshaft Position Sensor (CMPS) [Bank 1/Exhaust] |
| 25 | - | |
| 26 | Vehicle Speed Signal Input | ABS/ESP Control Module |
| 27 | Start Signal Input | Ignition Switch |
| 28 | Brake Check Switch Input Signal | Brake Switch |
| 29 | Stop Lamp Switch Input Signal | Brake Switch |
| 30 | - | |
| 31 | Injector (Cylinder No. 2) [High] Control Output | Injector (Cylinder #2) |
| 32 | Injector (Cylinder No. 3) [High] Control Output | Injector (Cylinder #3) |
| 33 | - | |
| 34 | Injector (Cylinder No. 1) [Low] Control Output | Injector (Cylinder No. 1) |
| 35 | Fuel Pressure Control Valve (FPCV) [High] Control Output | Fuel Pressure Control Valve (FPCV) |
| 36 | Sensor Ground | Camshaft Position Sensor (CMPS) [Bank 1/Intake] |
| 37 | Sensor Ground | Camshaft Position Sensor (CMPS) [Bank 1/Exhaust] |
| 38 | Generator PWM Signal Output | Generator |
| 39 | - | |
| 40 | - | |
| 41 | Heated Oxygen Sensor (HO2S) [Bank 1/Sensor 2] Input Signal | Heated Oxygen Sensor (HO2S) [Bank 1/Sensor 2] |
| 42 | - | |
| 43 | - | |
| 44 | - | |
| 45 | Electrical Load Input Signal [Defrost] | Generator |
| 46 | Injector (Cylinder No. 4) [High] Control Output | Injector (Cylinder No. 4) |
| 47 | Injector (Cylinder No. 1) [High] Control Output | Injector (Cylinder No. 1) |
| 48 | ETC Motor [-] Control Output | ETC Module |
| 49 | Injector (Cylinder No. 4) [Low] Control Output | Injector (Cylinder No. 4) |
| 50 | Fuel Pressure Control Valve (FPCV) [Low] Control Output | Fuel Pressure Control Valve (FPCV) |
| 51 | - | |
| 52 | - | |
| 53 | Sensor Ground | Crankshaft Position Sensor (CKPS) |
| 54 | Crankshaft Position Sensor (CKPS) [B] Signal Input | Crankshaft Position Sensor (CKPS) |
| 55 | - | |
| 56 | Camshaft Position Sensor (CMPS) [Bank 1/Intake] Signal Input | Camshaft Position Sensor (CMPS) [Bank 1/Intake] |
| 57 | Sensor Ground | Heated Oxygen Sensor (HO2S) [Bank 1/Sensor 2] |
| 58 | - | |
| 59 | - | |
| 60 | - |
Connector [K]
| Pin No. | Description | Connected To |
| 1 | ECM Ground | Ground |
| 2 | ECM Ground | Ground |
| 3 | ECM Ground | Ground |
| 4 | Battery Power (B+) | Battery |
| 5 | Battery Power (B+) | Battery |
| 6 | Battery Power (B+) | Main Relay |
| 7 | Battery Power (B+) | Main Relay |
| 8 | Sensor Ground | Accelerator Position Sensor (APS) No. 1 |
| 9 | Sensor Ground | Manifold Absolute Pressure Sensor (MAPS) |
| 10 | Sensor Ground | Boost Pressure Sensor (BPS) |
| 11 | - | |
| 12 | - | |
| 13 | - | |
| 14 | - | |
| 15 | - | |
| 16 | Sensor Ground | Engine Coolant Temperature Sensor (ECTS) |
| 17 | - | |
| 18 | - | |
| 19 | Wastegate Valve (WGV) Solenoid Control Output | Wastegate Valve Solenoid (WGV) |
| 20 | - | |
| 21 | - | |
| 22 | CVVT Oil Control Valve (OCV) [Bank 1/Intake] Control Output | CVVT Oil Control Valve (OCV) [Bank 1/Intake] |
| 23 | - | |
| 24 | Radiator Cooling Fan PWM Control Output | Cooling Fan Relay |
| 25 | - | |
| 26 | - | |
| 27 | Fuel Pump Relay Control Output (with Immobilizer/Smart Key) | Fuel Pump Relay |
| 28 | - | |
| 29 | Ignition Switch Input Signal | Ignition Lock |
| 30 | Sensor Ground | Accelerator Position Sensor (APS) No. 2 |
| 31 | - | |
| 32 | - | |
| 33 | - | |
| 34 | - | |
| 35 | - | |
| 36 | Sensor Ground | Rail Pressure Sensor (RPS) |
| 37 | Sensor Ground | Air Conditioning Pressure Sensor (APT) |
| 38 | - | |
| 39 | Generator COM Signal Output | Generator |
| 40 | - | |
| 41 | Starter Relay Control Output | Starter Relay |
| 42 | - | |
| 43 | Sensor Power Supply (+5V) | Accelerator Position Sensor (APS) No. 2 |
| 44 | Sensor Power Supply (+5V) | Camshaft Position Sensor (CMPS) |
| 45 | - | |
| 46 | - | |
| 47 | - | |
| 48 | - | |
| 49 | - | |
| 50 | CVVT Oil Control Valve (OCV) Control Output [Bank 1/Exhaust] | CVVT Oil Control Valve (OCV) [Bank 1/Exhaust] |
| 51 | Main Relay Control Output | Main Relay |
| 52 | Sensor Ground | Throttle Position Sensor (TPS) No. 1, 2 [ETC Module] |
| 53 | Fan Switch MAX Signal Input | Heater & A/C Control Module |
| 54 | Air Conditioning Pressure Sensor (APT) Signal Input | Air Conditioning Pressure Sensor (APT) |
| 55 | - | |
| 56 | Intake Air Temperature Sensor (IATS) Input Signal | Intake Air Temperature Sensor (IATS) |
| 57 | Manifold Absolute Pressure Sensor (MAPS) Signal Input | Manifold Absolute Pressure Sensor (MAPS) |
| 58 | Sensor Ground | Knock Sensor (KS) |
| 59 | VS+ (Nernst Cell Voltage) | Heated Oxygen Sensor (HO2S) [Bank 1/Sensor 1] |
| 60 | Rc (Compensation Resistance) | Heated Oxygen Sensor (HO2S) [Bank 1/Sensor 1] |
| 61 | LIN Communication Input Signal | Battery Sensor |
| 62 | CCP-CAN [Low] | Other Control Module, Data Link Connector (DLC) |
| 63 | C-CAN [Low] | Other Control Module, Data Link Connector (DLC) |
| 64 | - | |
| 65 | - | |
| 66 | Sensor Power Supply (+5V) | Accelerator Position Sensor (APS) No. 1 |
| 67 | - | |
| 68 | RCV Control Solenoid Valve Control Output | RCV Control Solenoid |
| 69 | - | |
| 70 | - | |
| 71 | Fuel Pump Relay Control Output (without Immobilizer/Smart Key) | Fuel Pump Relay |
| 72 | - | |
| 73 | - | |
| 74 | Throttle Position Sensor (TPS) 2 Signal Input | Throttle Position Sensor (TPS) No. 1, 2 [ETC Module] |
| 75 | - | |
| 76 | Fuel Level Sensor (FLS) Signal Input | Fuel Level Sensor (FLS) |
| 77 | Accelerator Pedal Position Sensor (APS) 2 Signal Input | Accelerator Position Sensor (APS) No. 2 |
| 78 | Rail Pressure Sensor (RPS) Signal Input | Rail Pressure Sensor (RPS) |
| 79 | Knock Sensor (KS) Signal Input | Knock Sensor (KS) |
| 80 | VS-/IP- (Common Ground for VS, IP) | Heated Oxygen Sensor (HO2S) [Bank 1/Sensor 1] |
| 81 | Rc/Rp (Pump Cell Voltage) | Heated Oxygen Sensor (HO2S) [Bank 1/Sensor 1] |
| 82 | Engine Speed Output Signal | Power Distribution Module (PDM) |
| 83 | Immobilizer Communication Line | Immobilizer Control Module |
| 84 | CCP-CAN [High] | Other Control Module, Data Link Connector (DLC) |
| 85 | C-CAN [High] | Other Control Module, Data Link Connector (DLC) |
| 86 | Sensor Power Supply (+5V) | Manifold Absolute Pressure Sensor (MAPS) |
| 87 | Sensor Power Supply (+5V) | Rail Pressure Sensor (RPS) |
| Air Conditioning Pressure Sensor (APT) | ||
| Boost Pressure Sensor (BPS) | ||
| 88 | Sensor Power Supply (+5V) | Throttle Position Sensor (TPS) No. 1, 2 [ETC Module] |
| 89 | Heated Oxygen Sensor (HO2S) [Bank 1 / Sensor 1] Heater Control Output | Heated Oxygen Sensor (HO2S) [Bank 1/Sensor 1] |
| 90 | - | |
| 91 | Heated Oxygen Sensor (HO2S) [Bank 1 / Sensor 2] Heater Control Output | Heated Oxygen Sensor (HO2S) [Bank 1/Sensor 2] |
| 92 | - | |
| 93 | - | |
| 94 | Purge Control Solenoid Valve (PCSV) Control Output | Purge Control Solenoid Valve (PCSV) |
Repair Procedures
Removal and Installation
Turn the ignition switch OFF and disconnect the negative (-) battery terminal.
Remove the battery.
(Refer to Engine Electrical System - Battery)
Disconnect the ECM connector (A).
Remove the mounting bolts and nuts, then remove the ECM bracket assembly (B).
Tightening Torque: 9.8–11.8 N·m
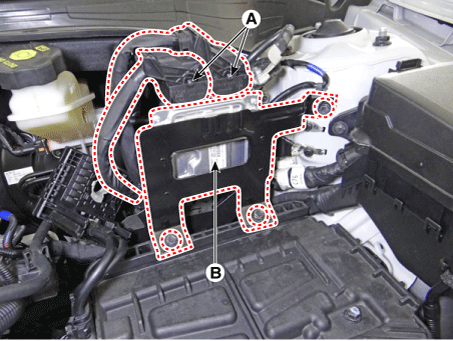
Remove the ECM (B) by loosening the mounting nuts (A) on the bracket.
Tightening Torque: 9.8–11.8 N·m
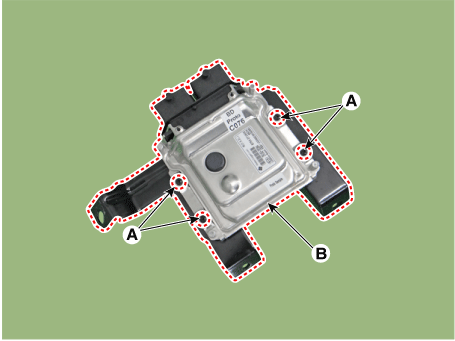
Install in the reverse order of removal.
ECM Circuit Inspection Procedure
ECM GROUND CIRCUIT INSPECTION: Measure the resistance between the ECM and the chassis ground, using the rear side of the ECM harness connector as the ECM-side check point. If a problem is found, repair it.
Specification: Below 1 Ω
ECM CONNECTOR INSPECTION: Disconnect the ECM connector and visually inspect the ground terminals on the ECM side and the harness side for bent pins or poor contact pressure. If a problem is found, repair it.
If no problem is found in Steps 1 and 2, the ECM may be faulty. Before replacing the ECM with a new one, make sure there are no DTCs, then re-check the vehicle. If DTCs are present, troubleshoot them first before replacing the ECM.
RECHECK THE ORIGINAL ECM: Install the original ECM (which may be faulty) into a known good vehicle and check the vehicle. If the problem recurs, replace the original ECM with a new one. If the problem does not occur, it is an intermittent problem (refer to "Intermittent Problem Inspection Procedure" in the Basic Inspection Procedure section).
Adjustment
ECM Neutral Mode Procedure (with Immobilizer)
After replacing the ECM on a vehicle with an immobilizer system, the following procedure must be performed.
[When Installing Used ECM] |
Perform the "ECM Neutral Mode" procedure using the KDS.
(Refer to Body Electrical System - "Smart Key System")
After completing "ECM Neutral Mode", perform the "Key Learning" procedure using the KDS.
(Refer to Body Electrical System - "Electronic Key")
[When Installing New ECM] Perform the "Key Learning" procedure using the KDS. (Refer to Body Electrical System - "Electronic Key") |
ECM Neutral Mode Procedure (with Smart Key)
After replacing the ECM on a vehicle with a smart key system (push button start), the following procedure must be performed.
[When Installing Used ECM] |
Perform the "ECM Neutral Mode" procedure using the KDS.
(Refer to Body Electrical System - "Smart Key System")
After completing "ECM Neutral Mode", turn the ignition on, then off, using the smart key or start button. The ECM will then automatically receive the smart key information.
(Refer to Body Electrical System - "Electronic Key")
[When Installing New ECM] Turn the ignition on, then off, using the smart key or start button. The ECM will then automatically receive the smart key information. (Refer to Body Electrical System - "Electronic Key") |
ETC Module Learning Procedure
Perform the ETC module learning procedure after replacing the ETC module.
(Refer to Electronic Throttle Control System - "Adjustment")
VIN Programming Procedure
The VIN (Vehicle Identification Number) is a number that contains vehicle information (manufacturer, vehicle type, model line/series, body type, engine type, transmission type, model year, plant location, etc. For more information, refer to the "GI" group in this manual). When replacing the ECM, the VIN must be programmed into the ECM. If the VIN is missing from the ECM memory, DTC P0630 is set.
Turn the ignition off.
Connect the KDS to the Data Link Connector (DLC).
Turn the ignition on.
Select "Vehicle, Model Year, Engine, System".
Select "Vehicle Software Management".
Select "Write VIN".
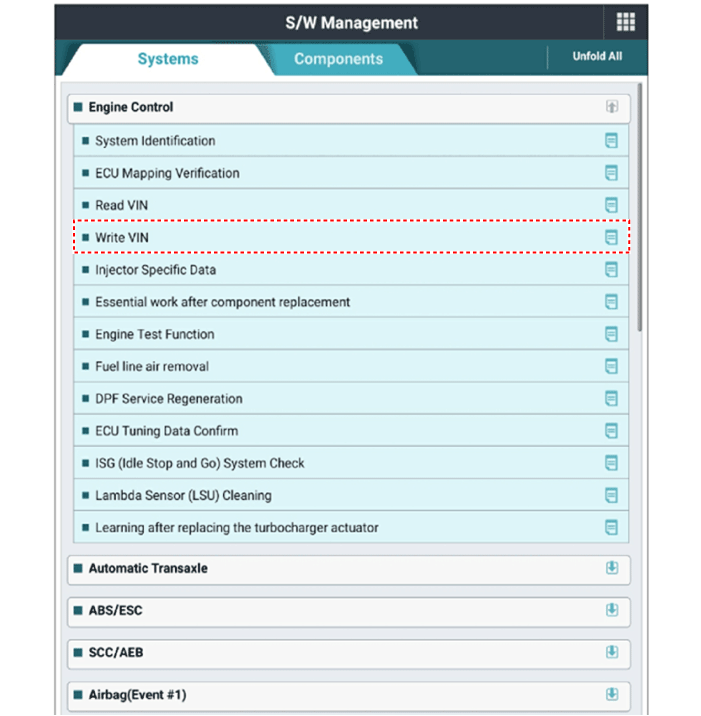
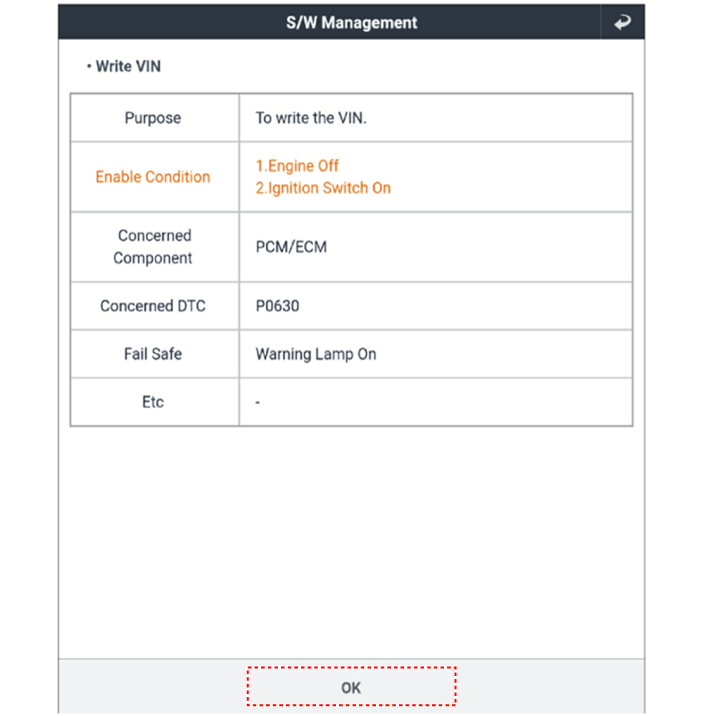
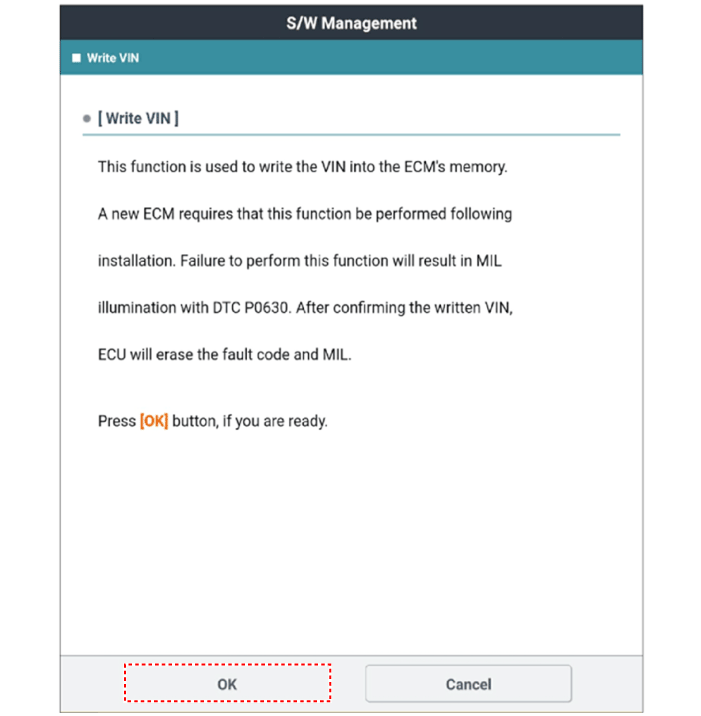
Test yourself
A quick Kia Forte BD quiz: every answer comes with an explanation and a link to the manual page.