HomeLink Universal Transceiver
- Basic information
- Programming HomeLink
- Programming HomeLink for Canadian customers and gate openers
Basic information Nissan Ariya
The HomeLink Universal Transceiver provides a convenient way to consolidate the functions of up to three individual handheld transmitters into one built-in device.
HomeLink Universal Transceiver:
- Will operate most Radio Frequency (RF) devices such as garage doors, gates, home and office lighting, entry door locks and security systems.
- Is powered by your vehicle's battery.
No separate batteries are required. If the vehicle's battery is discharged or is disconnected, HomeLink will retain all programming.
When the HomeLink Universal Transceiver is programmed, retain the original transmitter for future programming procedures (Example: new vehicle purchases).
Upon sale of the vehicle, the programmed HomeLink Universal Transceiver buttons should be erased for security purposes. For additional information, refer to "Programming HomeLink".
WARNING
- Your vehicle's EV system should be turned off while programming the HomeLink Universal Transceiver.
- Do not use the HomeLink Universal Transceiver with any garage door opener that lacks safety stop and reverse features as required by federal safety standards. (These standards became effective for opener models manufactured after April 1, 1982.) A garage door opener which cannot detect an object in the path of a closing garage door and then automatically stop and reverse, does not meet current federal safety standards. Using a garage door opener without these features increases the risk of serious injury or death.
- During the programming procedure your garage door or security gate will open and close (if the transmitter is within range). Make sure that people or objects are clear of the garage door, gate, etc. that you are programming.
Programming HomeLink Nissan Ariya 2023
The following steps show generic instructions how to program a HomeLink button.
If you have any questions or are having difficulty programming your HomeLink buttons, refer to the Home- Link web site at: www.homelink.com/nissan or call 1-800-355-3515.
NOTE
It is also recommended that a new battery be placed in the hand-held transmitter of the device being programmed to HomeLink for quicker programming and accurate transmission of the radiofrequency.
1. Position the end of your hand-held transmitter 1-3 in (26-76 mm) away from the HomeLink surface, keeping the HomeLink indicator light in view.

2. Using both hands, simultaneously press and hold the desired HomeLink button and handheld transmitter button. DO NOT release until the HomeLink indicator light 1 flashes slowly and then rapidly. When the indicator light flashes rapidly, both buttons may be released. (The rapid flashing indicates successful programming.)
NOTE
Some devices to be programmed may require you to replace Step 2 with the cycling procedure noted in the "Programming HomeLink for Canadian customers and gate openers".
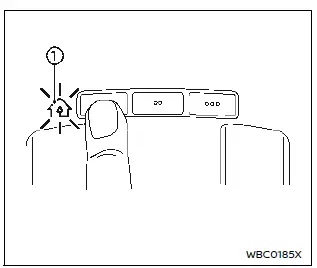
3. Press and hold the programmed HomeLink button and observe the indicator light.
- If the indicator light 1 is solid/ continuous, programming is complete and your device should activate when the HomeLink button is pressed and released.
- If the indicator light 1 blinks rapidly for two seconds and then turns to a solid/continuous light, continue with Steps 4-6 for a rolling code device. A second person may make the following steps easier. Use a ladder or other device. Do not stand on your vehicle to perform the next steps.
4. At the receiver located on the garage door opener motor in the garage, locate the "learn" or "smart" button (the name and color of the button may vary by manufacturer but it is usually located near where the hanging antenna wire is attached to the unit). If there is difficulty locating the button, reference the garage door opener's manual.
5. Press and release the "learn" or "smart" button.
NOTE
Once the button is pressed, you have approximately 30 seconds to initiate the next step.
6. Return to the vehicle and firmly press and hold the programmed HomeLink button for two seconds and release.
Repeat the "press/hold/release" sequence up to 3 times to complete the programming process. HomeLink should now activate your rolling code equipped device.
7. If you have any questions or are having difficulty programming your Home- Link buttons, refer to the HomeLink web site at: www.homelink.com/ nissan or call 1-800-355-3515.
Programming HomeLink for Canadian customers and gate openers Nissan Ariya
Canadian radio-frequency laws require transmitter signals to "time-out" (or quit) after several seconds of transmission - which may not be long enough for Home- Link to pick up the signal during programming.
Similar to this Canadian law, some U.S. gate operators are designed to "time-out" in the same manner.
If you live in Canada or you are having difficulties programming a gate operator or garage door opener by using the "Programming HomeLink" procedures, replace "Programming HomeLink" Step 2 with the following:
NOTE
When programming a garage door opener, etc., unplug the device during the "cycling" process to prevent possible damage to the garage door opener components.
Step 2: Using both hands, simultaneously press and hold the desired HomeLink button and the hand-held transmitter button. During programming, your handheld transmitter may automatically stop transmitting. Continue to press and hold the desired HomeLink button while you press and re-press ("cycle") your handheld transmitter every two seconds until the frequency signal has been learned.
The HomeLink indicator light will flash slowly and then rapidly after several seconds upon successful programming. DO NOT release until the HomeLink indicator light flashes slowly and then rapidly.
When the indicator light flashes rapidly, both buttons may be released. The rapid flashing indicates successful programming.
Proceed with "Programming HomeLink" step 3 to complete.
Remember to plug the device back in when programming is completed.
Operating the HomeLink Universal Transceiver
The HomeLink Universal Transceiver, after it is programmed, can be used to activate the programmed device. To operate, simply press and release the appropriate programmed HomeLink Universal Transceiver button. The amber indicator light will illuminate while the signal is being transmitted.
For convenience, the hand-held transmitter of the device may also be used at any time.
Programming troubleshooting
If the HomeLink does not quickly learn the hand-held transmitter information:
- replace the hand-held transmitter batteries with new batteries.
- position the hand-held transmitter with its battery area facing away from the HomeLink surface.
- press and hold both the HomeLink and hand-held transmitter buttons without interruption.
- position the hand-held transmitter 1-3 in (26-76 mm) away from the HomeLink surface. Hold the transmitter in that position for up to 15 seconds. If HomeLink is not programmed within that time, try holding the transmitter in another position - keeping the indicator light in view at all times.
If you have any questions or are having difficulty programming your HomeLink buttons, refer to the HomeLink web site at: www.homelink.com/nissan or 1-800- 355-3515.
Clearing the programmed information
Basic information
The following procedure clears the programmed information from both buttons.
Individual buttons cannot be cleared.
However, individual buttons can be reprogrammed, see "Reprogramming a single HomeLink button".
To clear all programming
1. Press and hold the two outer Home- Link buttons until the indicator light begins to flash in approximately 10 seconds. Do not hold for longer than 20 seconds.
2. Release both buttons.
HomeLink is now in the programming mode and can be programmed at any time beginning with "Programming HomeLink" - Step 1.
Reprogramming a single HomeLink button
To reprogram a HomeLink Universal Transceiver button, complete the following.
1. Press and hold the desired HomeLink button. Do not release the button.
2. The indicator light will begin to flash after 20 seconds. Without releasing the HomeLink button, proceed with "Programming HomeLink" - Step 1.
For questions or comments, contact HomeLink at: www.homelink.com/nissan or 1-800-355-3515.
The HomeLink Universal Transceiver button has now been reprogrammed. The new device can be activated by pushing the HomeLink button that was just programmed.
This procedure will not affect any other programmed HomeLink buttons.
If your vehicle is stolen
If your vehicle is stolen, you should change the codes of any non-rolling code device that has been programmed into HomeLink. Consult the Owner's Manual of each device or call the manufacturer or dealer of those devices for additional information.
When your vehicle is recovered, you will need to reprogram the HomeLink Universal Transceiver with your new transmitter information.
NOTE
FCC Notice:
For USA:
This device complies with Part 15 of the FCC Rules. Operation is subject to the following two conditions: (1) this device may not cause harmful interference, and (2) this device must accept any interference received, including interference that may cause undesired operation.
NOTE
Changes or modifications not expressly approved by the party responsible for compliance could void the user's authority to operate the equipment.
For Canada:
This device contains licence-exempt transmitter(s)/receiver(s) that comply with Innovation, Science and Economic Development Canada's licence-exempt RSS(s). Operation is subject to the following two conditions: (1) This device may not cause interference. (2) This device must accept any interference, including interference that may cause undesired operation of the device.