Power outlets
Basic information
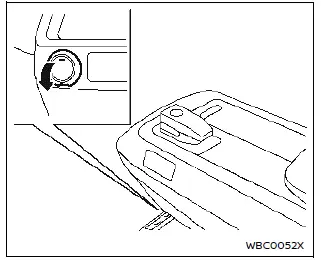
The power outlet is located in the front lower part of the center console.
CAUTION
- The outlet and plug may be hot during or immediately after use.
- Do not use with accessories that exceed a 12 volt, 120W (10A) power draw. Do not use double adapters or more than one electrical accessory.
- Use power outlet with the power switch in the ON or READY to drive position to avoid discharging the 12-volt battery.
- Avoid using power outlet when the air conditioner, headlights or rear window defroster is on.
- Push the plug in as far as it will go.
If good contact is not made, the plug may overheat.
- Before inserting or disconnecting a plug, be sure the electrical accessory being used is turned OFF.
- When not in use, be sure to close the cap. Do not allow water or any liquid to contact the outlet.
USB (Universal Serial Bus) charging connector
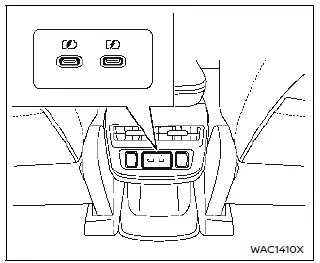
The USB charging connector is located on the back of the center console box.
The USB charging connector can be used only for charging an external device.
Connect a USB device into the connector.
Charging will start automatically (maximum output up to 5 volt, 15W, 3A).
The external device will be charged continuously while the power switch is in the ON position.
Some mobile devices cannot be charged depending on their specifications.
NOTE
For best results, it is recommended to use the manufacturer cables, which are sold separately.
CAUTION
- Do not force a USB device into the connector. Inserting the USB device tilted into the connector may damage the connector. Make sure that the USB device is connected correctly into the connector.
Wireless charger
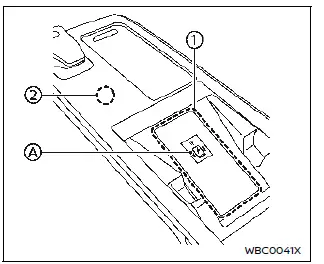
- Charging pad
- Indicator
Basic information
The wireless charger is located in the center console box. Lay the smartphone on the pad of the wireless charger. Charging will start automatically. The smartphone will be charged continuously while the power switch is in the ON position.
WARNING
- Never put metallic materials such as coins between the wireless charger and a smartphone.
- Those who use an implantable pacemaker or other medical equipment should contact the electric medical equipment manufacturer for the possible influences before use.
- Never put cloth over the smartphone during charging process.
- Never charge a smartphone when it is wet.
- While charging, never put metallic materials or small goods such as a Intelligent Key or memory drive.
CAUTION
- Do not put an RFID/NFC/credit card between the wireless charger and a smartphone. This could cause data corruption in the card.
- Do not use the wireless charger with dust accumulated or dirt on the pad.
- Do not hit the surface of the wireless charger.
- Do not spill liquid (water, drinks, etc.) on the charging pad.
- Do not use grease, oil or alcohol for cleaning charging pad.
Wireless charger Indicator
The indicator  will illuminate in orange when the charging process is started.
When the charging has completed, the indicator illuminates in green.
If a malfunction occurs or the charging process has stopped, the indicator will blink in orange for 8 seconds then turn off.
Operation of the wireless charger
To use the wireless charger, it is necessary to properly position the smartphone on the charging pad with the screen facing up. To maximize charging performance, ensure the smartphone is fully seated on the center of the charging pad over the "Qi" logo . Because the location of the power receiver may vary depending on the smartphone, you will need to try and find the area that suits your smartphone.
Remove the smartphone case or accessories before charging, as they may affect charging capability.
NOTE
- Only a Qi compatible smartphone can be used.
- The charging may not be possible depending on the smartphone type.
Please refer to your smartphone's instruction manual for details.
- Smartphones that are too large to be placed on the charging pad cannot be charged.
- Smartphones that are smaller than 5.5 x 2.7 in (139 x 69 mm) may not be charged. If a smartphone smaller than the above size is placed in a corner and cannot be charged, reposition the smartphone to the center of the charging pad.
- Never put a magnetic card between the charging pad and a smartphone.
Also, never put a credit card, magnetic recording medium, etc.
near the charging pad. The recorded data may be damaged.
- The charging pad can be used as a storage space while a Qi compatible smartphone is not placed.
- If the smartphone moves out of the charging pad, place the smartphone back on the [Qi] logo.
- Turn off the vibration function of the smartphone before wireless charging.
- If you charge your smartphone while using apps or immediately after using apps, the smartphone or the wireless charger may be warmed during charging process and the charging may stop by the protection function of the smartphone or the wireless charger. This is not a malfunction. If this occurs, restart charging after the smartphone or the wireless charger cooled down.
The indicator will blink in orange then turn off.
- The wireless charging process may be stopped by the status of the smartphone (battery temperature, etc.).
- If a radio noise interference occurs during charging process, put the smartphone onto the center ( logo) position of the wireless charger again.
- The wireless charging process will stop during process of searching the Intelligent Key.
- The wireless charging process will not be started when a USB (Universal Serial Bus) cable is connected to the smartphone. The indicator may illuminate in orange or blink if the smartphone is put on the wireless charger with a USB cable connected.
However, charging is not performed.
- Depending on the type of the smartphone, the indicator may remain illuminated in orange even when the charging process has been completed.
- When putting only metallic materials or key (Intelligent Key) on the charging pad, the indicator may illuminate for a short period of time. The wireless charging process is not operated.
FCC Notice:
For USA:
This device complies with Part 15 of the FCC Rules. Operation is subject to the following two conditions: (1) this device may not cause harmful interference, and (2) this device must accept any interference received, including interference that may cause undesired operation.
NOTE
Changes or modifications not expressly approved by the party responsible for compliance could void the user's authority to operate the equipment.
For Canada:
This device contains licence-exempt transmitter(s)/receiver(s) that comply with Innovation, Science and Economic Development Canada's licence-exempt RSS(s). Operation is subject to the following two conditions: (1) This device may not cause interference. (2) This device must accept any interference, including interference that may cause undesired operation of the device.