Child restraint system compatibility for each seating position

In this manual: Child restraint system compatibility for each seating position
Main Owner's Manual — 1Event data recorder — 1Exterior — 1Instrument panel (left-hand drive vehicles) — 1Switches (left-hand drive vehicles) — 1Interior (left-hand drive vehicles) — 1Instrument panel (right-hand drive vehicles) — 1Switches (right-hand drive vehicles) — 1Interior (right-hand drive vehicles) — 1For safe use — 1Before driving — 1For safe driving — 1Seat belts — 1Correct use of the seat belts — 1SRS airbags — 1Exhaust gas precautions — 1Child safety — 1Airbag manual on-off system — 1Riding with children — 1Child restraint systems — 1Child restraint system compatibility for each seating position — 1Child restraint system installation method — 1Child restraint system fixed with an ISOFIX lower anchorage — 1Emergency assistance — 1Hybrid system — 1Hybrid system features — 1Acoustic vehicle alerting system — 1Hybrid system precautions — 1Hybrid battery (traction battery) air intake vent — 1Theft deterrent system — 1Immobilizer system — 1Double locking system — 1Alarm — 1Warning lights and indicators — 1Warning lights — 1Indicators — 1Gauges and meters (7-inch display) — 1Meter display — 1Adjusting the clock — 1Gauges and meters (12.3-inch display) — 1Meter display — 1Adjusting the clock — 1Multi-information display(7-inch display) — 1Display contents — 1Changing the meter display — 1Driving support system information display — 1Settings display — 1Multi-information display(12.3-inch display) — 1Display contents — 1Changing the meter display — 1Fuel Economy — 1EV drive time ratio — 1Settings display — 1Head-up display — 1System components — 1Using the head-up display — 1Pop-up display — 1Energy monitor/consumption screen — 1Key information — 1Keys — 1Digital key — 1Opening, closing and lockingthe doors — 1Side doors — 1Unlocking and locking the doors from the inside — 1Back door — 1Unlocking and locking the back door from the outside — 1Opening/closing the back door (vehicles with power back door) — 1Changing settings of the power back door system (vehicles with power back door) — 1Smart entry & start system — 1Adjusting the seats — 1Front seats — 1Rear seats — 1Head restraints — 1Adjusting the steering wheeland mirrors — 1Steering wheel — 1Inside rear view mirror — 1Digital Rear-view Mirror — 1Adjusting the mirror — 1Cleaning the Digital Rear-view Mirror — 1Outside rear view mirrors — 1Opening and closing the windows — 1Favorite settings — 1Driving position memory — 1Registering/canceling/recalling a driving position to an electronic key (memory recall function) — 1My Settings — 1Before driving — 1Driving the vehicle — 1Cargo and luggage — 1Trailer towing — 1Driving procedures — 1Power (ignition) switch — 1EV drive mode — 1Transmission — 1Turn signal lever — 1Parking brake — 1Brake Hold — 1Operating the lights and wipers — 1Headlight switch — 1AHS (Adaptive High-beam System) — 1AHB (Automatic High Beam) — 1Fog light switch — 1Windshield wipers and washer — 1Refueling — 1Using the driving supportsystems — 1Toyota Safety Sense software update — 1Toyota Safety Sense — 1Sensors used by Toyota Safety Sense — 1Situations in which the sensors may not operate properly — 1Driver monitor — 1PCS (Pre-Collision System) — 1Operating conditions of each function of the pre-collision system — 1Situations in which the system may not operate properly — 1LTA (Lane Tracing Assist) — 1Enabling/disabling the system — 1LCA (Lane Change Assist) — 1Operating the LCA — 1LDA (Lane Departure Alert) — 1Changing LDA settings — 1PDA (Proactive driving assist) — 1FCTA (Front crossing traffic alert) — 1RSA (Road Sign Assist) — 1Types of road signs supported — 1Dynamic radar cruise control — 1Using the dynamic radar cruise control — 1Approach warning — 1Cruise control — 1Speed limiter — 1Emergency Driving Stop System — 1BSM (Blind Spot Monitor) — 1Blind Spot Monitor operation — 1Automatic Rear Flashing Hazard Lights — 1Secondary Collision Brake (Rear Impacts while Stopped) — 1Safe Exit Assist — 1Safe exit assist operation — 1Toyota parking assist-sensor — 1Sensor detection display, object distance — 1Toyota parking assist-sensor object warning function (vehicles with Advanced Park) — 1RCTA (Rear Crossing Traffic Alert) function — 1RCTA function — 1RCD (Rear Camera Detection) — 1When a pedestrian is detected — 1PKSB (Parking Support Brake) — 1System overview — 1Parking Support Brake function (static objects front and rear of the vehicle/static objects around the vehicle) — 1Types of sensors — 1Parking Support Brake function (moving vehicles rear of the vehicle) — 1Parking Support Brake function (pedestrians rear of the vehicle) — 1Toyota Teammate Advanced Park — 1Types of cameras and sensors used for the Advanced Park — 1Advanced Park guidance screens — 1Perpendicular parking (forward/reverse) function — 1Advanced Park perpendicular exiting (forward/reverse) function — 1Advanced Park Parallel parking function — 1Advanced Park parallel exiting function — 1Advanced Park memory function — 1Remote control function (if equipped) — 1Advanced Park cancelation/ suspension — 1Changing the Advanced Park settings — 1Driving mode select switch — 1GPF (Gasoline Particulate Filter) system — 1Driving assist systems — 1Driving tips — 1Hybrid electric vehicle driving tips — 1Winter driving tips — 1Selecting tire chains — 1Using the air conditioningsystem and defogger — 1Automatic air conditioning system — 1Air outlet layout and operations — 1Heated steering wheel/seat heaters — 1Using the interior lights — 1Using the storage features — 1List of storage features — 1Luggage compartment features — 1Other interior features — 1Power outlet — 1USB Type-C charging port — 1Wireless charger — 1Sun visors — 1Cleaning and protecting the vehicle exterior — 1Cleaning and protecting the vehicle interior — 1Maintenance requirements — 1Do-it-yourself service precautions — 1Hood — 1Positioning a floor jack — 1Engine compartment — 1Components — 1Checking the engine oil — 1Adding engine oil — 1Checking the coolant — 112-volt battery (2ZR-FXE engine) — 112-volt battery (M20A-FXS engine) — 1Tires — 1Checking tires — 1Tire rotation — 1Installing tire pressure warning valves and transmitters — 1Registering ID codes — 1Selecting wheel set — 1Tire inflation pressure — 1Wheels — 1Air conditioning filter — 1Cleaning the hybrid battery (traction battery) air intake vent — 1Electronic key battery — 1Checking and replacing fuses — 1Light bulbs — 1Essential information — 1Emergency flashers — 1If your vehicle has to be stopped in an emergency — 1If the vehicle is submerged or water on the road is rising — 1Steps to take in an emergency — 1If your vehicle needs to be towed — 1Emergency towing procedure — 1If you think something is wrong — 1If a warning light turns on or a warning buzzer sounds — 1If a warning message is displayed — 1If you have a flat tire (vehicles with an emergency tire puncture repair kit) — 1Location of the emergency tire puncture repair kit and tools — 1Taking out the emergency tire puncture repair kit — 1If you have a flat tire (vehicles with a spare tire) — 1Installing the spare tire — 1If the hybrid system will not start — 1If the electronic key does not operate properly — 1If the 12-volt battery is discharged — 1If your vehicle overheats — 1If the vehicle becomes stuck — 1Specifications — 1Maintenance data (fuel, oil level, etc.) — 1Fuel information — 1Customization — 1
4steps
~24min
2/5difficulty
Done 0 of 4

■ Child restraint system compatibility for each seating position

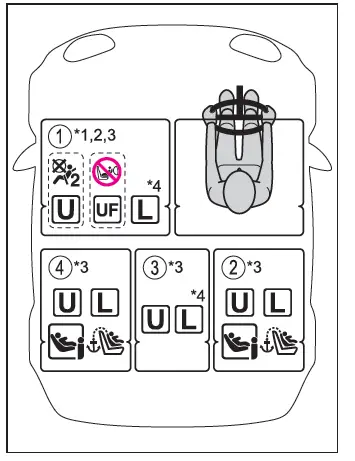
Compatibility of each seating position with child restraint systems displays the type of child restraint systems that can be used and possible seating positions for installation using symbols.

Also, the recommended child restraint system that is suitable for your child can be selected.

Otherwise, check [Recommended child restraint systems information] for recommended child restraint systems.

Check the selected child restraint system together with the following [Before confirming the compatibility of each seating position with child restraint systems].

■ Before confirming the compatibility of each seating position with child restraint systems

1. Checking the child restraint system standards.

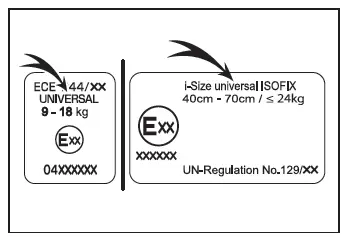
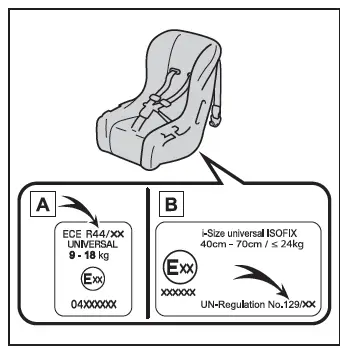
Use a child restraint system that conforms to UN (ECE) R44*1 or UN (ECE) R129*1, 2.

The following approval mark is displayed on child restraint systems which are conformed.

Check for an approval mark attached to the child restraint system.
Toyota C-HR. Child restraint systems

Example of the displayed regulation number

  1. UN (ECE) R44 approval mark*3
    The weight range of the child who is applicable for an UN (ECE) R44 approval mark is indicated.
  2. UN (ECE) R129 approval mark*3
    The height range of the child who is applicable as well as available weights for an UN (ECE) R129 approval mark is indicated.

2. Checking the category of the child restraint system.

Check the approval mark of the child restraint system for which of the following categories the child restraint system is suitable.

Also, if there are any uncertainties, check the user's guide included with the child restraint system or contact the retailer of the child restraint system.

  • "universal"
  • "semi-universal"
  • "restricted"
  • "vehicle specific"
Toyota C-HR. Child restraint systems

*1: UN (ECE) R44 and UN (ECE) R129 are U.N. regulations for child restraint systems.

*2: The child restraint systems mentioned in the table may not be available outside of the EU area.

*3: The displayed mark may differ depending on the product.

■ Compatibility of each seating position with child restraint systems

Left-hand drive vehicles

Toyota C-HR. Child restraint systems

Right-hand drive vehicles

Toyota C-HR. Child restraint systems

Deactivation of front passenger airbag.

Activation of front passenger airbag. Never use a rearward-facing child restraint system on the front passenger seat when the airbag manual on-off switch is on.

Suitable for "universal" category child restraint system fixed with the seat belt.

Suitable for forward-facing "universal" category child restraint system fixed with the seat belt.

Suitable for recommended child restraint systems given on recommended child restraint systems information.

Suitable for i-Size and ISOFIX child restraint system.

Includes a top tether anchorage point.

*1: Move the front seat fully rearward. If the passenger seat height can be adjusted, move it to the upper most position.

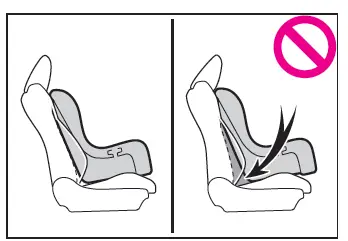
*2: Adjust the seatback angle to the most upright position. When installing a forward-facing child seat, if there is a gap between the child seat and the seatback, adjust the seatback angle until good contact is achieved.
Toyota C-HR. Child restraint systems

*3: If the head restraint interferes with your child restraint system, and the head restraint can be removed, remove the head restraint.

Otherwise, put the head restraint in the upper most position.

*4: Applicable for KIDFIX i-Size only.

When securing some types of child restraint systems in rear seat, it may not be possible to properly use the seat belts in positions next to the child restraint without interfering with it or affecting seat belt effectiveness.

Be sure your seat belt fits snugly across your shoulder and low on your hips. If it does not, or if it interferes with the child restraint, move to a different position. Failure to do so may result in death or serious injury.

  • When installing a child restraint in the rear seats, adjust the front seat so that it does not interfere with the child or child restraint system.
  • When installing a child seat with support base, if the child seat interferes with the seatback when latching it into the support base, adjust the seatback rearward until there is no interference.
  • If the seat belt shoulder anchor is ahead of the child seat belt guide, move the seat cushion forward.
Toyota C-HR. Child restraint systems
  • When installing a junior seat, if the child in your child restraint system is in a very upright position, adjust the seatback angle to the most comfortable position.

    And if the seat belt shoulder anchor is ahead of the child seat belt guide, move the seat cushion forward.

■ Detail information for child restraint systems installation
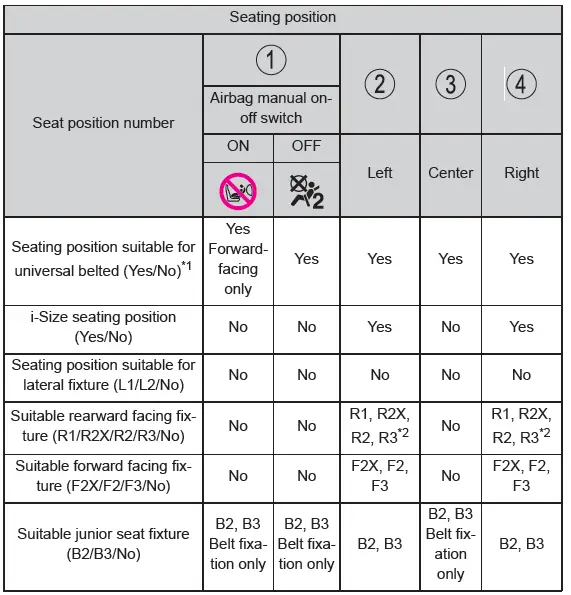
Toyota C-HR. Child restraint systems

*1: All universal categories (group 0, 0+, I, II and III).

*2: Before installing a child restraint system to this seat, adjust the position of the front passenger's seat to between the 1st lock position and 10th lock position (18th lock position from the rear).

Toyota C-HR. Child restraint systems
  1. 1st lock position
  2. 10th lock position

Toyota suggests the users to use 2 and 4 seating positions.

ISOFIX child restraint systems are divided into different "fixture". The child restraint system can be used in the seating positions for "fixture" mentioned in the table above. For kind of "fixture" relation, confirm the following table.

If your child restraint system has no kind of "fixture" (or if you cannot find information in the table below), please refer to the child restraint system "vehicle list" for compatibility information or ask the retailer of your child seat.

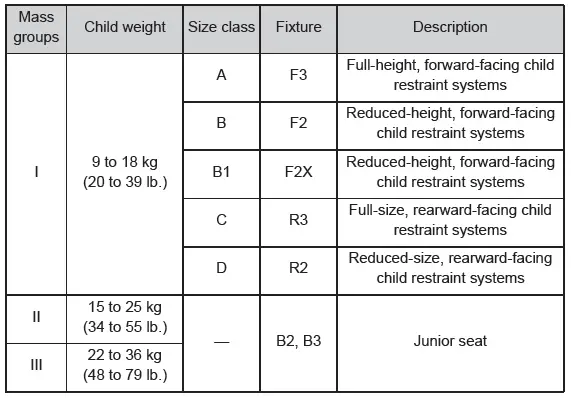
Toyota C-HR. Child restraint systems

■ Recommended child restraint systems information
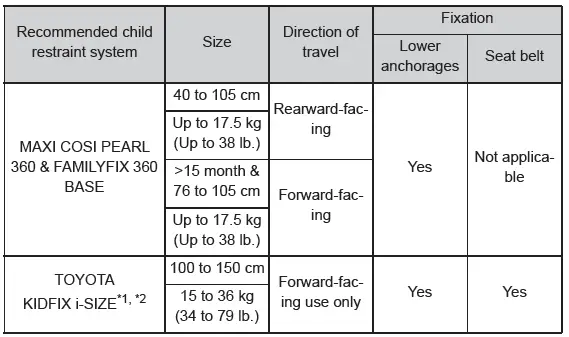
Toyota C-HR. Child restraint systems

*1: Be sure to attach the seat belt through the SecureGuard.

*2: TOYOTA recommends to use with lower anchorages.

The child restraint systems mentioned in the table may not be available outside the EU countries and United Kingdom.

  • When using the child restraint system with SecureGuard, be sure to guide the lap belt into SecureGuard A as shown in the illustration.
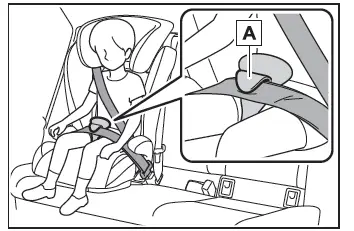
Toyota C-HR. Child restraint systems