The security indicator does not flash.
DESCRIPTION
The transponder key ECU assembly flashes the security indicator when the immobiliser system is activated.
WIRING DIAGRAM
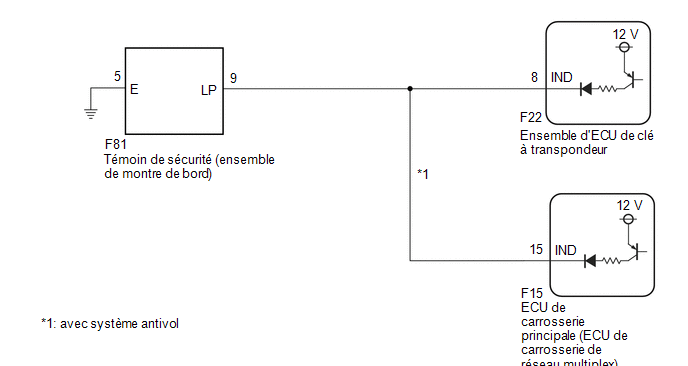
PRECAUTION / NOTICE / HINT
NOTICE:
When replacing the transponder key ECU assembly, refer to the Registration section.
Click here
PROCEDURE
SYSTEM CHECK
(a) Check the vehicle specifications.
Result:
Result | Proceed to |
|---|---|
Without theft deterrent system |
A |
With theft deterrent system |
B |
| B |  |
GO TO STEP 5 |
|

PERFORM ACTIVE TEST USING TECHSTREAM (SECURITY INDICATOR)
(a) Connect the Techstream to the DLC3.
(b) Turn the ignition switch to ON.
(c) Turn on the Techstream.
(d) Select the following menus: Body Electrical / Immobiliser / Active Test.
(e) Perform the Active Test by following the Techstream instructions.
Body Electrical > Immobiliser > Active TestTester display | Item | Control Range | Diagnostic Note |
|---|---|---|---|
Security Indicator |
Immobilizer Indicator |
ON / OFF |
- |
Security Indicator
OK:
The security indicator can be turned ON and OFF using the Techstream.
| OK | |
REPLACE TRANSPONDER KEY ECU ASSEMBLY |
|
CHECK HARNESS AND CONNECTOR (TRANSPONDER KEY ECU ASSEMBLY - SECURITY INDICATOR AND BODY GROUND)
(a) Disconnect connector F22 from the transponder key ECU assembly.
(b) Disconnect the F81 connector from the security indicator.
(c) Measure the resistance according to the value(s) in the table below.
Standard resistance:
Tester Connection | Condition | Specified Condition |
|---|---|---|
F81-9 (LP) - F22-8 (IND) |
Always |
Below 1 Ω |
F81-9 (LP) - Body ground |
Always |
10 kΩ minimum |
F22-8 (IND) - Body ground |
Always |
10 kΩ minimum |
F81-5 (E) - Body ground |
Always |
Below 1 Ω |
| NG | |
REPAIR OR REPLACE HARNESS OR CONNECTOR |
|
CHECK TRANSPONDER KEY ECU ASSEMBLY (IND TERMINAL)
(a) Connect the F22 connector of the transponder key ECU assembly.
(b) Measure the voltage according to the value(s) in the table below.
Standard voltage:
Tester Connection | Condition | Specified Condition |
|---|---|---|
F81-9 (LP) - Body ground |
No key in ignition key cylinder |
Pulse generation |
Key in ignition key cylinder |
Below 1 V |
| OK | |
REPLACE SECURITY INDICATOR (COMBINATION METER ASSEMBLY) |
| NG | |
REPLACE TRANSPONDER KEY ECU ASSEMBLY |
PERFORM ACTIVE TEST USING TECHSTREAM (SECURITY INDICATOR)
(a) Connect the Techstream to the DLC3.
(b) Turn the ignition switch to ON.
(c) Turn on the Techstream.
(d) Select the following menus: Body Electrical / Immobiliser or Main Body / Active Test.
(e) Perform the Active Test by following the Techstream instructions.
Body Electrical > Immobiliser > Active TestTester display | Item | Control Range | Diagnostic Note |
|---|---|---|---|
Security Indicator |
Immobilizer Indicator |
ON / OFF |
- |
Security Indicator
Body Electrical > Main Body > Active TestTester display | Item | Control Range | Diagnostic Note |
|---|---|---|---|
Security Indicator |
Immobilizer Indicator |
ON / OFF |
- |
Security Indicator
Result:
Result | Proceed to |
|---|---|
Security indicator operates normally when performing the Active Test of "Main Body" and "Immobiliser" |
A |
|
B |
|
C |
Security indicator operates normally when performing the Active Test of "Main Body" and "Immobiliser" |
D |
| B | |
GO TO STEP 7 |
| C | |
GO TO STEP 8 |
| D | |
GO TO STEP 9 |
|
INSPECT SECURITY INDICATOR OPERATION
(a) When the immobiliser system is activated, check that the security indicator comes on.*1
OK:
The security indicator comes on normally.
(b) When the theft deterrent system is in the arming standby state, check that the security indicator is on.*2
Click here
OK:
The security indicator is on.
Result:
Result | Proceed to |
|---|---|
*1 and *2 are OK |
A |
*1 is NG (*2 is OK) |
B |
*2 is NG (*1 is OK) |
C |
*1 and *2 are NG |
D |
| A | |
USE SIMULATION METHOD TO CHECK |
| B | |
REPLACE TRANSPONDER KEY ECU ASSEMBLY |
| C | |
REPLACE MAIN BODY ECU (MULTIPLEX NETWORK BODY ECU) |
| D | |
REPLACE SECURITY INDICATOR (COMBINATION METER ASSEMBLY) |
CHECK HARNESS AND CONNECTOR (SECURITY INDICATOR - TRANSPONDER KEY ECU ASSEMBLY)
(a) Disconnect the F81 connector from the security indicator.
(b) Disconnect the F22 transponder key ECU assembly connector.
(c) Measure the resistance according to the value(s) in the table below.
Standard resistance:
Tester Connection | Condition | Specified Condition |
|---|---|---|
F22-8 (IND) - F81-9 (LP) |
Always |
Below 1 Ω |
F22-8 (IND) - Body ground |
Always |
10 kΩ minimum |
F81-9 (LP) - Body ground |
Always |
10 kΩ minimum |
| OK | |
REPLACE TRANSPONDER KEY ECU ASSEMBLY |
| NG | |
REPAIR OR REPLACE HARNESS OR CONNECTOR |
CHECK HARNESS AND CONNECTOR (SECURITY INDICATOR - MAIN BODY ECU)
(a) Disconnect the F81 connector from the security indicator.
(b) Disconnect the F15 connector from the main body ECU (multiplex network body ECU).
(c) Measure the resistance according to the value(s) in the table below.
Standard resistance:
Tester Connection | Condition | Specified Condition |
|---|---|---|
F15-15 (IND) - F81-9 (LP) |
Always |
Below 1 Ω |
F15-15 (IND) - Body ground |
Always |
10 kΩ minimum |
F81-9 (LP) - Body ground |
Always |
10 kΩ minimum |
| OK | |
REPLACE MAIN BODY ECU (MULTIPLEX NETWORK BODY ECU) |
| NG | |
REPAIR OR REPLACE HARNESS OR CONNECTOR |
CHECK HARNESS AND CONNECTOR (SECURITY INDICATOR - MAIN BODY ECU OR TRANSPONDER KEY ECU ASSEMBLY)
(a) Disconnect the F81 connector from the security indicator.
(b) Disconnect the F22 transponder key ECU assembly connector.
(c) Disconnect the F15 connector from the main body ECU (multiplex network body ECU).
(d) Measure the resistance according to the value(s) in the table below.
Standard resistance:
Tester Connection | Condition | Specified Condition |
|---|---|---|
F22-8 (IND) - F81-9 (LP) |
Always |
Below 1 Ω |
F15-15 (IND) - F81-9 (LP) |
Always |
Below 1 Ω |
F22-8 (IND) - Body ground |
Always |
10 kΩ minimum |
F15-15 (IND) - Body ground |
Always |
10 kΩ minimum |
F81-9 (LP) - Body ground |
Always |
10 kΩ minimum |
F81-5 (E) - Body ground |
Always |
Below 1 Ω |
| NG | |
REPAIR OR REPLACE HARNESS OR CONNECTOR |
|
REPLACE SECURITY INDICATOR
(a) Temporarily replace the security indicator (combination meter assembly) with a new or normally functioning one.
Click here
(b) When the immobiliser system is activated or the theft deterrent system is in the arming standby state, check that the security indicator flashes.
OK:
The security indicator flashes.
| OK | |
END (SECURITY INDICATOR DEFECTIVE) |
|
REPLACE TRANSPONDER KEY ECU ASSEMBLY
(a) Replace the transponder key ECU assembly with a new or normally functioning one.
Click here
HINT:
Refer to Registration.
Click here
(b) When the immobiliser system is activated or the theft deterrent system is in the arming standby state, check that the security indicator flashes.
OK:
The security indicator flashes.
| OK | |
END (TRANSPONDER KEY ECU ASSEMBLY WAS DEFECTIVE) |
| NG | |
REPLACE MAIN BODY ECU (MULTIPLEX NETWORK BODY ECU) |