Sockets in the vehicle

In this manual: Sockets in the vehicle
About this Owner's Manual — 1Illustrated index — 1Symbols in the instrument cluster — 1Warning and information texts — 1Introduction to the instrument cluster — 1ID. Light — 1Service menu/ Service display — 1Limits of the Driver Alert System — 1Correct seating position — 1Automatic safety belt retractor, safety belt pretensioner, safety belt load limiter — 1Indicator light — 1Installation locations and deployment zones of the airbags — 1Switching the Front Passenger's Front Airbag On and Off — 1Types of child restraints — 1Securing yourself and the vehicle — 1Emergency equipment — 1Information Call, Roadside Assistance Call and Emergency Call Service — 1Troubleshooting — 1Legally required eCall Emergency System — 1Vehicle key functions — 1Unlocking or locking using Keyless Access — 1Child safety lock — 1Anti-theft alarm system — 1Interior monitoring and towing protection — 1Opening and closing the trunk lid — 1Opening and closing the windows — 1Power window pinch protection — 1Adjusting the steering wheel position — 1Manually adjusting front seats — 1Adjusting the head restraints — 1Removing and installing the head restraints — 1Center armrest — 1Memory function — 1Massage feature — 1Switching the turn signals on and off — 1Switching the lights on and off — 1Switching the high beam headlights on and off — 1Switching the poor weather lights on and off — 1Switching on and off the rear fog light — 1Switching the parking light on and off — 1Entry and exit lighting (orientation lighting) — 1Headlight range control — 1Interior/reading lights, ambient lighting — 1Operating the windshield wiper lever — 1Rain/light sensor — 1General safety precautions — 1Overview of the Climatronic — 1Overview of seat heating — 1Operating the stationary air conditioning — 1Programming the stationary air conditioning — 1Functions of the electric drivetrain — 1Steering information — 1Information on the pedals — 1Information on the brakes — 1Switching the ignition on and off — 1Activating the vehicle's drive system — 1Exiting a vehicle while the vehicle's drive system is active — 1Deactivating the vehicle's drive system — 1Driving mode selector — 1Brake energy recuperation — 1Selecting the driving mode — 1Standard behavior of the driving mode and the vehicle systems — 1Eco tips — 1Operating the vehicle in different countries and continents — 1Limits of the sensor system — 1Operating the cruise control system — 1Operating the speed limiter — 1System Limitations of the Predictive Control — 1Driving with predictive control — 1Eco assist — 1Special driving situations — 1System Limitations of ACC — 1Switching ACC on and off — 1Adjusting the ACC settings — 1System Limitations of Predictive Cruise Control — 1Driving with predictive cruise control — 1Warning levels and braking support — 1System Limitations of Front Assist — 1Oncoming vehicle braking when turning — 1Lane Assist system limitations — 1Driving with Lane Assist — 1Operating Travel Assist — 1Using assisted lane changing — 1Driving with Emergency Assist — 1Side Assist system limitations — 1Driving with Side Assist — 1Parking — 1Electronic parking brake — 1Auto Hold — 1Safety instructions — 1Automatic braking intervention — 1Switching Park Distance Control (PDC) on and off — 1Parking (Rear View Camera system with parking mode selection) — 1Changing the camera perspective — 1Searching for parking spaces — 1Calibrating the parking process — 1Displaying and editing parking spaces — 1Driving into or out of a parking space — 1Rear Traffic Alert — 1Information about braking assistance systems — 1Switching ASR Sport on and off — 1Sockets in the vehicle — 1Cyber security — 1Downloading and installing an Over-the-Air Update — 1V2X limitations — 1Activating and deactivating V2X — 1Traffic hazard alert — 1USB port — 1Bluetooth interface — 1Setting up the Internet connection — 1Activating and deactivating a Wi-Fi hotspot — 1Apple CarPlay — 1Android Auto — 1MirrorLink — 1Introduction to online services — 1Viewing and enabling functions — 1Safety instructions — 1Overview of Infotainment system — 1Brands, licenses, copyright — 1Functions and radio symbols — 1Setting a 360º range display and Electric Vehicle Route Planner — 1Stowing luggage and cargo — 1Mounting the bicycle rack mount — 1Information on the roof rack — 1Warning signs for the high-voltage system — 1Handling the high-voltage battery — 1Charging — 1Placement — 1Information on bulb replacement — 1Replacing bulbs in LED headlights — 1Fuses in the hood space — 1Ground jump-start point — 1Instructions for towing — 1Safety precautions for working in the hood space — 1Preparing the vehicle for work in the hood space — 1Operating fluids and operating equipment — 1Charging, replacing, disconnecting, or connecting the 12 V vehicle battery — 1Handling tires — 1Preparing Your Vehicle — 1Maintenance procedures and digital maintenance schedule — 1Information about operating conditions — 1Scope of service — 1Vehicle care information — 1Washing the vehicle — 1Accessories and replacement parts — 1Sensors and Cameras — 1Repairs and technical modifications — 1Airbag system repairs and situations that can affect the system function — 1Mobile phone usage in the vehicle — 1Data Storage and Data Protection Information — 1Event data recorder (crash data recorder) — 1Labels and signs — 1Fluids in the air conditioning system — 1Infotainment system and aerials — 1Disposal of old batteries and electronic devices — 1Product recycling — 1Old vehicle return and scrap disposal — 1Useful information on vehicles with N1 type approval (light commercial vehicle) — 1Radar Sensors — 1Specifications & Consumer information — 1
2steps
~12min
1/5difficulty
Done 0 of 2

Do not exceed the maximum power of the sockets. The power draw of the external devices is indicated on their identification labels.

12 V socket
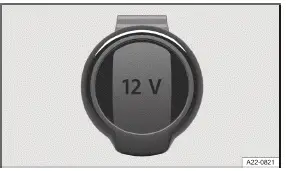
Volkswagen ID.3. Fig. 1 In the luggage compartment on the right-hand side: folding 12-volt socket (general example).
Fig. 1 In the luggage compartment on the right-hand side: folding 12-volt socket (general example).

The total continuous output of all 12 V sockets in the Volkswagen ID.3 vehicle is 120 watts (→ Sockets) .

The maximum power of a 12 V socket in the vehicle when the vehicle is drive-ready totals 180 watts.

NOTICE

Using 12 V sockets for too long at maximum power can cause the fuse to blow.

  • Never use 12 V sockets at their maximum power for longer than 10 minutes.

  • Only ever use a single 12 V socket at maximum power.

  • Charging Options for Mobile Devices
  • Wireless charging function
  • Storage compartment cover

Charging Options for Mobile Devices

You can charge mobile devices in the Volkswagen ID.3 vehicle either wirelessly or by using the built-in USB-C connectors.

Charging with USB-C Connectors

The vehicle may contain the following USB -C ports:

Symbol for a USB port for data transmission and charging.

Symbol for a USB port for charging only.

Available Charging Power

Voltages up to 20 V are provided via the USB port, which enables up to 45 W charging power.

Depending on the vehicle equipment, the following charging profiles may be supported by theU SB ports:

  • Legacy charging (2.5 W).

  • BC1.2 (7.5 W).

  • USB -C charging (15 W).

  • USB power delivery (up to 45 W).

The actual charging power of the connected device depends on the following aspects:

  • Supported charging profiles.

  • Device charge level.

  • Device temperature.

  • Charging cable used.

For double USB ports, the charging power can be split between both ports.

Wireless charging function
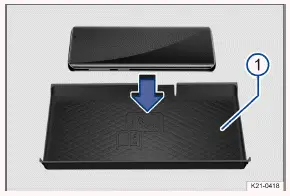
Volkswagen ID.3. Fig. 1 General example: storage compartment with a liner pad for wireless charging in the center console.
Fig. 1 General example: storage compartment with a liner pad for wireless charging in the center console.

  1. Shelf with a liner pad.

The wireless charging function depends on the Volkswagen ID.3 vehicle equipment and is not available in all countries.

The wireless charging function uses electromagnetic induction to transfer energy wirelessly over short distances. To use this function, you need a suitable Qi-certified cell phone. To find out whether a cell phone supports the Qi standard, see the cell phone operating instructions. New technologies might not be compatible with the wireless charging function. The manufacturer of the cell phone can offer further information regarding compatibility.

The maximum charging power is 5 watts.

Depending on the vehicle, the rear shelf with liner mat→ fig. 1 (1) for the wireless charging function is located in the center console or between the front seats in a storage compartment.

In some vehicles, the liner mat bears a phone symbol, which indicates the center position for the wireless charging function → fig. 1 (1) . The symbol on the liner mat may look different in some vehicles.

Only a single Qi-certified cell phone without a protective case and with maximum dimensions( width x length) of 80 mm x 140 mm (approx. 3 in x 6 in) should ever be placed flat on the wireless charging function shelf.

Qi-certified cell phones with larger dimensions cannot be charged wirelessly.

Wireless Cell Phone Charging

Requirements

  • You must have a suitable cell phone that does not exceed the maximum dimensions and supports the Qi standard.

  1. Before charging, remove any foreign objects with metal components, such as coins, from the storage compartment and follow the cell phone operating instructions.

  2. Place your cell phone, without a protective case and with the display facing upward, completely flat at the center of the shelf.

The charging process starts automatically.

The Infotainment system informs you when the charging process is starting and, if necessary, if there are any foreign objects with metal components in the storage compartment. Remove foreign objects immediately.

Your Cell Phone Is Not Recognized

If a cell phone is not placed on the shelf correctly or if it is too large, it may not be detected correctly or detected at all. The Infotainment system may notify you of a foreign object in the storage compartment.

If a suitable cell phone is used and its position is corrected, the fault may be eliminated. Remove your cell phone and place it correctly in the storage compartment for the wireless charging function.

Storage compartment cover
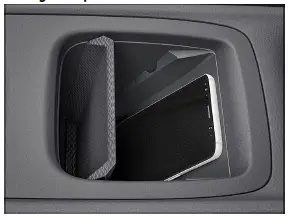
Volkswagen ID.3. Fig. 2 General example: Storage compartment cover (open).
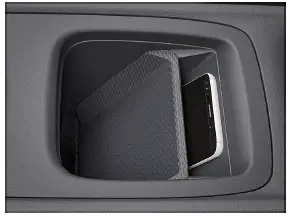
Fig. 2 General example: Storage compartment cover (open).

Volkswagen ID.3. Fig. 3 General example: Storage compartment cover (closed).
Fig. 3 General example: Storage compartment cover (closed).

Depending on the Volkswagen ID.3 vehicle equipment, the storage compartment for the wireless charging function may have a cover for the cell phone display.

Only a cell phone with maximum dimensions (width x length) of approximately 3 in x 6 in (80 mm x 140 mm), in accordance with the specifications, may be placed in the covered storage compartment.

The cover can prevent you from being distracted by the cell phone, e.g. by incoming notifications.

The cover must always be closed while driving and the display of the cell phone must be completely covered up→ .

If the closing function is not hindered in any way, the cover folds forward automatically without engaging.

The cover must not be prevented from folding forward.

WARNING

Notifications on the cell phone display may distract the driver. This can result in an accident with serious or fatal injuries.

  • Place only a single, suitable and Qi-certified (if necessary) cell phone without a protective case and with maximum dimensions (width x length) of 80 mm x 140 mm (approx. 3 in x 6 in), in accordance with the specifications, on the shelf in the storage compartment.

  • Remove items that prevent the cover from closing.

  • Always keep the cover closed while driving.

WARNING

Metal objects on the shelf can become very hot. This may cause burns or a fire.

  • Do not place metal objects or objects with metal components on the wireless charging shelf.

NOTICE

If any ID cards, bank cards or credit cards with a magnetic strip or chip are placed on the wireless charging shelf, the data saved on the magnetic strip or chip could be damaged or become unusable.

  • Do not place any ID cards, bank cards or credit cards with a magnetic strip or chip on the wireless charging shelf.