Ground jump-start point
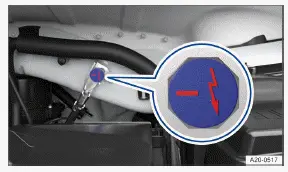
Fig. 1 In the hood space: Negative terminal jump-start point.
 The jump-start point (negative terminal) is for connecting the black jumper cable→ fig. 1 .
To reduce the risk of considerable damage to the Volkswagen ID.3 vehicle electrical system, it is not permitted to jump-start other vehicles with an electric vehicle.
The vehicle can receive a jump-start using this negative terminal jump-start point.
Positive jump-start point
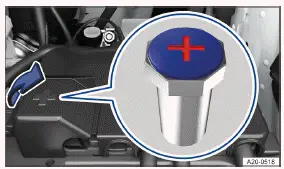
Fig. 1 Under a cover in the hood space: Positive jump-start point.
 The jump-start point (positive battery terminal) for connecting the red jumper cable is located under a cover in the hood space.
To reduce the risk of considerable damage to the Volkswagen ID.3 vehicle electrical system, it is not permitted to jump-start other vehicles with an electric vehicle. The jump-start point is not designed for jump-starting other vehicles.
The vehicle can receive a jump-start using this positive terminal jump-start point.
Preparing and Performing a Jump-start
Preparations
Observe the following for jump-starting:
Wear suitable eye protection and safety gloves →
 .
Pay attention to the operating instructions provided by the manufacturer of the jump-start cables.
Open the hood.
Always use a jumper cable with fully insulated terminal clamps and without any insulation defects for jumpstarting →
 .
Ensure that there is sufficient distance between the Volkswagen ID.3 vehicle providing the jump-start and the vehicle receiving the jump-start, otherwise current could already flow when connecting the positive battery terminals.
Make sure the terminal clamps have sufficient contact with metal.
Jumper cable
So that vehicles can be jump-started, an appropriate jumper cable is required.
The following jumper cable wire diameters must not be fallen short of by the vehicle providing the jump-start.
Volkswagen ID.3 Vehicles with electric drivetrain: To jump-start the vehicle with a drained 12 V vehicle battery, the wire diameter of the jumper cable must be at least 25 mm2 (0.038 in2).
Vehicle receiving the jump-start
Check that the discharged 12 V vehicle battery is properly connected to the 12 V vehicle electrical system.
If a 12 V vehicle battery with a viewing window has been installed, check the color of the viewing window. If the viewing window is light yellow or has no color, do not perform a jump-start and contact an authorized Volkswagen dealer or authorized Volkswagen Service Facility.
Vehicle providing the jump-start
Pay attention to the operating instructions provided by the Volkswagen ID.3 vehicle manufacturer.
Check that the battery providing the jump-start has the same voltage (12 V) and approximately the same battery capacity as the discharged 12 V vehicle battery. Pay attention to the information printed on the battery of the vehicle providing the jump-start.
Jump-starting
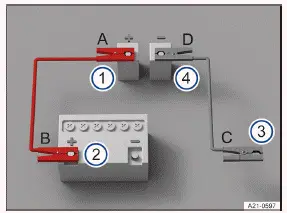
Fig. 1 Diagram for connecting the jumper cables.
Positive jump-start point of the electric drivetrain Volkswagen ID.3 vehicle receiving the jump-start.
Positive battery terminal of the vehicle providing the jump-start.
Suitable negative terminal of the vehicle providing the jump-start. Preferably a jump-start point( negative), otherwise a large metal part that is bolted securely to the engine block, or the engine block itself.
Jump-start point (negative) of the electric drivetrain vehicle receiving the jump-start.
Only connect the jumper cables in the sequence A - B - C - D→ fig. 1 .
Switch the ignition off on both Volkswagen ID.3 vehicles.
In the hood space, open the cover on the jump-start point Plus (+) , if fitted.
Connect one end of the red jumper cable to the positive jump-start point
 of the vehicle with the discharged 12 V vehicle battery → fig. 1 (1) → .
Connect the other end of the red jumper cable to the positive battery terminal
 on the vehicle providing current → fig. 1 (2) .
Connect one end of the black jumper cable preferably to a negative jump-start point on the vehicle with the 12 V vehicle battery providing current → fig. 1 (3) .
Or: If there is no negative terminal (-) jump-start point, connect the end of the black jumper cable to a large metal part that is bolted securely to the engine block, or the engine block itself, on the Volkswagen ID.3 vehicle with the 12 V vehicle battery providing current → fig. 1 (3) .
Connect the other end of the black jumper cable to the negative terminal jump-start point
 on the vehicle with the discharged 12 V vehicle battery → fig. 1 (4) → .
Route the jumper cables so that they cannot become caught in moving parts in the hood space.
Activating the vehicle's drive system
Start the engine in the Volkswagen ID.3 vehicle that is providing current and allow it to idle.
Activate the vehicle's drive system in the vehicle with the discharged 12 V vehicle battery. If the vehicle's drive system cannot be activated, stop the starting process after 10 seconds, and try again after approximately 1 minute.
If the vehicle's drive system still cannot be activated, contact an authorized Volkswagen dealer or authorized Volkswagen Service Facility.
Removing the jumper cables
Before disconnecting the jumper cables, switch off the low beam headlight if necessary.
In the Volkswagen ID.3 vehicle with the drained 12 V vehicle battery, switch on the blower for the air conditioner and the rear window defroster. This will reduce any voltage surges that may occur when disconnected.
Once the vehicle has been jump-started, always disconnect the jumper cables in the order D - C - B - A → fig. 1 .
Close the cover of the positive battery terminal jump-start point ( ), if fitted.
After successful jump-starting, have the 12 V vehicle battery checked by an authorized Volkswagen dealer or authorized Volkswagen Service Facility. Volkswagen recommends contacting an authorized Volkswagen dealer or authorized Volkswagen Service Facility.
WARNING
Performing a jump-start incorrectly can cause the 12 V vehicle battery to explode, which can cause serious injuries.
Always wear suitable eye protection and safety gloves.
Never lean over the 12 V vehicle battery.
Always connect the positive cable first and then the negative cable.
Never connect the negative cable to the brake lines.
Ensure that there is no contact between the non-insulated parts of the terminal clamps.
Make sure the cable insulation is free from any defects.
Make sure that the cable that is connected to the positive battery terminal on the 12 V vehicle battery does not come into contact with any Volkswagen ID.3 vehicle components that conduct electricity.
NOTICE
A drained 12 V vehicle battery can freeze at temperatures around approx. 0 ºC( approx. +32 ºF), suffer damage and fail.
Always replace a frozen or thawed 12 V vehicle battery.
Introduction
Towing requires practice, particularly if a towing cable is used. Both drivers should be familiar with the special considerations when towing. Inexperienced drivers should not tow.
Follow all applicable laws when towing.
Always make sure the towing force does not exceed the permitted level and there are no shock loading conditions.
There is always the risk of the coupling becoming overloaded when driving off-road.
WARNING
The Volkswagen ID.3 vehicle handling and braking efficiency will change considerably when it is towed. This may cause you to lose control of the vehicle and result in accidents and serious or fatal injuries.
Bear in mind that more force is required for steering and braking during towing.
WARNING
If a vehicle that has no electrical power is towed, the electronic steering lock may suddenly engage. If this happens, you will not be able to move the steering wheel. This can cause accidents and serious or fatal injuries.
Never switch off the ignition with the starter button while towing.
If the Volkswagen ID.3 vehicle loses power while it is being towed, stop towing the vehicle immediately and see an authorized Volkswagen dealer or authorized Volkswagen Service Facility for assistance.
NOTICE
When pushing the Volkswagen ID.3 vehicle by hand, the taillights, side spoiler on the rear window and large sections of sheet metal could be damaged and the rear spoiler could detach.
When pushing the vehicle by hand, do not press on the taillights, side spoiler on the rear window, large sections of sheet metal, or the rear spoiler.
Towing
Towing refers to using a vehicle to pull another Volkswagen ID.3 vehicle that cannot be driven. (→ Vehicle towing) .
The vehicle can be towed using a tow bar or tow rope:
The maximum permissible speed is 50 km/h.
The maximum permissible distance is 50 km (30 miles).
The easiest and safest way to tow is using a tow bar. You should use a towing cable only if a tow bar is not available.
The towing cable should be elastic to protect both vehicles. Use a cable made of synthetic rubber or a similar elastic material.
Towing with a tow truck
The Volkswagen ID.3 vehicle must be towed with all four wheels on a tow truck.
WARNING
Vehicle components can be badly damaged by incorrectly attached tow ropes or tow bars. This increases the risk of accident and could result in serious or fatal injuries.
Only ever secure the vehicle to be recovered and towed at the points designed for this purpose.
Never secure the tow rope or the tow bar to axle or suspension components.
Contact an authorized Volkswagen dealer or authorized Volkswagen Service Facility and have the vehicle taken away on a tow truck, if necessary.