Removing and installing switches and lamps
Light switch/headlight range control
PROCEDURE

1. Press the light switch –1– and at the same time turn it left –2–.
2. Hold the switch in this position and remove the light switch housing from the instrument panel –3–.
3. Disconnect the connector from the switch.
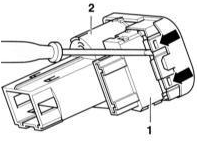
4. Use a flat screwdriver or plastic wedge to lift the side latches (arrows in illustration) on control –1– and release the latches.
5. Pull control –1– out of the light switch housing towards the rear.
6. Insert the control into the guide on light switch –2– and press it into the light switch housing.
7. Connect the connector.
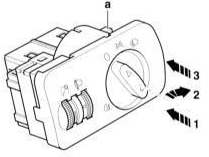
8. To install, press the light switch –1– and at the same time turn it right –2–. This pushes in both locking hooks.
9. In this position, press the light switch into the opening in the instrument panel –3– and secure it.
Switch in center console
PROCEDURE
1. Remove the radio. Refer to Radio Removal, Installation and Coding.
2. Open the ashtray and remove the insert.

3. Unscrew the Phillips screw –1– and remove the ashtray –2–.
4. Disconnect the connector of the ashtray and cigarette lighter illumination lamp.
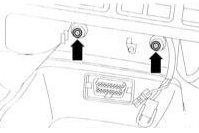
5. Remove 2 Phillips screws (arrows in illustration).
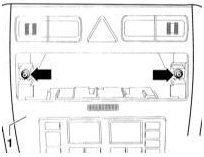
6. Remove 2 Phillips screws (arrows in illustration) in the radio opening.
7. Carefully pull trim –1– upward and remove it.
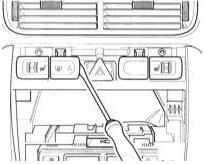
8. Using your hand, press the corresponding switch forward from the rear through the radio opening. At the same time, carefully use a small screwdriver to push the clips between the switch and the center console.
9. Finally, remove the switch completely and disconnect the connector.
10. Install in reverse order of removal.
Glove box lamp switch
PROCEDURE
1. Carefully pry off the side cover of the instrument panel on the front passenger side.

2. Disconnect plug connections –1– and remove cable lugs –2–.
3. Pull switch –3– out of the instrument panel holder in the direction of the arrow.
4. Install in reverse order of removal.
Window regulator/mirror adjustment switch
PROCEDURE
1. Remove the door trim panel. Refer to Removal and Installation of Door Trim Panel.
2. Carefully detach the insulation mat from the back of the trim.

3. Disconnect the connector of window regulator switch –3– and/or mirror adjustment switch –1–.
4. Remove switch –1– from the door trim. To do this, release latches –2–.
5. Install in reverse order of removal.
Sunroof switch/interior lamp
The sunroof control cannot be replaced separately. If faults occur, replace the control unit and interior lamp as a complete assembly.
PROCEDURE

1. Pull lens –1– forward with your fingers and disconnect it from the rear.
2. Unscrew fixing screws –2– and remove the sunroof switch/interior lamp –3–.
3. Compress hooks (B) with a screwdriver and pull the sunroof switch forward, disconnecting it from the rear (A).
4. Disconnect plug connections –4– and –5–. 6 – reading lamp, 7 – interior lamp.
5. Connect the plug connections on the sunroof switch/interior lamp.
6. Engage the sunroof switch/interior lamp in positions (A) and (B) and secure it.
7. Secure the switch/interior lamp with two screws.
8. Secure the lens at the rear and insert it into the opening from the front.
Test yourself
A quick Audi A3 quiz: every answer comes with an explanation and a link to the manual page.