Interior Light Bulb Replacement
Interior Light / Reading Light Bulb
PROCEDURE
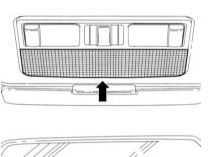
1. Carefully remove the three-part light lens from the front by hand.
2. Remove the defective festoon bulb from the socket and replace it. Make sure the bulb is seated securely; if necessary, bend the contacts.
3. Remove the defective reading light bulb and replace it.
CAUTION
If the new bulb does not fit into the socket, remove the housing. To do this, unscrew the housing retaining screws with a Phillips screwdriver. On the back of the housing, turn the reading light bulb socket 90° (1/4 turn) to the right and remove it. Insert the new bulb into the socket. Install the socket into the housing and secure it by turning it to the left. Secure the light housing.4. Install the lens and secure it.
Glove Box Light Bulb
PROCEDURE
1. Open the glove box.

2. Insert a narrow screwdriver into the light slot and carefully remove the bulb.
3. Squeeze the connector latch and remove the bulb.
4. Remove the damaged festoon bulb from the socket and replace it. Make sure the bulb is seated securely; if necessary, bend the contact clips.
5. Bend the deformed bulb housing spring outward, away from the housing.
6. Mate the connector and secure it.
7. Insert the bulb into the opening.
8. Close the glove box.
Rear Interior Light Bulb
PROCEDURE
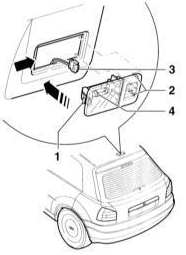
1. Insert a flat-blade screwdriver at the side, behind the light, and press the stopper –1– on the cabin ceiling (arrow in illustration). Alternative: press the light from the switch side with your fingers, compressing spring –1–, and remove it from the switch side.
2. Remove the light.
3. Disconnect connector –3–.
4. Remove the damaged festoon bulb –4– from the socket and replace it. Make sure the bulb is seated securely; if necessary, bend the contact clips.
5. If necessary, bend the retaining spring outward, away from the housing.
6. Mate and secure the connector.
7. First insert the light with both hooks –2– into the opening in the cabin ceiling. On the other side, press in and secure the light (arrow).
Luggage compartment lamp
There is one luggage compartment light bulb on the right and one on the left side panel of the luggage compartment.
PROCEDURE
1. Insert a flat-blade screwdriver from the rear into the slot on the lens. To protect against damage, place a cloth between the screwdriver and the trim.
2. Carefully remove the light.
3. Disconnect the connector.
4. Remove the damaged festoon bulb from the socket and replace it. Make sure the bulb is seated securely; if necessary, bend the contact clips.
5. If necessary, bend the retaining spring outward, away from the housing.
6. Mate and secure the connector.
7. Insert the luggage compartment light bulb electrical connections first into the opening of the side panel, then press it in from the other side.
Test yourself
A quick Audi A3 quiz: every answer comes with an explanation and a link to the manual page.