Removal, Installation and Adjustment of Washer Nozzles
REMOVAL
1. Open the hood.
2. Remove the lower hood trim panel and fold it down. To do this, unscrew the plastic screws (1) from the clip (2) and remove the clip with a screwdriver

3. Disconnect the electrical connector (1).
4. Disconnect the washer fluid hose from the nozzle (2).
5. Press in the stopper and remove the nozzle (3) through the hole in the hood.
INSTALLATION
1. Press the nozzle into the hood opening and secure it.
2. Connect the washer fluid hose.
3. Connect the electrical connector.
4. Lower the hood. Press in the clip and install the plastic screws.
ADJUSTMENT
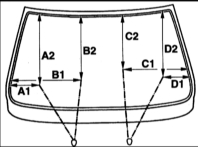
1. Mark the points shown in the reference illustration on the windshield with a felt-tip pen, using the dimensions below, and switch on the washer. The jets must hit the corresponding points. If they do not, the nozzles must be adjusted.
2. Dimensions for adjusting the washer jets.
A1 = 226
A2 = 540
B1 = 530
B2 = 506
C1 = 460
C2 = 450
D1 = 210
D2 = 505
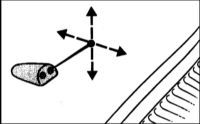
3. The jet direction of the nozzles can be adjusted with wire or a needle. The dealer uses special tool HAZET 4850-1 for this purpose. The tool consists of a telescopic rod with a needle at the end. The extended rod allows more precise adjustment of the nozzle direction than, for example, a needle alone.
Test yourself
A quick BMW 1 quiz: every answer comes with an explanation and a link to the manual page.