Removal and Installation of Wiper Drive/Cover
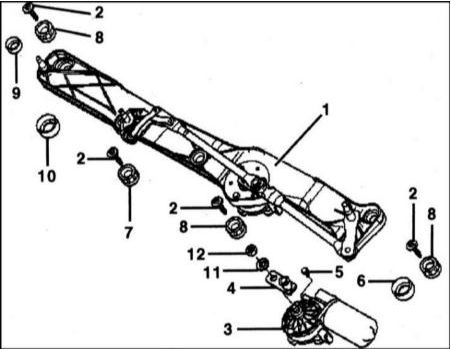
Wiper Drive
1 — wiper arm bracket
2 — screw
3 — electric motor
4 — crank
5 — bolt
6 — bearing bushing, oval hole
7 — bearing bushing, round hole
8 — bearing bushing, round hole
9 — damper ring, upper part
10 — damper ring, lower part
11 — spring washer
12 — nut
REMOVAL
1. Mark the position of the wiper arms on the windshield. You can use adhesive tape for this.
2. Remove the caps from the mounting nuts. You can use a small screwdriver, for example.

3. Loosen the nuts.
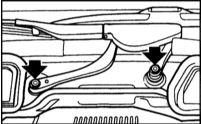
4. Remove both wiper arms on the front passenger side.
* Do not deform the arm. It may break! Remove the arm from the bearing using a special puller, for example BMW-616000.
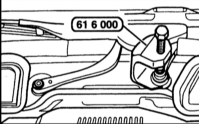
5. Lift off the cover of the left arm.
6. Remove the nut from the wiper bearing and lift the arm off.
7. Remove the adjusting washer of the arm from the bearing. The washer is very tight. A special puller, for example BMW-616000, is required to remove it. See also illustration 4.

8. Lift off the rubber seal on the front partition.
9. Disconnect the clamps (2) of the air ducts (1) on the left and right. Turn the ducts toward the center of the vehicle. To do this, disconnect them from the bayonet fittings.
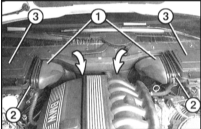
10. Remove the intake air filter insert (3) on the left and right; refer to Cabin Air Filter Replacement.
11. Remove the bracket (4) from the side. Disconnect the filter housing (3) at the rear and remove it.

12. Remove the air intake cover. To do this, release the eight clips by removing the pins with a screwdriver.
13. Remove the mounting screws and remove the wiper drive cover.
14. Remove the cable cover by first turning all clips 90°.
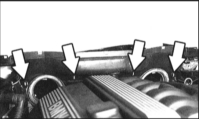
15. Unlock and disconnect the multi-pin connector. To do this, push the locking lever down. This releases the connector from the contacts.
16. Remove the five bolts securing the wiper drive and remove it.
INSTALLATION
1. Install the wiper drive and tighten the bolts by hand. Position the drive so that it seats correctly.
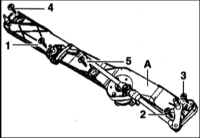
2. Secure the drive (A) with bolts 1 through 5 in sequence to a torque of 10 N·m.
3. Connect the connector and lock it.
4. Install the cable cover and secure it with four clips.
5. Secure the drive cover with screws.
6. Install the air intake cover. Secure it with clips.
7. Install the air filter housing and secure it at the front with the bracket.
8. Install the clean air filters on the right and left; refer to Cabin Air Filter Replacement.
9. Insert the air duct into the bayonet fitting and lock it by turning outward. At the end of the turn, insert the duct first downward at the filter, then press and secure it with the plastic clamp. Move the duct in different directions to check that it is securely attached. Install the second duct in the same way.
10. Install the rubber seal on the front wall.
11. Install the left wiper arm adjusting washer and align it according to the previously made marks. Make sure the blade angle to the windshield is approximately 90°. If the angle differs, reposition the arm and adjusting washer. Tighten the arm and adjusting washer to a torque of 40 N·m.
12. Secure the left arm cover.
13. Install both right wiper arms.
14. Tighten the nuts to a torque of 25 N·m, then after 15 minutes retighten them to a torque of 25 N·m.
15. Install the caps on the mounting nuts.
Test yourself
A quick BMW 1 quiz: every answer comes with an explanation and a link to the manual page.