Removing and installing the front windshield wiper motor
Wet the windshield with water.
Run the windshield wiper system for approx. 2 minutes and switch it off using the wiper switch. This causes the wiper to move to the end position.
Mark the resting position of the wiper blades on the windshield with masking tape. To do this, stick a strip of tape on the windshield directly next to the wiper blade. When installing, place the wiper arm back on the serrations of the wiper shaft so that the wiper blade is directly next to the tape strip.
Disconnect the battery negative (-) cable. Warning: this erases electronic memories, such as engine operating values. Observe the notes in the chapter "Remove and install battery".
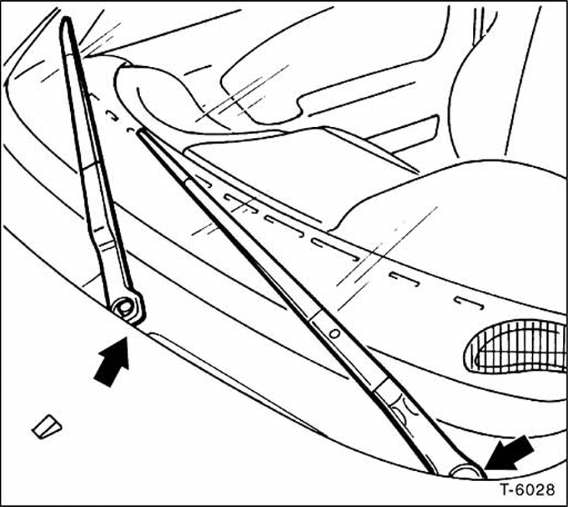
Pry off the plastic caps from the wiper bearings with a narrow screwdriver.
Loosen the retaining nut by approx. 2 turns. Free the wiper arm from the taper of the tandem bearing by moving it sideways. If necessary, fold up the windshield wiper arms.
Fold the wiper arm back down, unscrew the nut and remove the wiper arm. Remove the second wiper arm in the same way.
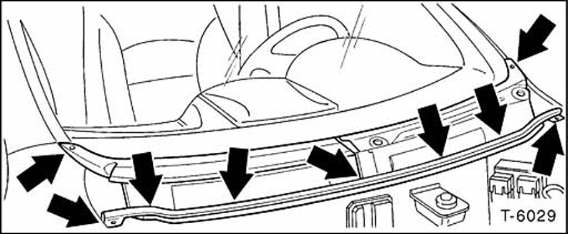
Open the hood, unscrew the cover below the windshield - arrows - and remove it.

Lift the protective cover for the wiper motor and disconnect the multi-plug.
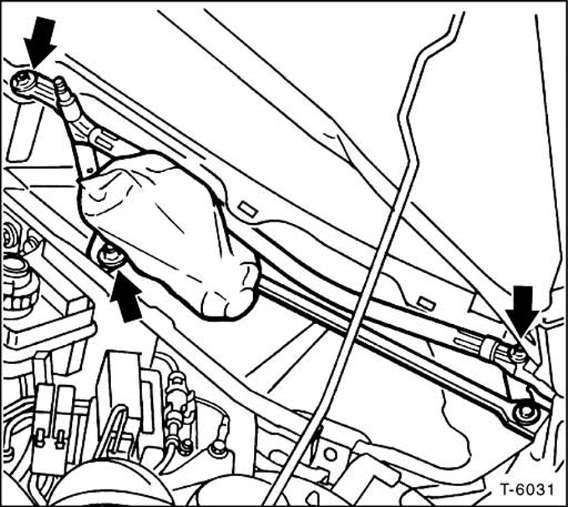
Unscrew the 3 retaining screws for the wiper linkage - arrows - and lift the linkage out together with the motor.
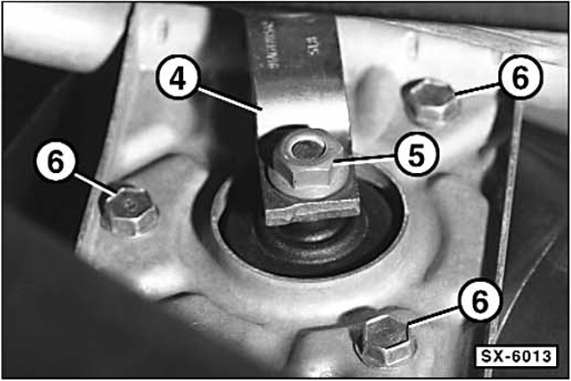
Mark the position of the crank arm - 4 - relative to the mounting plate.
To do this, draw a line on the mounting plate along the crank arm with a felt-tip pen.
Unscrew nut - 5 - from the drive shaft and pull crank arm - 4 - off the taper.
Unscrew the 3 retaining screws - 6 - for the wiper motor and remove the wiper motor from the mounting plate.
Screw the wiper motor onto the mounting plate.
Fit the crank arm in line with the mark made during removal, hold it in place and tighten with 25 N·m.
Slide the cover hood over the wiper motor.
Insert the motor with the wiper linkage and tighten the 4 screws with 10 N·m.
Connect the multi-plug.
Install the cover below the windshield.
Install the wiper arms. To do this, place each wiper arm on the taper of the tandem bearing so that the wiper blade is next to the adhesive marks on the windshield. Tighten the nuts lightly, do not fully tighten.
Connect the battery negative cable (-).
Run the wiper system in the first speed and check that the wiper arms do not strike the lower cover or the edge of the windshield. Reposition the wiper arms if necessary.
Tighten the wiper arm nuts with 15 N·m. Press the plastic covers onto the nuts.
Set the clock. Enter the radio anti-theft code.
Test yourself
A quick Fiat Bravo quiz: every answer comes with an explanation and a link to the manual page.