Removal and Installation of Heater Core
The vehicles covered by this Manual are equipped with the Supplemental Restraint System (SRS), more commonly known as the airbag. Before performing any work near the airbag module or steering column, be sure to disconnect the system to avoid injury from accidental deployment (see Chapter Body Electrical). The insulation and connectors of the SRS circuit wiring are colored bright yellow. Do not connect any diagnostic equipment to this circuit!
The air conditioning system is constantly under high pressure. Never disconnect the refrigerant lines or remove any system components without first discharging the system. The air conditioning system must be discharged by an experienced technician in a workshop. Always wear safety glasses when disconnecting refrigerant lines!
REMOVAL
PROCEDURE
1. Removal of the heater assembly on the vehicles covered is a fairly difficult task for the average home mechanic. It requires patience and care. Many of the wiring connectors and fasteners are located under the instrument panel, so access to them is very limited. Heater removal normally requires removing the instrument panel and discharging the refrigerant circuit of the air conditioning system. The driver and passenger airbags must also be disabled, and the steering column support must be removed.
2. If the vehicle is equipped with A/C, have the system discharged at a specialized workshop. Disconnect the negative cable from the battery.
If the installed audio system has an anti-theft code, make sure you have the correct code to activate the audio system before disconnecting the battery!
3. Drain the cooling system (see Chapter Maintenance and Tune-Up). See the warning at the beginning of the section Antifreeze - General Information.
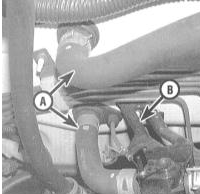
4. In the engine compartment, disconnect the engine coolant hoses from the inlet and outlet fittings of the heater core on the engine compartment rear bulkhead. Place a drain pan under the fittings to catch spilled fluid.
Disconnect one of the hoses from the heater core and lower it into the drain pan, then apply low-pressure air to the fitting of the second hose. The coolant remaining in the heater core should be forced out of its internal passages, which will significantly reduce the risk of coolant getting onto the interior trim during removal of the assembly.
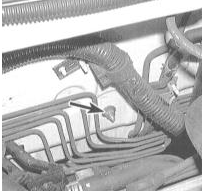
5. Disconnect the control cable from the heater core air control door, then remove the nut securing the heater assembly to the engine compartment bulkhead. The nut is removed from the engine compartment side.
Be careful not to bend or otherwise damage the fuel lines and brake tubes routed near the nut.
6. Remove the center console, glove box and instrument panel (see Chapter Body).
7. Disconnect the wiring connectors and the blend air control cable from the heater assembly (see Section Removal and Installation of the Heater and Air Conditioning Control Assembly, Adjusting the Control Cable)
8. On vehicles without A/C, remove the air duct hose routed between the heater housing and blower motor housing. On vehicles equipped with A/C, also remove the evaporator (see Section Removal and Installation of the A/C Evaporator with Expansion Valve).
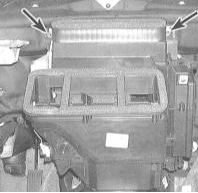
9. Remove the upper retainers securing the heater assembly to the engine compartment bulkhead from the passenger compartment side. Remove the assembly.
10. Loosen the clamps securing the heater duct inlet connections to the housing and remove the heater core.
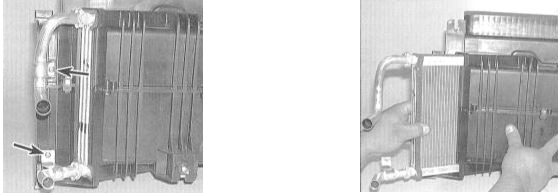
INSTALLATION
PROCEDURE
1. Installation is the reverse of removal. Be sure to check the air control doors for proper operation. If necessary, perform repairs by replacing broken or deformed components. Verify that the electrical components operate properly.
2. Fill the cooling system and bleed air from it (see Chapter Maintenance and Tune-Up). Connect the battery and start the engine. Check the heating system components for leaks and proper operation. If equipped, have the air conditioning system charged at a specialized workshop.
Test yourself
A quick Honda Accord quiz: every answer comes with an explanation and a link to the manual page.