Radiator and Coolant Reservoir Removal and Installation
Do not begin procedures until the engine has completely cooled. See also the warning at the beginning of the Antifreeze - General Information section.
Coolant Reservoir
PROCEDURE
1. The coolant reservoir is located near the radiator, in the right front (4-cylinder models) or right front (V6 models) corner of the engine compartment (next to the battery).
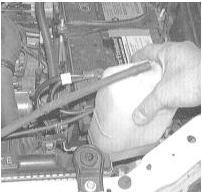
2. Follow the overflow hose from the radiator filler neck to the top of the coolant reservoir. Remove the cap together with the attached hose. Remove the reservoir by pulling it straight up and releasing it from the mounting bracket.
3. Drain the coolant from the reservoir into a suitable container.
4. Clean the reservoir, wipe it down on the outside and check for cracks and other damage. Replace if necessary. The coolant level inside the reservoir should be easily read through the translucent walls.
5. Installation is the reverse of removal.
Radiator
REMOVAL
PROCEDURE
1. Disconnect the negative battery cable.
If the installed radio is equipped with an anti-theft code, before disconnecting the battery make sure you have the correct code to activate the audio system!
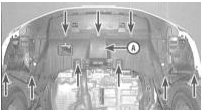
2. Apply the parking brake and chock the rear wheels. Raise the front of the vehicle and support it on jack stands. If equipped, remove the radiator splash shield.
3. Drain the cooling system (refer to Maintenance and Tune-Up section). If the coolant was replaced recently, save it for reuse (see the warning in the Antifreeze - General Information section).
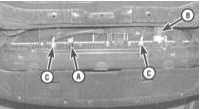
4. On AT models, disconnect the ATF cooling lines from the radiator (see accompanying illustration). Be prepared to catch spilled fluid, and immediately plug the open ends of the lines and fittings.
5. Disconnect the electrical connector of the cooling fan (see Section Cooling Fan Inspection and Control Circuits; Cooling Fan Replacement).
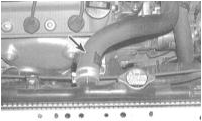
6. Loosen the clamps and disconnect both the upper and lower hoses from the radiator. If the hoses are stuck to the connection necks, use pliers or a knife (and replace the hoses afterward). Also disconnect the hose going to the coolant reservoir.
7. Remove the cooling fans (see Section Cooling Fan Inspection and Control Circuits; Cooling Fan Replacement).
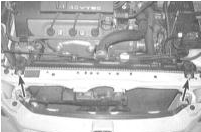
8. Remove the bolts and the small brackets securing the upper edge of the radiator to the support crossmember.
9. Carefully remove the radiator from the engine compartment. Avoid spilling coolant on painted body panels and avoid cutting your fingers on the sharp core fins.
10. After removal from the vehicle, the radiator can be checked for signs of leaks, damage, and blockage of the core. Any repair must be performed only at a specialized workshop using the required equipment.
11. Insect remains and vegetation can be removed from between the core fins by blowing with compressed air (be sure to wear safety glasses), or by cleaning with a soft brush. Be careful not to bend the thin core fins or cut your fingers on them.
12. Check the condition of the radiator rubber mounts and replace any that are worn or damaged.
INSTALLATION
PROCEDURE
1. Installation is the reverse of removal. Make sure the radiator is correctly seated on its mounts.
2. After installation, fill the cooling system with coolant of the specified type (see Maintenance and Adjustments chapter). If necessary, bleed air from the system through the bleed valve.
3. Start the engine and check for leaks. Warm the engine to normal operating temperature (both radiator hoses should become hot to the touch). Check the coolant level and add the required mixture if necessary.
4. On AT models, check the ATF level and top up if necessary.
Test yourself
A quick Honda Accord quiz: every answer comes with an explanation and a link to the manual page.